One of the most fascinating parts of FPV is the ability to see the world directly from the drone’s perspective in real time.
That immersive experience is what makes FPV feel completely different from traditional drones.
But for that experience to happen, the drone needs a complete:
FPV video system.
This system is responsible for:
- capturing live video
- transmitting the signal wirelessly
- displaying the image inside the pilot’s goggles
For beginners, this part of FPV can feel especially confusing because there are many terms involved:
- analog
- digital
- VTX
- camera latency
- antennas
- signal penetration
- video noise
- transmission power
- frequencies
The good news is:
The analog FPV system is actually much simpler than it first appears.
And there is a very important reason why we are starting with analog instead of digital systems.
This chapter will explain:
- how analog FPV works
- the role of each component
- why analog remains extremely relevant
- how to choose beginner-friendly FPV video hardware
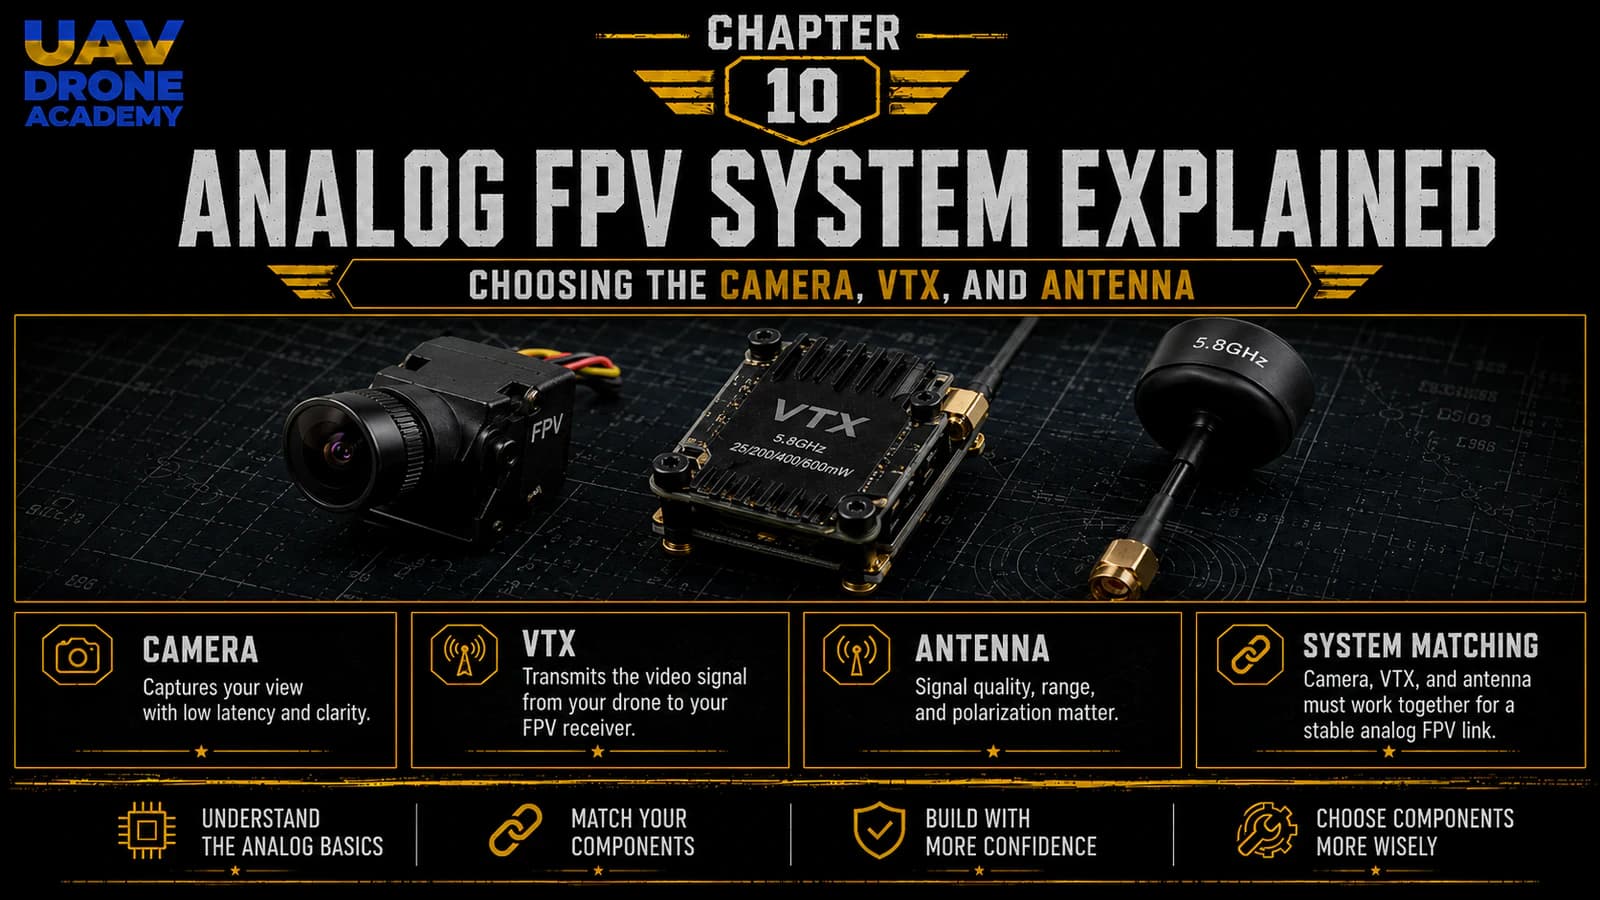
What Is an Analog FPV System?
An analog FPV system transmits live video from the drone to the pilot using:
Analog radio frequency signals.
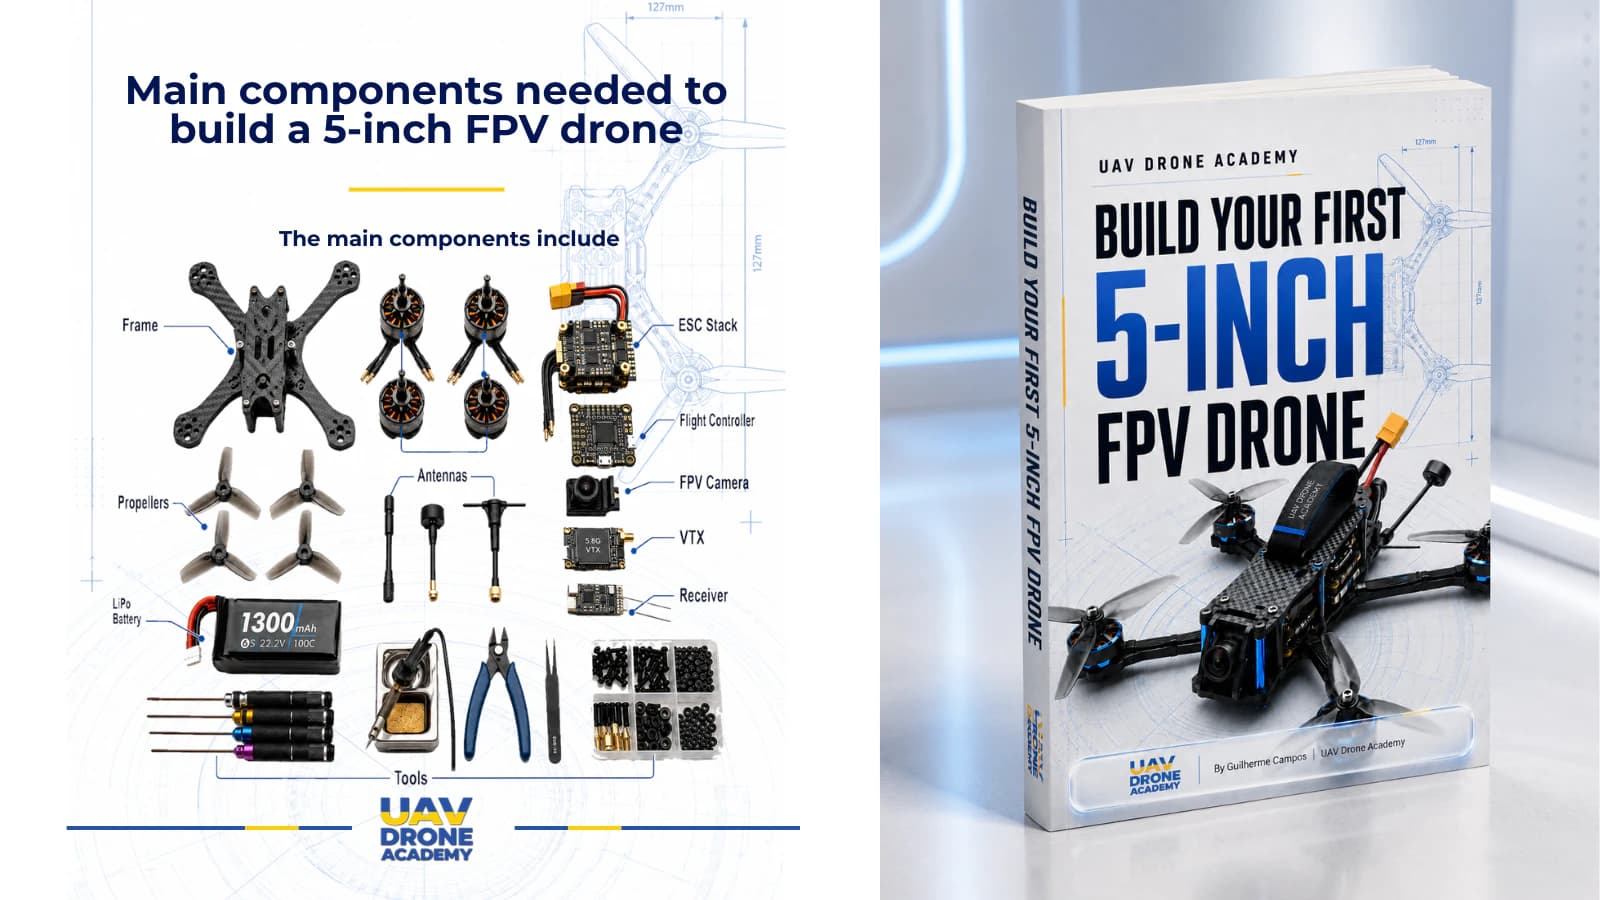
The system consists of three major components:
- FPV camera
- VTX, or Video Transmitter
- antennas
Together, these components create the real-time FPV experience.
Why Analog FPV Still Exists
Many beginners assume:
“Digital systems completely replaced analog.”
Not true.
Digital FPV became extremely popular, but analog still remains widely used because it offers:
- lower cost
- lower repair cost
- simpler installation
- lower overall system complexity
- strong compatibility
- lightweight setups
That is exactly why analog remains one of the best learning platforms for beginners.
Why We Are Starting With Analog
This decision is intentional.
Our beginner build philosophy prioritizes:
- simplicity
- affordability
- repairability
- practical learning
Analog systems support all four goals extremely well.
Lower Cost
Analog systems are significantly cheaper than HD digital systems.
This reduces:
- beginner investment
- crash anxiety
- repair costs
- replacement costs
That matters a lot during the learning phase.
Easier Installation
Analog systems are generally:
- easier to wire
- easier to configure
- easier to troubleshoot
This is extremely valuable for first-time builders.
Better for Learning the Fundamentals
Analog helps beginners understand:
- video transmission
- antennas
- signal behavior
- VTX configuration
- RF concepts
without becoming overwhelmed by more advanced HD ecosystems immediately.
The FPV Camera
The FPV camera captures the live image during flight.
This is the pilot’s eye inside the drone.
Unlike cinematic cameras, FPV cameras prioritize:
Low latency.
Latency means:
Delay between real-world movement and displayed image.
Low latency is critical because FPV pilots rely on:
- instant reaction
- real-time control
- rapid maneuvering
Why FPV Cameras Are Different From Action Cameras
Action cameras prioritize:
- image quality
- stabilization
- recording resolution
FPV cameras prioritize:
- speed
- responsiveness
- low processing delay
That is why FPV cameras often have:
- lower resolution
- smaller sensors
- simpler image processing
But they react extremely fast.
Key FPV Camera Characteristics
When choosing an FPV camera, pilots usually evaluate:
- image quality
- latency
- low-light performance
- dynamic range
- aspect ratio
- camera size
What Is Dynamic Range?
Dynamic range describes how well the camera handles:
- bright areas
- dark shadows
- rapidly changing lighting conditions
Good dynamic range is extremely important in FPV because drones often fly:
- outdoors
- through trees
- between shadows and sunlight
- inside buildings
Poor dynamic range can make flying difficult.
Camera Aspect Ratio
The most common FPV camera aspect ratios are:
- 4:3
- 16:9
4:3 Cameras
Advantages:
- taller image
- better vertical visibility
- easier freestyle flying
Many freestyle pilots prefer 4:3.
16:9 Cameras
Advantages:
- wider cinematic appearance
- more modern display shape
Often preferred for cinematic flying.
Which Aspect Ratio Are We Using?
For this beginner freestyle-oriented build:
4:3 is an excellent choice
because it improves:
- situational awareness
- freestyle visibility
- obstacle awareness
The VTX
VTX stands for:
Video Transmitter.
The VTX is responsible for transmitting the video signal wirelessly to the pilot’s goggles.
Without the VTX:
The pilot would see nothing.
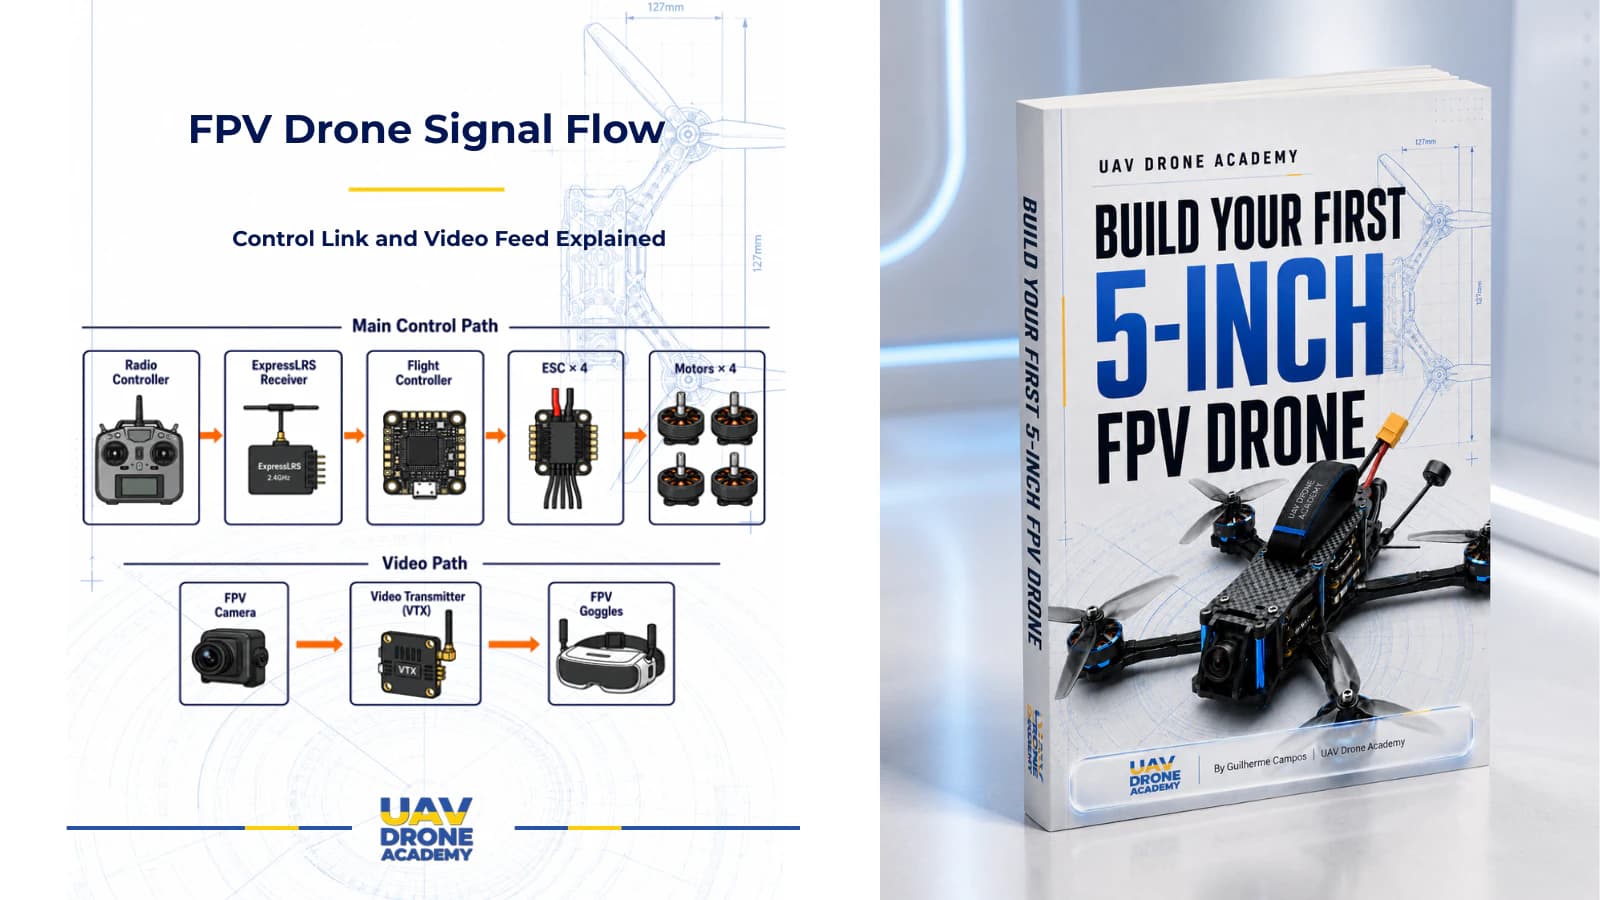
How the VTX Works
The FPV camera sends video to the VTX.
The VTX then broadcasts the signal using radio frequencies.
The goggles receive the signal and display the live image.
This entire process happens in real time.
VTX Power Levels
Most VTX systems allow adjustable transmission power.
Common power levels include:
- 25mW
- 200mW
- 500mW
- 800mW
- 1W and above
Higher Power Is Not Always Better
Many beginners assume:
“Higher power means perfect signal.”
Not necessarily.
Higher power can also create:
- more heat
- increased power consumption
- potential interference
- unnecessary complexity
For beginners practicing nearby:
Moderate power levels are usually more than enough.
Why VTX Cooling Matters
VTX units generate heat.
Especially when sitting powered on without airflow.
That is why many VTXs become:
- very hot on the bench
- much cooler during flight
This is normal.
SmartAudio and VTX Control
Modern VTX systems often support:
SmartAudio.
This allows the flight controller to control:
- channels
- power levels
- VTX settings
directly through Betaflight.
This makes configuration much easier.
Understanding FPV Antennas
The antenna is one of the most underestimated parts of FPV.
A good antenna dramatically improves:
- signal quality
- penetration
- range
- video stability
A poor antenna can ruin the entire FPV experience.
Why FPV Uses Circular Polarized Antennas
Most modern FPV systems use:
Circular polarized antennas.
These help reduce:
- signal reflections
- multipathing
- interference
This improves video stability significantly.
Common Antenna Types
The two most common FPV antenna types are:
- LHCP
- RHCP
These mean:
- Left-Hand Circular Polarization
- Right-Hand Circular Polarization
The important rule:
Both antennas must match.
Example:
- RHCP drone antenna
- RHCP goggles antenna
Mixing them reduces signal quality heavily.
Why Antenna Placement Matters
Antenna position strongly affects:
- signal strength
- range
- penetration
Bad antenna placement can cause:
- interference
- blocked signal
- reduced range
That is why antenna mounting becomes important during assembly.
Analog Signal Behavior
Unlike digital systems, analog signals degrade gradually.
This means:
- the image becomes noisy
- static appears
- signal weakens progressively
This actually gives pilots warning before complete signal loss.
Many experienced pilots still appreciate this behavior.
Analog vs Digital FPV
At this point, many beginners naturally ask:
“Should I just skip analog and start with digital?”
Digital systems offer:
- better image quality
- HD resolution
- cleaner video
But they also introduce:
- higher cost
- more complex ecosystems
- more expensive repairs
- heavier setups
Our goal right now is:
Learning FPV fundamentals properly.
Analog remains one of the best platforms for that.
Popular Beginner-Friendly Analog Components
Popular FPV cameras include:
- Runcam Phoenix
- Foxeer Predator
- Caddx Ratel
Popular beginner VTX systems include:
- SpeedyBee TX800
- Rush Tank
- AKK VTX systems
Popular antenna brands include:
- Lumenier
- RushFPV
- Foxeer
- TrueRC
These products became popular because they offer:
- reliability
- affordability
- strong community support
Common Beginner Mistakes
Using Cheap Low-Quality Antennas
Bad antennas severely reduce FPV performance.
Antennas matter much more than many beginners realize.
Overheating the VTX on the Bench
Leaving a VTX powered for long periods without airflow can overheat the system.
Always be careful during setup sessions.
Mixing RHCP and LHCP
This is one of the most common beginner mistakes.
Both sides must use matching polarization.
Obsessing Over Image Quality Too Early
For beginners:
- control
- latency
- reliability
matter far more than cinematic image quality.
What We Want in Our Beginner Build
Our ideal beginner analog system should be:
Reliable
Stable signal during learning flights.
Affordable
Lower repair stress.
Easy to Configure
Minimal setup complexity.
Widely Supported
Strong community documentation.
Upgrade Friendly
Easy transition to HD systems later.
Our Build Philosophy Moving Forward
At this point, our project philosophy should feel very consistent.
We prioritize:
- practical learning
- simplicity
- reliability
- affordability
- repairability
That creates the strongest possible beginner FPV foundation.
Conclusion
The analog FPV system is what transforms a normal drone into a true FPV aircraft.
Together, the:
- camera
- VTX
- antennas
create the immersive real-time flying experience that defines FPV.
Although digital systems continue growing rapidly, analog remains one of the best ways for beginners to:
- learn the fundamentals
- reduce cost
- simplify troubleshooting
- build confidence
For our minimalist beginner-friendly 5-inch build, analog provides the perfect balance between:
- simplicity
- functionality
- affordability
- practical learning value
Now that we understand the FPV video system, the next step is understanding the communication system that connects the pilot directly to the drone: the radio link.
Next Chapter
ExpressLRS for FPV Beginners: Choosing the Radio Receiver and Control Link