We have now finished the component selection phase.
Until this point, we focused on understanding:
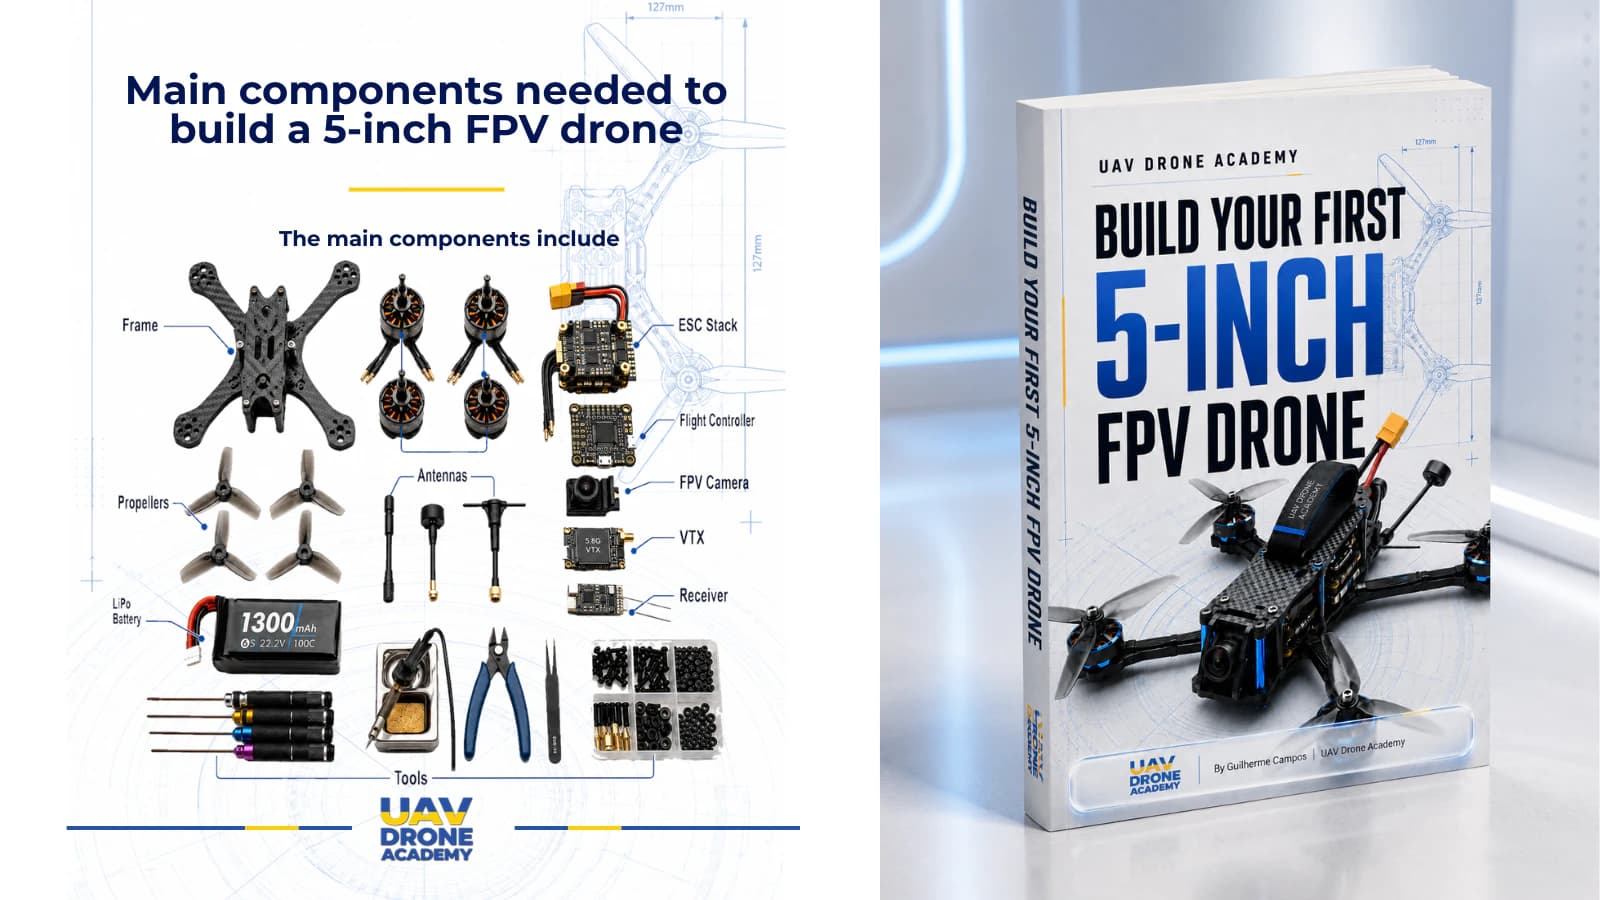
- what each part does
- why each component matters
- how the systems connect together
- which parts make sense for a beginner-friendly 5-inch FPV build
Now we are entering a new stage:
physical assembly
This is where the project becomes real.
But before assembling the frame, installing motors, soldering wires, or connecting electronics, we need to prepare the correct tools.
This step is extremely important.
Many beginners focus only on buying drone parts and forget that building an FPV drone also requires:
- soldering tools
- measuring tools
- cutting tools
- safety tools
- basic workshop organization
The good news is that you do not need an expensive professional electronics lab.
You only need the right basic tools, used carefully and correctly.
In this chapter, we will cover the essential tools required to build your first 5-inch FPV drone safely, cleanly, and confidently.
Why Tools Matter So Much
A good FPV build is not only about good components.
It also depends on:
- clean soldering
- secure wiring
- proper screw tightening
- safe power testing
- careful inspection
Poor tools can create:
- weak solder joints
- damaged wires
- stripped screws
- broken pads
- short circuits
- unreliable electronics
That is why tools are part of the build, not an afterthought.
A beginner with proper tools will usually build a better drone than someone using expensive components with poor tools.
The Goal of This Tool Kit
For this beginner project, our tool kit should be:
Practical
Only the tools we truly need.
Affordable
No unnecessary professional equipment.
Safe
Especially for soldering and LiPo handling.
Beginner Friendly
Easy to understand and use.
Reusable
Useful for future repairs, upgrades, and builds.
This tool kit will support not only this drone, but also your future FPV learning path.
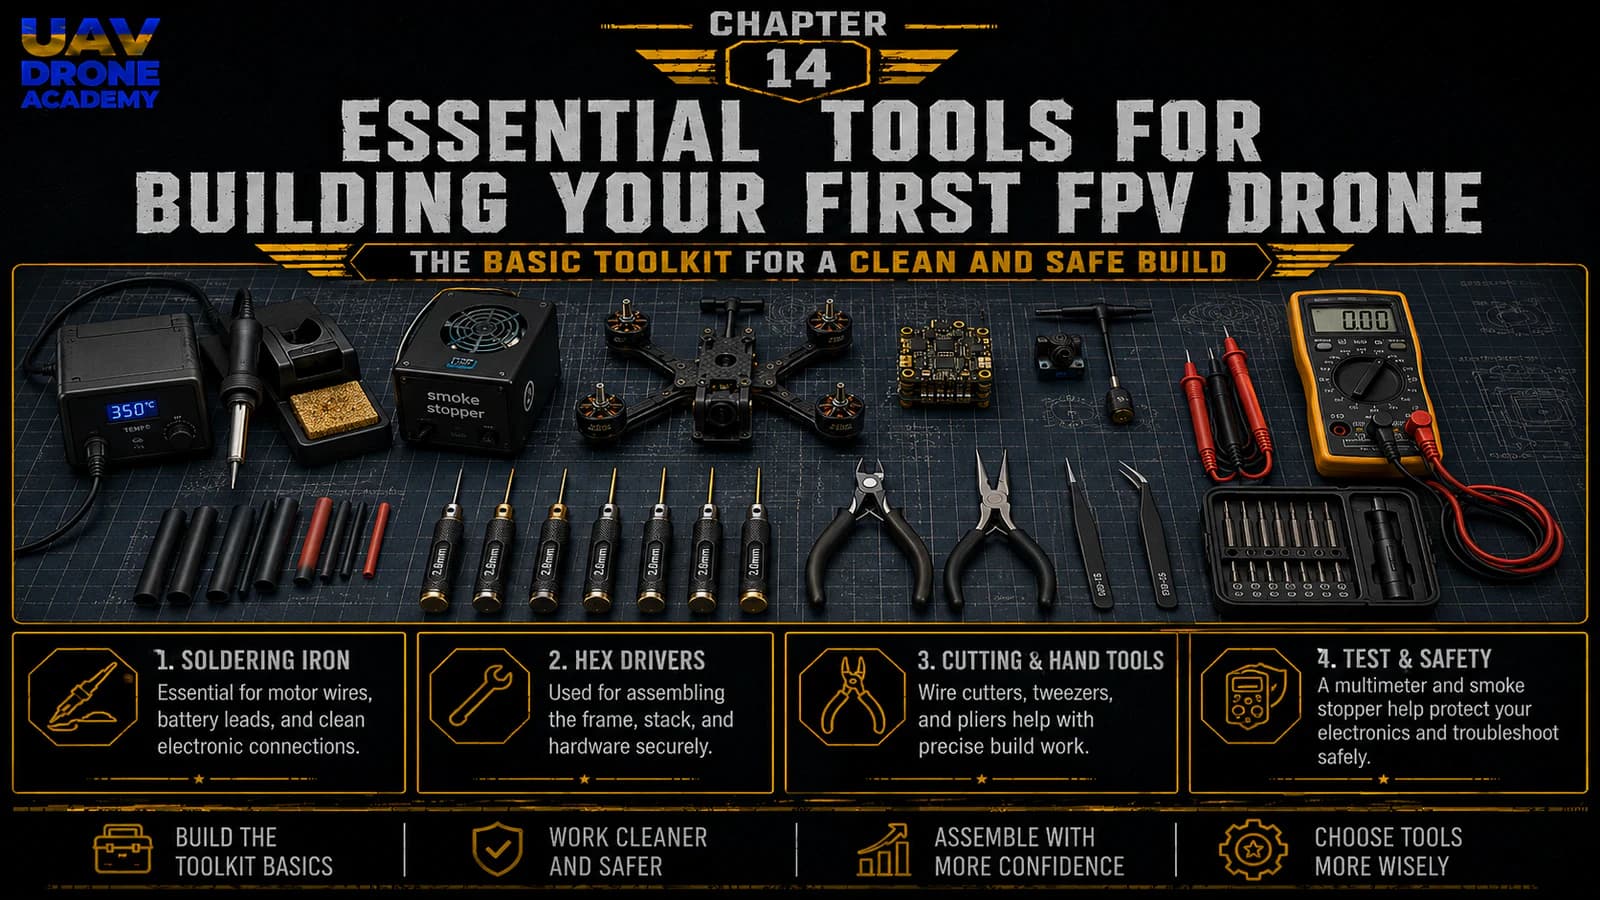
The Most Important Tool: Soldering Iron
The most important tool for building an FPV drone is the:
soldering iron
Soldering is required to connect:
- motor wires
- battery leads
- receiver wires
- VTX wires
- camera wires
- capacitor leads
- sometimes other accessories
A weak soldering setup can make the build extremely frustrating.
What Makes a Good Soldering Iron?
For FPV work, the soldering iron should have:
Adjustable Temperature
This allows you to control heat depending on the job.
Small signal wires require less heat.
Large battery pads require more heat.
Enough Power
Battery pads and ESC power connections absorb a lot of heat.
A weak iron may struggle to heat them properly.
Replaceable Tips
Different soldering tips help with different tasks.
For FPV, a medium chisel tip is usually very useful.
Recommended Soldering Iron Type
For beginners, a good option is:
temperature-controlled soldering iron
You do not need the most expensive model.
But avoid extremely weak USB irons or very cheap low-power irons for the main build.
They may work for small wires, but they often struggle with large ESC battery pads.
Solder
Solder is the metal alloy used to create electrical connections.
For FPV work, good solder makes a huge difference.
What Kind of Solder Should Beginners Use?
The easiest solder to work with is usually:
63/37 leaded solder
Why?
Because it:
- melts smoothly
- flows well
- creates clean joints
- is easier for beginners
Lead-free solder can work, but it usually requires:
- higher temperature
- better technique
- more practice
If using leaded solder, always work in a ventilated area and wash your hands after handling it.
Flux
Flux is one of the most underrated tools in soldering.
Flux helps solder:
- flow better
- stick properly
- create cleaner joints
- reduce oxidation
For beginners, flux can dramatically improve soldering quality.
Why Flux Matters
Without flux, solder may:
- form blobs
- refuse to stick
- create dull joints
- behave unpredictably
With flux, soldering becomes much easier.
For FPV builds, flux is highly recommended.
Soldering Tip Cleaner
During soldering, the iron tip becomes dirty and oxidized.
A dirty tip transfers heat poorly.
You should use:
- brass wool cleaner
- or a damp sponge
Brass wool is often preferred because it cleans the tip without cooling it too much.
Keeping the tip clean is one of the easiest ways to improve soldering quality.
Helping Hands or PCB Holder
When soldering small FPV wires, you often need more than two hands.
A helping hands tool or PCB holder keeps parts stable while you solder.
This makes the work:
- safer
- cleaner
- easier
- less stressful
For beginners, this is extremely useful.
Wire Cutters
Wire cutters are used to trim:
- motor wires
- receiver wires
- VTX wires
- battery leads
- zip ties
A clean cut makes soldering easier and improves the final build quality.
Avoid using large general-purpose pliers for tiny wires.
Small electronics cutters are much better.
Wire Strippers
Wire strippers remove insulation from wires without damaging the copper strands.
This is important because damaged wires can:
- break later
- create weak joints
- reduce reliability
For FPV, small-gauge wire strippers are very useful.
If you do not have wire strippers, you can strip carefully with cutters, but beginners should use proper strippers whenever possible.
Tweezers
Tweezers help position:
- small wires
- heat shrink
- tiny connectors
- antenna cables
- small screws
They are especially useful when working in tight spaces inside the frame.
A pair of fine-tip tweezers is inexpensive and very helpful.
Hex Drivers
FPV drones use many small screws.
Most frames and motors use hex screws.
You will need a set of:
metric hex drivers
Common sizes include:
- 1.5 mm
- 2.0 mm
- 2.5 mm
Good hex drivers matter because low-quality tools can strip screw heads.
Stripped screws are frustrating and can make repairs difficult.
Small Screwdrivers
In addition to hex drivers, small screwdrivers may be useful for:
- accessories
- receiver mounting
- camera brackets
- small hardware
A basic precision screwdriver set is enough.
Needle-Nose Pliers
Needle-nose pliers help with:
- holding small parts
- bending wires
- positioning components
- tightening small nuts
- pulling zip ties
They are not always required, but they make many small tasks easier.
Multimeter
A multimeter is one of the most important safety tools in FPV building.
It allows you to test:
- continuity
- voltage
- polarity
- short circuits
For beginners, the most important function is:
continuity mode
This helps verify that positive and negative pads are not accidentally shorted before connecting a battery.
Why a Multimeter Is Not Optional
Without a multimeter, you are guessing.
And guessing with electronics can be expensive.
Before powering the drone, you should check:
- battery pads
- ESC connections
- solder joints
- polarity
- possible shorts
A basic digital multimeter is enough for this project.
Smoke Stopper
A smoke stopper is a protection device used when powering a drone for the first time.
It helps limit current if there is a short circuit.
This can prevent:
- burned ESCs
- damaged flight controllers
- destroyed components
- sudden smoke during first power-up
Why Beginners Should Use a Smoke Stopper
The first battery connection is one of the most stressful moments in any FPV build.
A smoke stopper gives an extra layer of protection.
It does not guarantee that nothing can go wrong, but it greatly reduces risk.
For this build:
use a smoke stopper during first power tests
Heat Shrink Tubing
Heat shrink is used to protect:
- solder joints
- wire connections
- receiver antennas
- small electronics
- exposed conductors
It also helps organize wiring cleanly.
A small assortment of heat shrink sizes is very useful.
Electrical Tape
Electrical tape can help temporarily secure wires.
However, it should not replace proper mounting, heat shrink, or zip ties.
Use it carefully and avoid messy wiring.
For long-term builds, heat shrink and zip ties are usually cleaner.
Zip Ties
Zip ties are simple but extremely useful.
They help secure:
- wires
- antennas
- receiver cables
- VTX wires
- camera cables
- capacitor wires
A clean build is not only more beautiful.
It is also more reliable.
Loose wires can enter propellers or break during crashes.
Double-Sided Tape
Double-sided tape can be used to mount:
- receiver
- VTX
- capacitor
- small accessories
For FPV builds, stronger foam tape is often useful because it also provides some vibration isolation.
Do not rely only on weak office tape.
Use tape designed for practical mounting.
Battery Straps and Anti-Slip Pad
Even though these are part of the drone hardware, they are also important during assembly.
The battery must be mounted firmly.
You will need:
- battery strap
- rubber pad or anti-slip pad
A loose battery can shift during flight and affect balance.
In a crash, a poorly secured battery can also damage wires or eject from the drone.
Threadlocker
FPV drones vibrate a lot.
Some screws can loosen over time.
Threadlocker can help secure metal-to-metal screws, especially motor screws.
Important:
use threadlocker carefully
Do not use it on plastic parts.
Do not let it touch electronics.
Do not overuse it.
A small amount is enough.
LiPo Safe Bag or Charging Box
LiPo batteries require safe charging and storage habits.
A LiPo safe bag or fire-resistant charging container is highly recommended.
This helps reduce risk during:
- charging
- storage
- transport
LiPo safety should be treated seriously from the beginning.
Safety Glasses
Safety glasses are simple but important.
They protect your eyes during:
- soldering
- cutting wires
- trimming zip ties
- working with small parts
- testing motors
Small pieces can fly unexpectedly.
Protecting your eyes is always worth it.
Ventilation
Soldering produces fumes.
You should work in a ventilated area.
A small fan or fume extractor is helpful.
At minimum:
- avoid breathing solder fumes directly
- keep your face away from the smoke
- work with airflow
This is especially important when soldering for longer sessions.
Clean Work Surface
A clean work surface makes the build much easier.
Before starting, prepare a table with:
- good lighting
- enough space
- organized tools
- small containers for screws
- a safe area for soldering
Avoid building on:
- carpets
- beds
- cluttered surfaces
- unstable tables
Small screws and parts are easy to lose.
Lighting
Good lighting is essential.
Many FPV solder pads are small.
Poor lighting increases the chance of:
- bad solder joints
- wrong wire connections
- missed damage
- poor inspection
A simple desk lamp can make a huge difference.
Small Parts Organizer
FPV builds use many tiny screws and spacers.
A small parts organizer helps avoid losing:
- motor screws
- stack screws
- nuts
- washers
- standoffs
- spare hardware
Even a simple small box or tray is better than leaving everything loose on the table.
Computer and USB Cable
To configure the drone later, you will need:
- a computer
- USB cable
- Betaflight Configurator
Make sure the USB cable supports data transfer.
Some USB cables only charge devices and do not transfer data.
This is a very common beginner frustration.
Optional But Useful Tools
Some tools are not absolutely required, but they can make the build easier.
Calipers
Calipers help measure:
- screw length
- frame spacing
- hardware dimensions
- wire length
Useful, but not mandatory.
Blue Tack or Temporary Putty
Can help hold small parts temporarily during assembly.
Useful for positioning tiny components.
Small File or Sandpaper
Sometimes carbon fiber edges are sharp.
A small file or sandpaper can help smooth rough edges.
Important:
carbon fiber dust is harmful, so avoid breathing it and clean the area carefully.
Hot Glue
Hot glue can help secure some wires or small components.
However, it should be used carefully.
Do not use hot glue near parts that become hot, such as VTX units.
What You Do Not Need Yet
Beginners sometimes think they need a complete professional workshop.
You do not.
For this first build, you do not need:
- oscilloscope
- bench power supply
- 3D printer
- CNC tools
- advanced RF equipment
- professional electronics station
Those tools may become useful later, but they are not required for this beginner project.
Essential Tool Checklist
Before starting the physical build, prepare:
- temperature-controlled soldering iron
- solder
- flux
- soldering tip cleaner
- helping hands or PCB holder
- wire cutters
- wire strippers
- tweezers
- metric hex drivers
- precision screwdrivers
- needle-nose pliers
- multimeter
- smoke stopper
- heat shrink tubing
- zip ties
- double-sided tape
- threadlocker
- LiPo safe bag
- safety glasses
- good lighting
- clean work surface
- computer
- data-capable USB cable
This is enough to build your first 5-inch FPV drone properly.
Common Beginner Mistakes
Using a Weak Soldering Iron
A weak iron makes soldering large pads extremely difficult.
This often creates poor joints and frustration.
Skipping the Multimeter Check
Always check for shorts before plugging in a battery.
This habit can save expensive electronics.
Not Using a Smoke Stopper
First power-up should always be done carefully.
A smoke stopper adds important protection.
Working in a Messy Area
A cluttered workspace increases mistakes.
Clean organization improves build quality.
Using the Wrong USB Cable
If Betaflight does not recognize the drone, the USB cable may be charge-only.
Use a data-capable cable.
Our Build Philosophy Moving Forward
Now that we are entering the physical assembly phase, our philosophy remains the same:
- work slowly
- keep things clean
- verify every step
- avoid unnecessary complexity
- build for reliability
The goal is not to rush.
The goal is to understand what we are doing and build a drone that is safe, clean, and reliable.
Conclusion
Tools are a critical part of building your first FPV drone.
Good tools make the process:
- safer
- cleaner
- easier
- more reliable
- less frustrating
You do not need a professional electronics lab.
But you do need the correct basic tools, especially:
- soldering iron
- solder
- flux
- multimeter
- smoke stopper
- hex drivers
- wire cutters
- safety equipment
With the correct tools prepared, we are finally ready to begin the physical build.
In the next chapter, we will start assembling the frame — the structural foundation of our 5-inch FPV drone.
Next Chapter
How to Assemble a 5-Inch FPV Frame Step by Step