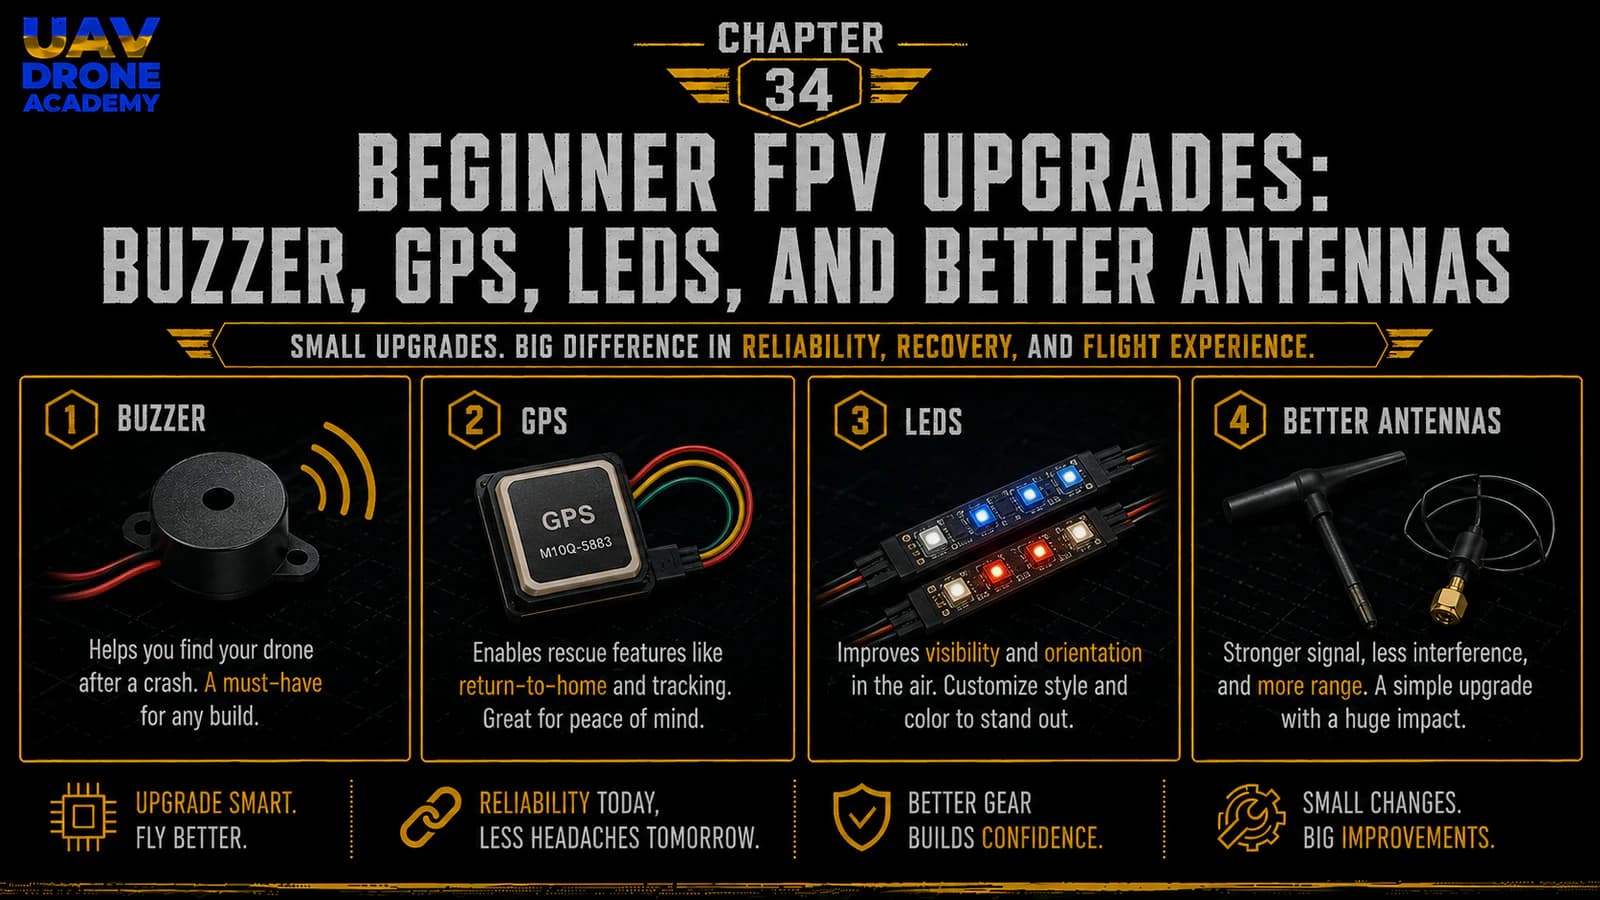
Your first 5-inch FPV drone was built with a simple analog FPV system.
That was intentional.
Analog FPV is still one of the best ways for beginners to learn because it is:
- affordable
- simple
- lightweight
- easy to repair
- widely supported
- good enough for learning real FPV control
But after some flights, many pilots start asking the same question:
should I upgrade to digital FPV?
This is a very common question.
Digital FPV systems offer a much clearer image than analog.
They can make flying feel more immersive.
They can improve visibility.
They can record better onboard footage.
They can make the FPV experience feel more modern and polished.
But digital FPV is not always the right upgrade at the beginning.
It can add:
- cost
- weight
- complexity
- heat
- mounting challenges
- compatibility issues
- repair cost
- ecosystem lock-in
The goal of this chapter is simple:
help beginner FPV pilots understand when upgrading from analog to digital HD FPV makes sense — and when it is better to keep flying analog.
Why We Started With Analog FPV
In this course, we started with analog FPV because it matches the beginner build philosophy.
Our first drone was designed to be:
- simple
- affordable
- repairable
- easy to understand
- lightweight
- compatible with common parts
- not overloaded with advanced systems
Analog FPV fits that philosophy well.
It teaches the most important fundamentals:
- camera wiring
- VTX wiring
- antenna matching
- video channel selection
- OSD setup
- video signal behavior
- interference awareness
- practical field troubleshooting
Analog may not look beautiful compared to digital HD, but it teaches FPV very well.
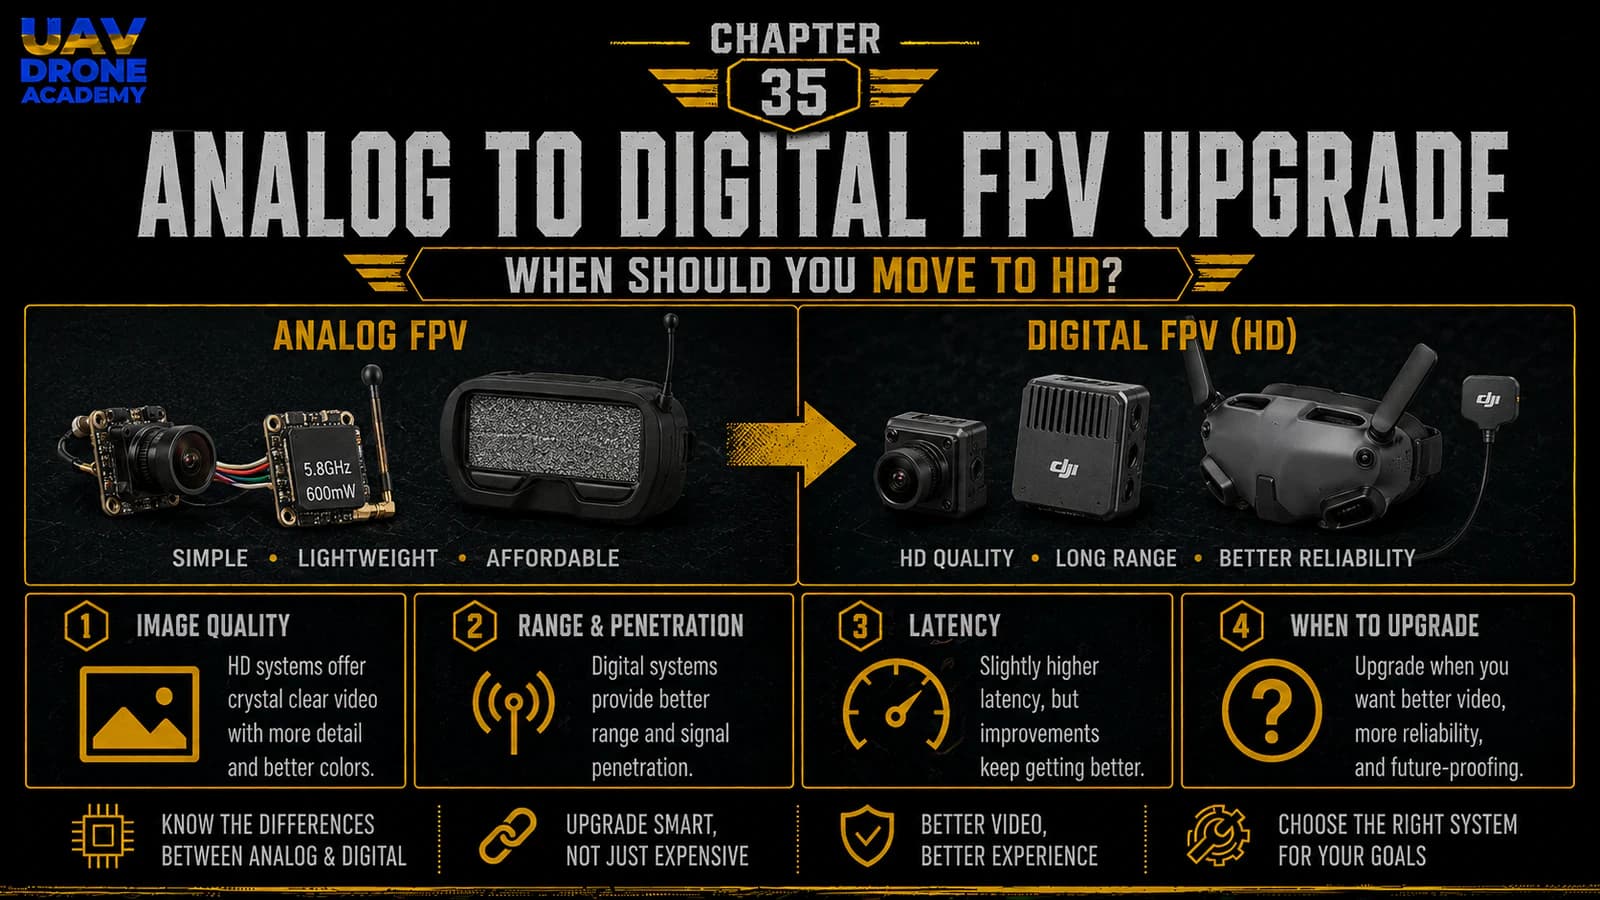
What Is Digital FPV?
Digital FPV replaces the traditional analog video system with a digital video transmission system.
Instead of sending a simple analog video signal from the camera to the VTX, digital systems process the camera image digitally, transmit it to compatible goggles, and display a high-resolution video feed.
A digital FPV system usually includes:
- digital FPV camera
- digital air unit or VTX
- compatible goggles
- antennas
- wiring to the flight controller
- power connection
- digital OSD support
The result is usually a much cleaner and sharper image than analog.
Common Digital FPV Ecosystems
The main digital FPV ecosystems include:
- DJI FPV systems
- Walksnail Avatar systems
- HDZero systems
Each system has different strengths.
Some focus more on image quality.
Some focus more on low latency.
Some are popular for freestyle.
Some are popular for racing.
Some are better for onboard recording.
Some are more open or flexible than others.
There is no single perfect system for every pilot.
The right choice depends on your budget, flying style, goggles, latency preference, repair expectations, and long-term plan.
Analog vs Digital: The Basic Difference
The easiest way to understand the difference is this:
analog is simple and low-cost
digital is clearer and more expensive
Analog video can look noisy, especially when signal weakens.
Digital video can look sharp and clean, but when signal degrades, it may behave differently depending on the system.
Analog usually degrades gradually with static.
Digital systems may show compression artifacts, frame drops, freezes, or sudden quality reduction depending on signal conditions.
This does not mean one is always better.
It means they behave differently.
Image Quality
The biggest reason pilots upgrade to digital is image quality.
Digital FPV can make it easier to see:
- branches
- gaps
- ground texture
- obstacles
- wires
- small details
- landing areas
- direction and horizon
For cinematic flying, cruising, and general enjoyment, digital image quality can be a major improvement.
For beginners, a clearer image can reduce visual stress.
However, image quality alone does not make someone a better pilot.
Control skill still matters.
A pilot who cannot control the drone well in analog will not magically become skilled in digital.
Latency
Latency is the delay between what the camera sees and what the pilot sees in the goggles.
In FPV, latency matters because the pilot reacts in real time.
Low latency feels more immediate.
Higher latency can feel less connected.
Analog is known for very low latency.
Some digital systems also have very good latency, but digital video usually involves more processing than analog.
For casual freestyle, cruising, and cinematic flying, modern digital latency can be acceptable for many pilots.
For serious racing or ultra-reactive flying, latency becomes more important.
Beginners should not focus only on image quality.
They should also understand latency and consistency.
Latency Consistency
Latency consistency can matter as much as latency number.
A system with stable, predictable latency can feel easier to trust.
A system with variable latency may feel less consistent if conditions change.
When choosing digital FPV, consider:
- how latency behaves at different signal strengths
- whether the system prioritizes image quality or speed
- whether racing modes are available
- whether the goggles and air unit combination affects latency
- whether your flying style needs the lowest possible delay
For most beginner freestyle pilots, the difference may not be the most important factor at first.
But it is still worth understanding.
Cost
Digital FPV is significantly more expensive than analog.
Upgrading usually requires:
- digital goggles
- digital air unit or VTX
- digital camera
- antennas
- possible mounts
- wiring changes
- sometimes a different frame or top plate arrangement
This can cost much more than the original analog system.
For beginners, this matters.
If you are still crashing often, a digital air unit may be more expensive to damage than an analog camera or VTX.
Before upgrading, ask:
am I ready to risk more expensive video hardware?
If the answer is no, keep flying analog a bit longer.
Repair Cost
Analog repairs are usually cheaper.
If you break an analog camera or VTX, replacement is often relatively affordable.
Digital air units and cameras are usually more expensive.
Digital systems may also use delicate coax cables, specific connectors, and ecosystem-specific parts.
A crash that would be cheap on analog may be more expensive on digital.
This does not mean digital is bad.
It just means the repair cost is part of the decision.
Weight
Digital systems can be heavier than simple analog systems, depending on the air unit.
Weight affects:
- flight time
- throttle response
- center of gravity
- crash energy
- motor load
- agility
- battery performance
A 5-inch drone can handle digital FPV, but weight still matters.
If your drone was originally designed as a simple analog freestyle build, adding a digital air unit may change how it feels.
Before upgrading, check:
- available mounting space
- air unit weight
- camera size
- antenna mounting
- cable routing
- cooling airflow
- center of gravity
Heat
Digital air units can generate heat.
They need airflow.
On the bench, a digital VTX or air unit may heat up quickly if powered without movement.
This matters during setup.
When working on a digital FPV system:
- avoid leaving it powered for long periods without airflow
- use a small fan during bench testing
- make sure the air unit has ventilation
- avoid burying it inside the frame without airflow
Heat management is part of digital FPV ownership.
Mounting Space
Not every analog frame is ideal for digital conversion.
Before upgrading, check whether your frame supports:
- the digital air unit size
- 20x20 or 25.5x25.5 mounting
- camera size
- camera plates
- antenna mounting
- cable routing
- airflow
Some modern frames have digital-specific versions or accessories.
A very compact analog build may require creative mounting.
For beginners, avoid complicated mounting solutions if possible.
A clean and secure installation is better than forcing the digital system into a frame that does not fit well.
Wiring Differences
Analog wiring is usually simple:
- camera power
- camera ground
- camera video
- VTX power
- VTX ground
- video out
- VTX control
Digital wiring may include:
- power
- ground
- UART TX/RX
- MSP DisplayPort
- OSD communication
- camera cable
- antennas
- air unit connections
The exact wiring depends on the digital system.
But the beginner lesson is simple:
digital FPV usually needs both power and data communication with the flight controller
Do not assume it wires exactly like analog.
Always follow the wiring diagram for your digital system and flight controller.
OSD Differences
Analog OSD is usually overlaid by the flight controller before the video is sent to the VTX.
Digital FPV often handles OSD differently.
Many digital systems use a data connection between the flight controller and the air unit or goggles to render OSD information digitally.
This can give a clean HD OSD, but it also requires correct configuration.
If the OSD does not appear after a digital upgrade, the issue may be:
- wrong UART
- MSP not enabled
- DisplayPort setting missing
- wrong OSD mode
- firmware compatibility
- incorrect wiring
- incorrect air unit setup
This is another reason beginners should not rush the upgrade.
Antennas Still Matter
Digital FPV does not eliminate antenna principles.
You still need:
- correct antennas
- correct polarization
- good antenna placement
- secure connectors
- clear line of sight when possible
- awareness of signal blockage
A digital system with poor antenna placement can perform badly.
Carbon fiber, battery, frame geometry, and pilot position can all affect signal quality.
Better image quality does not remove the need for good RF habits.
Analog Signal Behavior vs Digital Signal Behavior
Analog video usually becomes progressively worse as signal weakens.
You may see:
- static
- lines
- snow
- breakup
- reduced clarity
This gives the pilot a gradual warning.
Digital video may maintain a clean image for longer, but when the signal becomes weak, it may show:
- blocky artifacts
- reduced bitrate
- stuttering
- frame drops
- frozen image
- sudden breakup
Different digital systems behave differently.
The beginner lesson is:
learn how your video system warns you before signal loss
Do not fly to the edge of your video link during early digital flights.
When Digital FPV Makes Sense
Upgrading to digital FPV makes sense when:
- your drone is already flying reliably
- you are crashing less often
- you want better image quality
- you can afford the goggles and air units
- you understand the added repair cost
- your frame can fit the hardware cleanly
- you are willing to learn the digital setup process
- you want better DVR or onboard recording
- you fly in places where clearer video helps
- you are ready to manage heat and wiring complexity
Digital FPV is an excellent upgrade when the foundation is already solid.
When You Should Stay Analog Longer
You should stay analog longer if:
- you are still learning basic control
- you crash often
- your budget is limited
- you do not have spare parts
- your current analog system works fine
- you mostly fly close-range practice
- you are still troubleshooting your build
- your frame does not fit digital hardware well
- you do not want more wiring complexity yet
- you are not ready for more expensive repairs
Analog is not a failure.
Analog is still a valid FPV system.
Many pilots continue using analog because it is cheap, light, simple, and reliable enough for their needs.
Should Beginners Start With Digital Instead?
Some beginners can start with digital FPV.
If the budget allows and the pilot values image quality, digital can be a good experience.
But for a first self-built drone, analog still has strong advantages:
- lower cost
- easier repair
- less fear of crashing expensive video hardware
- simpler troubleshooting
- lower entry barrier
- lighter build
- easier learning of core FPV systems
For this course, analog was the better starting point because the goal was learning the full build process without unnecessary complexity.
The Best Time to Upgrade
A good time to upgrade is after you can:
- take off confidently
- land safely
- fly several batteries without crashing
- inspect and maintain the drone
- replace props and basic parts
- understand Betaflight basics
- troubleshoot receiver and video issues
- control the drone in open space
- manage battery voltage
- stay calm during small problems
In other words:
upgrade after the drone and pilot are stable
Do not use digital FPV to compensate for lack of basic control.
Use it to improve an already working experience.
Upgrade Option 1 — Convert Your Existing Drone
One option is to convert your existing analog drone to digital.
This may be practical if:
- the frame has enough space
- the camera size fits
- the air unit can be mounted securely
- airflow is acceptable
- the flight controller has available UARTs
- power requirements are supported
- antenna mounting is possible
This can be a good learning project.
But it may require rewiring, remounting, and reconfiguring OSD.
Before converting, plan everything.
Do not start cutting wires without understanding the full installation.
Upgrade Option 2 — Build a Second Digital Drone
Another option is to keep your first analog drone and build a second digital drone.
This is often a better long-term strategy.
Why?
Because:
- your analog drone remains a cheap practice platform
- your digital drone can be built cleanly from the start
- you can choose a digital-compatible frame
- you avoid compromising the first build
- you have a backup drone
- repairs and troubleshooting stay clearer
For many pilots, this is the smarter path.
Your first analog drone becomes your training and repair platform.
Your second drone becomes your upgraded HD platform.
Upgrade Option 3 — Buy Digital Goggles First
Another strategy is to buy digital goggles first, then upgrade the drone later.
This makes sense only if:
- you are committed to that ecosystem
- you understand compatibility
- you know which air units work with the goggles
- you still have a way to fly your analog drone
- the goggles support analog input through a module or adapter
Be careful with ecosystem compatibility.
Not all digital goggles work with all digital air units.
Before buying goggles, decide which ecosystem you want to enter.
Choosing a Digital Ecosystem
When choosing a digital ecosystem, consider:
Image Quality
How sharp and clean is the image?
Latency
How fast and consistent does the video feel?
Cost
How expensive are goggles, air units, cameras, antennas, and spare parts?
Durability
How well does the hardware survive crashes?
Weight
How much does the air unit and camera add?
Availability
Can you easily buy replacement parts?
Compatibility
Will it work with your frame, flight controller, and goggles?
OSD Support
Does it support the Betaflight OSD features you need?
Flying Style
Is it better for freestyle, racing, cinematic, or cruising?
Do not choose only based on image quality.
Choose based on your complete use case.
DJI FPV Systems
DJI digital FPV systems are popular because of their strong image quality and polished user experience.
They are often chosen by pilots who want:
- sharp video
- strong penetration
- good onboard recording options
- reliable ecosystem integration
- modern goggles experience
However, DJI systems can be more expensive and may involve ecosystem compatibility decisions.
For beginners, DJI can be excellent if budget allows, but it may not be the cheapest or simplest repair path.
Walksnail Avatar Systems
Walksnail Avatar systems are another popular digital FPV option.
They are often chosen by pilots who want:
- HD video
- a flexible ecosystem
- different air unit sizes
- onboard recording options
- compatibility across multiple drone sizes
Walksnail can be attractive for pilots who want HD FPV with a range of air unit choices.
As with any digital system, check compatibility, firmware, goggles, antennas, and mounting requirements before buying.
HDZero Systems
HDZero is often discussed for pilots who care about low latency and racing-style performance.
It can be attractive for:
- racing
- low-latency flying
- pilots who want digital clarity with a more latency-focused experience
- certain freestyle pilots who prioritize responsiveness
Image quality and signal behavior differ from DJI and Walksnail, so pilots should understand the tradeoffs.
For beginners, HDZero may make sense if low latency is a priority or if racing is part of the long-term plan.
Digital FPV and Recording
One major advantage of digital FPV is better recording options.
Depending on the system, you may get:
- goggle DVR
- onboard recording
- HD footage
- gyro data
- stabilization support
- better review footage for learning
This can be very useful if you want to:
- review flights
- make social media clips
- create training content
- capture cinematic footage
- analyze mistakes
But remember:
better footage does not replace safe flying
Recording quality should not be the first priority during early training.
Digital FPV and Freestyle
Digital FPV can be excellent for freestyle.
A clearer image helps with:
- seeing obstacles
- reading terrain
- flying gaps
- improving confidence
- enjoying the flight experience
But freestyle also involves crashes.
That means repair cost matters.
If you are still crashing constantly, analog may be better for rough practice.
Once you are more controlled, digital freestyle becomes more attractive.
Digital FPV and Racing
For racing, latency and consistency are extremely important.
Racing pilots may prefer systems that prioritize:
- low latency
- predictable video behavior
- lightweight hardware
- race format compatibility
- channel management
- durability
Not every digital system is equally ideal for racing.
If racing is your goal, research the local racing community and see what systems are commonly used.
Compatibility with events and other pilots can matter.
Digital FPV and Cinematic Flying
For cinematic flying, digital FPV is very attractive.
Clear video helps with:
- framing
- smooth lines
- obstacle awareness
- confidence
- recording review
However, cinematic flying often adds even more equipment:
- action camera
- GPS
- larger battery
- smoother tune
- different frame
- different camera angle
So do not assume digital alone makes a drone cinematic.
It is one piece of a larger setup.
Practical Upgrade Checklist
Before upgrading from analog to digital, confirm:
Pilot Readiness
- you can take off safely
- you can land safely
- you can fly several batteries without crashing badly
- you understand battery voltage
- you can recover from small mistakes
- you can inspect and repair the drone
Drone Readiness
- frame has space
- camera fits
- air unit fits
- airflow is acceptable
- UART is available
- power supply supports the digital system
- antennas can be mounted safely
- wiring can be routed cleanly
Budget Readiness
- goggles are affordable
- air unit is affordable
- camera replacement is affordable
- spare antennas are affordable
- crash repair cost is acceptable
Configuration Readiness
- you understand UART setup
- you understand MSP or DisplayPort needs
- you can configure OSD
- you can troubleshoot video issues
- you can save Betaflight backups
If these points are not true yet, keep flying analog longer.
Beginner Mistakes When Upgrading to Digital
Upgrading Too Early
Do not spend a lot of money before learning basic control.
Ignoring Frame Compatibility
Digital hardware must fit physically and have airflow.
Forgetting About Heat
Digital air units can overheat on the bench.
Use airflow during setup.
Choosing Based Only on Image Quality
Latency, cost, repairability, and compatibility also matter.
Mixing Incompatible Goggles and Air Units
Digital ecosystems are not universally compatible.
Check before buying.
Making the Drone Too Heavy
Weight changes flight feel.
Plan battery, mounting, and balance.
Not Backing Up Betaflight
Always save your working analog configuration before major changes.
Should You Convert This Beginner Build?
For the specific beginner 5-inch build from this course, the answer is:
yes, it can be upgraded later, but it does not need to be upgraded immediately
This drone was designed to teach FPV fundamentals.
Analog is enough for:
- learning control
- practicing hover
- flying open areas
- understanding Betaflight
- repairing crashes
- developing maintenance habits
Digital becomes more attractive after you:
- fly more confidently
- crash less often
- want better image quality
- are ready for higher cost and complexity
Recommended Beginner Decision
If you are still in the early learning phase:
stay analog
If you are flying confidently and want a better visual experience:
consider digital
If you want to build a long-term HD freestyle platform:
consider a second digital build
If you want cinematic footage:
digital may be worth planning carefully
If you want racing:
prioritize latency and event compatibility
There is no universal answer.
The best choice depends on your stage, budget, flying style, and repair confidence.
What We Have Completed
At this stage, we have explored the analog-to-digital FPV upgrade decision.
We covered:
- why we started with analog
- what digital FPV is
- image quality
- latency
- cost
- repair cost
- weight
- heat
- mounting space
- wiring differences
- OSD differences
- antenna considerations
- major digital ecosystems
- when to upgrade
- when to stay analog
- whether to convert the current build or build a second drone
The main lesson is simple:
digital FPV is a great upgrade when the pilot and drone are ready
It is not something beginners must rush into immediately.
Our Build Philosophy Moving Forward
The philosophy remains:
upgrade when the upgrade supports your learning
Analog helped us build the foundation.
Digital can improve the experience later.
The best pilots do not upgrade randomly.
They upgrade with purpose.
They understand what each system does.
They know the tradeoffs.
They keep the drone reliable.
That is the difference between buying more parts and actually improving the aircraft.
Conclusion
Upgrading from analog FPV to digital HD FPV can dramatically improve the visual experience.
Digital systems can provide:
- sharper image quality
- better recording options
- improved obstacle visibility
- a more immersive flying experience
But digital also adds:
- cost
- weight
- heat
- complexity
- compatibility decisions
- higher repair expenses
For beginners, analog remains an excellent starting point.
It is simple, affordable, repairable, and effective for learning core FPV skills.
The right time to move to digital is when your drone is already reliable, your flying is more controlled, and you are ready to invest in a better visual system without compromising safety or repairability.
Digital FPV is not the beginning of learning.
It is an upgrade after the foundation is strong.
In the final chapter of this series, we will look beyond the first build and define the next learning path: how to progress from beginner pilot to more advanced FPV builder, flyer, and systems thinker.
Next Chapter
From First Build to Advanced FPV: Your Next Learning Path