FPV Receiver and Radio Controller: Your Control Link
Your drone does not know you exist. It has motors, a flight controller, a battery, and exactly zero interest in your opinions. The only reason it responds when you move a stick is a small board called the FPV receiver, working together with the radio controller in your hands. These two devices form the control link, the invisible radio connection that turns thumb movements into flight.
In this lesson we will look at both ends of that link. You will learn what the radio controller actually does, what the receiver does on the drone, why ExpressLRS (ELRS) became the standard choice for beginners, and how the receiver physically connects to the flight controller. If you are building on the classic 5-inch platform, it helps to first understand what "5-inch" actually means, because the receiver we discuss here is sized and mounted with that platform in mind.
What the Radio Controller Actually Does
The radio controller (also called a transmitter or TX) is the device you hold in your hands. You move the sticks, and the controller converts those positions into digital data packets and sends them out as radio signals, many times per second. The drone picks up those signals and reacts. That is the entire relationship: you talk, the drone listens.
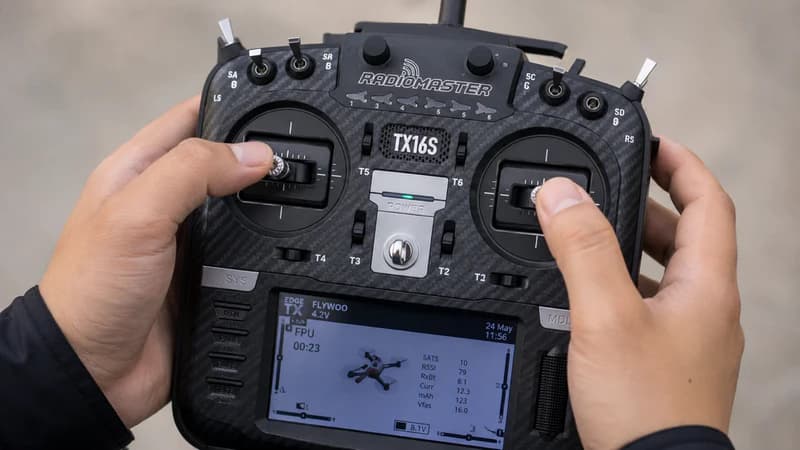
Everything the radio sends is organized into channels. A channel is one stream of control information. The two sticks give you four channels: throttle, yaw, pitch, and roll. Switches and buttons add more channels, and you will use them for things like arming the drone, changing flight modes, and turning on a beeper. A modern radio handles more channels than a beginner will ever need, so channel count is rarely a real buying concern anymore.
Here is the part beginners often miss: the radio controller is the most durable investment in your whole FPV setup. Drones crash, break, and get rebuilt. Your radio just sits safely in your hands through all of it. A good radio also connects to a simulator, which means you can practice flying on your computer before your drone even exists. Buy a decent one once, and it will outlive several drones.
What the FPV Receiver Does on the Drone
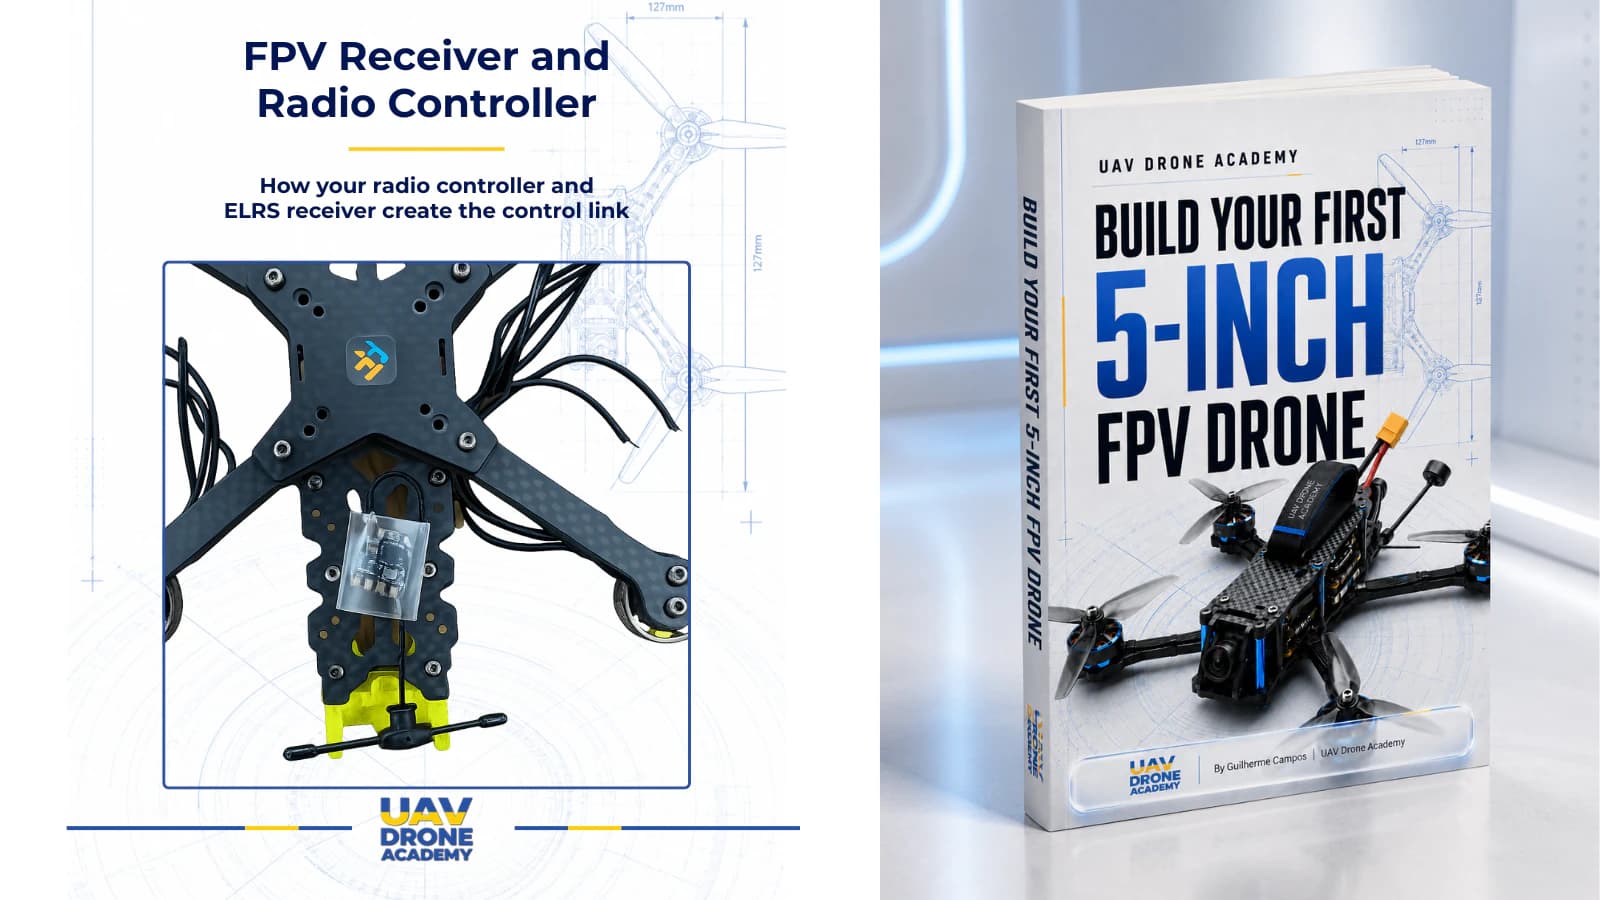
The FPV receiver (RX) is the other end of the conversation. It is a small circuit board with an antenna, mounted somewhere on the frame, and its job is simple: catch the radio packets coming from your controller and hand them to the flight controller. The receiver does not stabilize anything and does not make decisions. It is a messenger, not a brain.
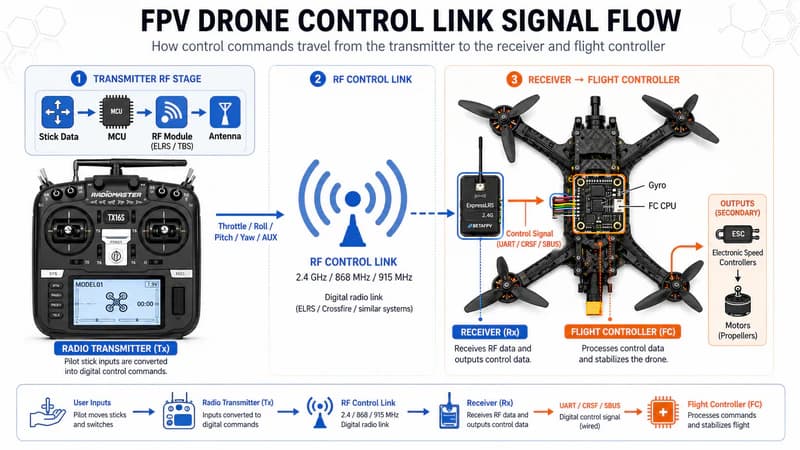
Modern control links are also two-way. The receiver sends telemetry back to your radio, which is data about the drone itself: link quality, signal strength, and often battery voltage. Your radio can read these values out loud or show warnings. This matters for safety. When the link quality starts dropping, you want to know before the connection fails, not after.
One complete signal path, start to finish: your thumb moves the stick, the radio encodes that into a packet, the packet travels as a radio wave, the receiver catches it, the receiver passes the command to the flight controller over a wire, and the flight controller adjusts motor speeds. All of this happens fast enough to feel instant. That speed is called latency, and keeping it low is one of the main jobs of a good control link.
What Is ExpressLRS (ELRS)?
ExpressLRS (ELRS) is an open-source radio control link protocol, meaning the software that defines how the radio and receiver talk to each other is developed publicly and can be used by any manufacturer. It is the current standard for FPV beginners and experienced pilots alike, and it earned that position honestly: very low latency, long range, reliable link quality, and hardware that costs less than a set of good propellers.
The open-source model is exactly why ELRS gear is affordable and available everywhere. Dozens of manufacturers build ELRS radios and receivers, and they all speak the same protocol. Buy a radio from one brand and a receiver from another, and they will still work together. Before ELRS, you were often locked into one company's ecosystem. Now you are not.
A quick comparison of the control links you will hear about:
| Protocol | Best trait | Trade-off |
|---|---|---|
| ExpressLRS (ELRS) | Open-source, low latency, huge hardware selection, affordable | Setup and binding have a learning curve |
| TBS Crossfire | Mature long-range link with a strong reputation | Proprietary, generally more expensive |
| Legacy 2.4GHz systems (FrSky, FlySky) | Cheap, found in older gear | Weaker range and performance, fading support |
The takeaway is short: for a new build today, ELRS is the sensible default. Crossfire is a respectable alternative, and legacy systems belong in the past.
How Does the ELRS Receiver Connect to the Flight Controller?
The receiver connects to the flight controller through a UART, which is a serial communication port: a pair of solder pads on the flight controller, one for transmitting data and one for receiving it. Flight controllers have several UARTs, usually labeled with a T and an R followed by a number, such as T2 and R2 for UART 2. Any free full UART works for a receiver.
The wiring uses four connections, and one detail trips up almost everyone:
| Receiver pad | Connects to (FC) | What it carries |
|---|---|---|
| 5V | 5V pad | Power for the receiver |
| GND | GND pad | Ground, the common reference |
| TX | RX pad of the UART | Control commands to the FC |
| RX | TX pad of the UART | Telemetry data from the FC |
Notice the crossover. The receiver's TX goes to the flight controller's RX, and vice versa. It feels wrong the first time, but think of it as a phone call: your mouth connects to the other person's ear. One device transmits, the other receives.
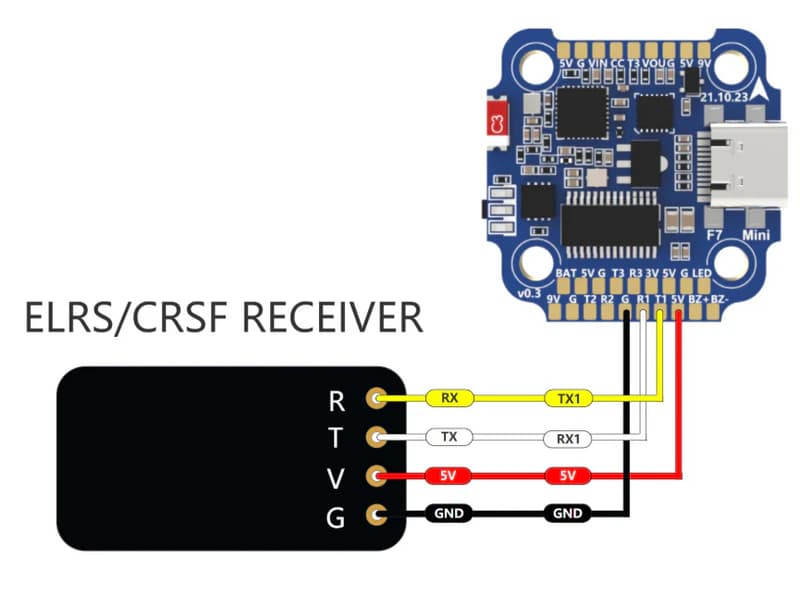
Later, during software setup, you will tell the flight controller firmware which UART the receiver lives on. You do not need to memorize that now. What matters at this stage is understanding that the receiver is a serial device on a UART, because that single fact explains most receiver wiring problems you will ever troubleshoot.
Why Antenna Placement Matters on a Carbon Frame
Carbon fiber is wonderful for frames and terrible for radio signals. It is conductive, which means it blocks and reflects radio waves. If the receiver antenna sits pressed against a carbon plate or zip-tied along a carbon arm, you have built a drone that partially shields itself from your own commands. That is not a hypothetical problem. It shows up as link warnings and shaky control exactly when the drone is far away or behind an obstacle.
The fix is simple and visible on most well-built quads: the antenna is held away from the frame in a small TPU mount, usually pointing out the back or up, clear of carbon and clear of the battery leads. Power wires carry electrical noise, so distance from them helps too. The antenna is also one of the parts that suffers in crashes, so after any hard landing, check it. We cover this in detail in our guide to what usually breaks first in FPV crashes.
Binding: Teaching the Radio and Receiver to Talk
Binding is the pairing process that tells a receiver to listen to your radio and ignore everyone else's. You will bind the receiver to your radio during the setup process, and with ELRS there are two common approaches.
The elegant way is a binding phrase. This is a short text phrase you set on both the radio and the receiver when flashing their firmware. Any receiver carrying your phrase connects to your radio automatically, with no buttons and no ritual. Set it once, and every future build binds itself.
The manual way is bind mode, triggered with the receiver's bind button or by power-cycling the receiver a few times until its LED double-blinks, then selecting bind on the radio. It works fine, it is just more ceremony. One rule saves you from most binding headaches: keep the radio and receiver on the same major firmware version. Mismatched versions are the classic reason a brand-new receiver refuses to connect.
Common Beginner Mistakes
Every one of these mistakes is popular, and every one of them is avoidable:
- Swapping the TX and RX wires. The link stays dead until you cross them correctly. If wiring looks right but nothing works, check this first.
- Mounting the antenna against carbon. The drone flies fine in your yard, then loses link the first time you fly behind a tree.
- Mixing firmware versions. A radio and receiver on different major ELRS versions will refuse to bind, and no amount of button pressing fixes it.
- Buying a bargain radio with a legacy protocol. It saves money today and costs you a full replacement the moment you get serious.
None of these are talent problems. They are checklist problems, which is good news, because checklists are free.
FAQ
What does a receiver do on an FPV drone? It catches the radio signals from your controller and passes the commands to the flight controller over a UART. It also sends telemetry, such as link quality, back to your radio.
What is the difference between a transmitter and a receiver? The transmitter is the radio controller in your hands, sending commands. The receiver is the small board on the drone, catching those commands. Together they form the control link.
Do I need to bind my receiver every time I fly? No. Binding happens once during setup. After that, the receiver connects to your radio automatically every time both are powered on.
Can any radio controller work with any receiver? No. Both must speak the same protocol. An ELRS radio needs an ELRS receiver. The brands can differ, but the protocol must match.
What's Next
You now understand the control link from stick to motor: the radio encodes, the receiver catches, the flight controller obeys. That knowledge will pay off during wiring, during software setup, and during every troubleshooting session for the rest of your FPV life.
With the theory in place, the next step in the build is pure hands-on work. Continue with our guide on how to install motors on a 5-inch FPV drone, where the drone starts turning from a parts pile into an aircraft.