At this point, our beginner 5-inch FPV drone is almost fully configured.
We have already:
- connected the drone to Betaflight
- configured the Ports tab
- bound the ExpressLRS receiver
- checked receiver channels
- assigned the Arm switch
- reviewed failsafe behavior
- checked motor order
- checked motor direction
- configured a clean beginner-friendly OSD
Before moving into the first flight preparation phase, we need to understand one more important topic:
PID and filters
For many beginners, PID and filters look like the most complicated part of Betaflight.
You may see terms like:
- P gain
- I gain
- D gain
- Feedforward
- D-term
- gyro filtering
- dynamic notch
- RPM filtering
- sliders
- profiles
- rates
- blackbox logs
At first, this can feel overwhelming.
But here is the most important thing to understand:
beginners do not need to become tuning experts before the first flight.
Modern Betaflight defaults are already very capable for many normal 5-inch FPV builds.
The goal of this chapter is not to teach advanced tuning.
The goal is to explain the basic concepts so you understand what PID and filters do, why they matter, and why we should avoid unnecessary changes too early.
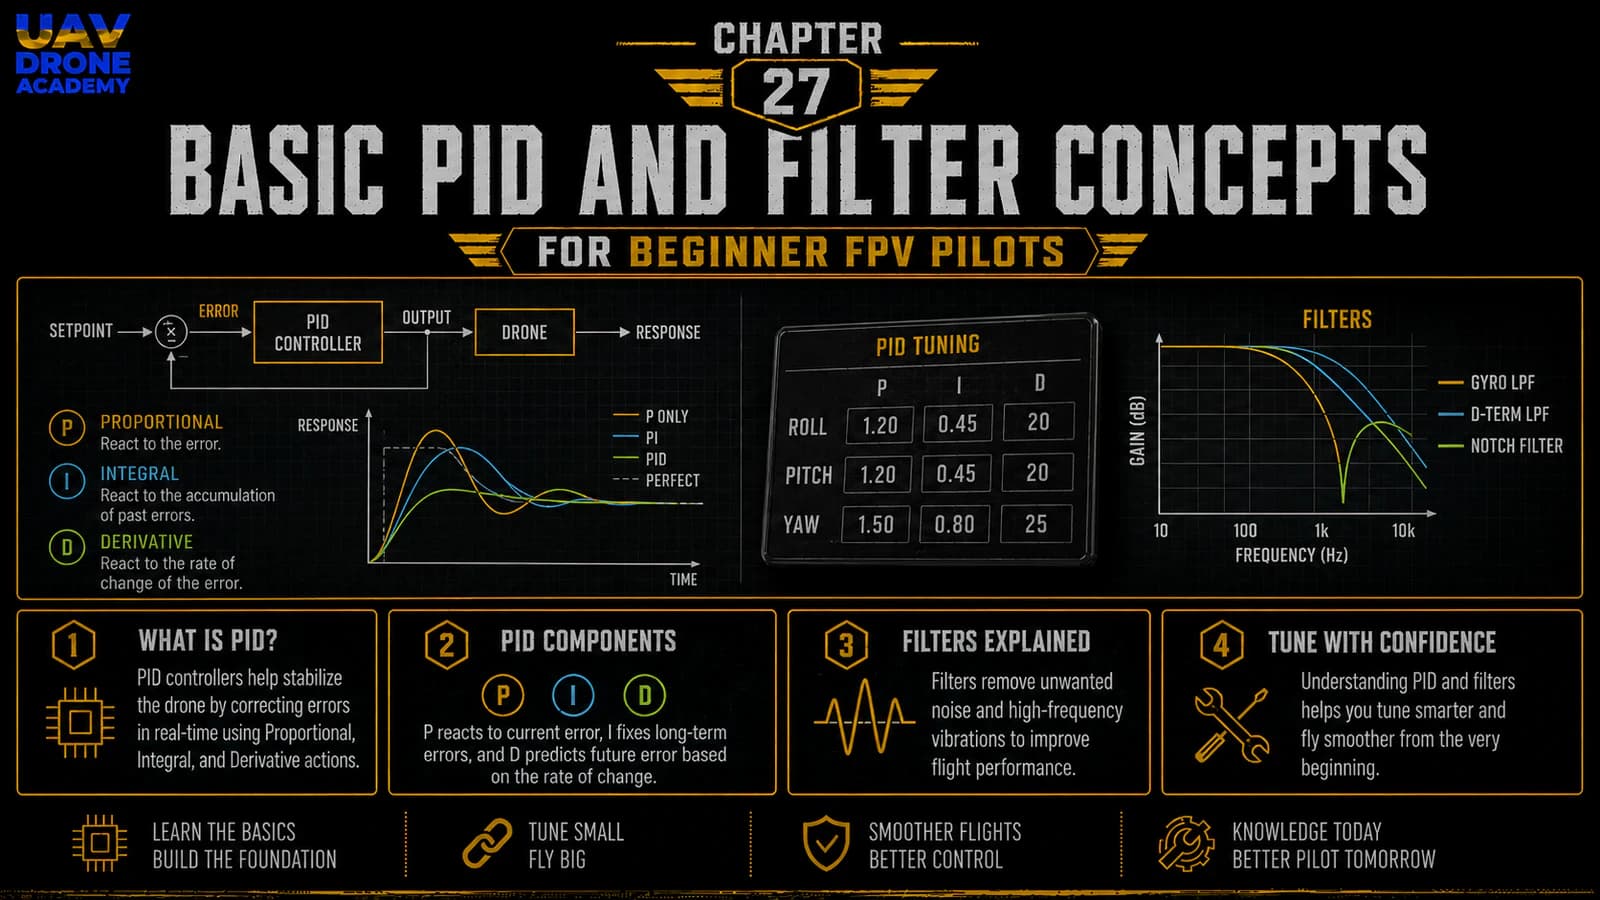
What Are PID Settings?
PID is part of the control system that helps the drone respond correctly to pilot commands and stabilize itself during flight.
PID stands for:
Proportional
Integral
Derivative
These three terms work together inside the flight controller.
Their job is to help the drone reach the desired movement and correct errors between what the pilot commands and what the drone is actually doing.
In simple terms:
PID helps the drone follow commands accurately.
Betaflight’s PID Tuning tab is where PID controller settings, filter settings, and rates can be configured.
Why PID Matters
When you move the sticks, you are asking the drone to rotate or move in a certain way.
But the drone is affected by:
- weight
- propeller airflow
- motor response
- wind
- vibration
- inertia
- battery voltage
- frame stiffness
- pilot input
The flight controller uses PID logic to constantly correct the difference between the desired movement and the real movement.
This happens many times per second.
Without PID control, the drone would not feel stable or precise.
A Simple Way to Understand PID
Imagine you want the drone to rotate at a certain speed.
The flight controller compares two things:
- What you asked for with the sticks.
- What the gyro says the drone is actually doing.
If there is a difference, Betaflight corrects it by adjusting motor output.
That correction is shaped by PID settings.
P Term — Proportional
The P term reacts to present error.
In simple language:
P corrects the current mistake.
If the drone is not rotating as commanded, P pushes it toward the target.
Higher P can make the drone feel:
- sharper
- more responsive
- more locked in
But too much P can cause:
- oscillations
- vibration
- rough flight behavior
- hot motors
For beginners, the important concept is:
P gives the drone authority to correct movement.
I Term — Integral
The I term corrects long-term error.
In simple language:
I helps the drone hold attitude over time.
It helps when the drone is affected by:
- wind
- battery position
- weight imbalance
- long maneuvers
- steady external forces
If I is too low, the drone may:
- drift
- fail to hold angle during long moves
- feel loose
If I is too high, it may:
- feel slow to recover
- create unwanted behavior after stick inputs
- feel less natural
For beginners, the important concept is:
I helps the drone stay consistent.
D Term — Derivative
The D term reacts to how quickly error is changing.
In simple language:
D dampens fast movement.
D helps reduce:
- bounce-back
- overshoot
- prop wash
- sharp oscillations
- rough recovery after fast movements
But D is also sensitive to noise.
Too much D can cause:
- hot motors
- noisy motor output
- reduced efficiency
- possible component stress
For beginners, the important concept is:
D smooths and dampens movement, but too much can heat motors.
Feedforward
Feedforward is another important control concept in Betaflight.
It helps the drone respond quickly to stick movements.
While PID reacts to error, Feedforward anticipates pilot input and helps the drone feel more connected to the sticks.
In simple language:
Feedforward improves stick responsiveness.
If Feedforward is too low, the drone may feel delayed or soft.
If Feedforward is too high, the drone may feel too sharp or twitchy.
For beginners, it is usually best to leave Feedforward settings at safe defaults until you have enough flight experience to understand what you want to change.
PID Is Not the Same as Rates
Beginners often confuse PID settings with rates.
They are different.
PID settings affect how the drone corrects movement and stabilizes itself.
Rates affect how fast the drone rotates when you move the sticks.
Rates change the feel of the controls.
PID changes the control behavior behind the scenes.
For a beginner, rates may be adjusted later to make the drone easier to control.
But PID tuning should not be changed randomly.
What Are Filters?
Filters help clean up noisy sensor data.
The flight controller uses gyro data to understand how the drone is moving.
But real drones produce vibration from:
- motors
- propellers
- frame resonance
- loose screws
- damaged bearings
- unbalanced props
- electrical noise
If the flight controller reacts to all of that noise directly, motor output can become rough and unstable.
Filters reduce unwanted noise before it causes problems.
In simple language:
filters help Betaflight ignore vibration and focus on real movement.
Why Filtering Matters
A clean signal helps the drone fly better.
Good filtering can improve:
- smoothness
- motor behavior
- gyro stability
- flight feel
- reliability
Poor filtering can lead to:
- hot motors
- oscillations
- rough flight
- noisy motor output
- unstable behavior
Filters are especially important because the D term can amplify noise.
That is why PID and filters are closely related.
Gyro Filtering
The gyro measures rotation.
Gyro filtering reduces unwanted vibration before Betaflight uses that data for control.
If the gyro signal is noisy, the flight controller may think the drone is moving more than it actually is.
This can cause unnecessary correction commands to the motors.
Good gyro filtering helps the flight controller make better decisions.
D-Term Filtering
The D term is useful, but sensitive to noise.
D-term filtering helps reduce noise before it causes hot motors or rough motor output.
If D-term filtering is too low, noise may reach the motors.
If filtering is too high, the drone may feel less responsive.
Modern Betaflight defaults usually balance this well for many beginner builds.
Dynamic Notch Filtering
Dynamic notch filtering helps detect and reduce specific vibration frequencies that change during flight.
As motor speed changes, vibration frequencies also change.
Dynamic notch filtering helps target that noise more intelligently.
Beginners do not need to deeply tune dynamic notch filters before the first flight.
The important concept is:
dynamic filters help Betaflight manage changing vibration noise.
RPM Filtering
RPM filtering uses motor speed information from the ESC to filter motor-related noise more precisely.
This can improve flight performance when configured correctly.
However, RPM filtering depends on ESC telemetry or bidirectional DShot support.
For beginners, this can be useful later, but it should not become the first priority before basic safe flight.
If your build and Betaflight setup already support RPM filtering correctly, that is good.
If not, do not panic.
The first priority is still:
- safe configuration
- correct motor direction
- working receiver
- clean OSD
- safe hover test
Why Beginners Should Not Tune Too Early
Many beginners see PID sliders and immediately want to adjust them.
This is usually a mistake.
Before changing PID or filters, you need to know whether the drone actually has a problem.
A bad flight issue may be caused by:
- wrong propeller installation
- damaged propellers
- loose frame screws
- bad motor bearings
- bad solder joints
- wrong motor direction
- incorrect flight controller orientation
- poor battery
- vibration from the frame
- loose stack mounting
If you change PID settings before checking the basics, you may hide the real problem or make the drone worse.
Mechanical Problems Come First
Before tuning software, always check the mechanical build.
A clean mechanical build matters more than aggressive tuning.
Check:
- frame screws
- motor screws
- propellers
- motor bell movement
- stack mounting
- soft mounts
- wires touching the gyro
- loose antennas
- cracked arms
- damaged props
A mechanically clean drone will usually fly much better with default settings.
A mechanically bad drone will not be fixed properly by random PID changes.
Betaflight Defaults Are Usually Good Enough
Modern Betaflight defaults are designed to work well for many common FPV builds.
For a normal 5-inch freestyle drone with common components, defaults are often good enough for:
- first hover
- basic flight testing
- early learning
- initial setup verification
This does not mean defaults are perfect for every drone.
But they are usually a safe starting point.
For beginners, the best first step is:
start with defaults, verify the drone, then tune only if needed.
When Should You Consider Tuning?
You may consider tuning later if the drone shows clear issues such as:
- persistent oscillations
- hot motors after short flights
- strong prop wash
- bounce-back after flips or rolls
- poor tracking
- strange vibration
- rough motor sound
- unstable behavior that is not caused by hardware
But even then, tuning should be done carefully.
Do not change many things at once.
Change one thing, test, observe, and compare.
Hot Motors Warning
Motor temperature is one of the most important tuning safety indicators.
After a short test hover or short flight, motors should be checked carefully.
Warm motors can be normal.
Very hot motors are a warning sign.
Hot motors may indicate:
- too much D gain
- too little filtering
- mechanical vibration
- damaged propellers
- bad bearings
- incorrect settings
- overworked power system
If motors are too hot to touch comfortably, stop and investigate.
Do not keep flying.
What About PID Sliders?
Betaflight includes sliders that allow easier adjustment of PID and filters.
These sliders are more beginner-friendly than manually changing every value.
However, beginner-friendly does not mean risk-free.
Do not move sliders randomly.
If you eventually use sliders, do it slowly and with a clear reason.
For the first flights, leaving default sliders alone is usually the safest choice.
What About Presets?
Betaflight may include presets for certain setups or components.
Presets can be useful when they are designed for your specific hardware or situation.
But presets should still be used carefully.
A preset made for a different drone, different propeller size, different battery, or different flying style may not be ideal for your build.
For beginners, avoid loading random presets just because someone online recommended them.
Understand the purpose first.
Blackbox Logs
Blackbox logging records flight data that can be analyzed later.
Advanced pilots use Blackbox to tune more precisely.
Blackbox can help identify:
- vibration
- noise
- oscillations
- D-term behavior
- motor output problems
- tuning issues
But for beginners, Blackbox is not required before the first hover test.
It can become useful later as your understanding improves.
Rates vs Tuning for Beginners
If the drone feels too fast or too sensitive, the first thing beginners often need is not PID tuning.
They may need gentler rates.
Rates control how fast the drone rotates when you move the sticks.
A beginner-friendly rate setup can make the drone easier to learn.
PID tuning should not be used to solve a pilot comfort problem that is actually caused by aggressive rates.
What We Should Do for This Build
For our beginner 5-inch FPV build, the best approach is:
- keep Betaflight default PID settings
- keep default filter settings
- do not load random presets
- do not adjust advanced tuning yet
- complete final safety checks
- perform a controlled first hover
- observe motor temperature
- inspect flight behavior
- only tune later if there is a real reason
This keeps the process safe and logical.
Beginner PID and Filter Checklist
Before moving forward, confirm:
- propellers still removed during setup
- Betaflight connects correctly
- PID tab opens normally
- no random PID changes made
- no random filter changes made
- no unknown presets loaded
- frame screws are tight
- motor screws are correct
- propellers are not damaged
- motors spin smoothly
- stack is soft mounted correctly
- no wires touch the gyro
- beginner understands that defaults are the starting point
If all of this is correct, we can move forward safely.
Common Beginner Mistakes
Changing PID Before Flying
Do not tune a problem you have not observed yet.
Start with safe defaults.
Trying to Fix Mechanical Problems With Software
Loose screws, bad props, damaged motors, and vibration should be fixed mechanically first.
Moving Too Many Sliders at Once
If you change multiple things at the same time, you will not know what helped or hurt.
Ignoring Motor Temperature
Hot motors are a warning sign.
Always check motor temperature during early testing.
Loading Random Presets
Only use presets when you understand why they apply to your drone.
Confusing Rates With PID
If the drone feels too fast, rates may be the issue, not PID.
Overthinking Tuning Too Early
Beginners should focus first on safe assembly, correct configuration, and controlled practice.
Advanced tuning can come later.
What We Have Completed
At this stage, we have:
- understood what PID means
- learned the basic role of P, I, and D
- introduced Feedforward
- understood what filters do
- reviewed gyro filtering and D-term filtering
- introduced dynamic notch and RPM filtering
- understood why default settings are usually the right starting point
- learned why mechanical problems should be fixed before tuning
- reviewed common beginner tuning mistakes
This gives us enough understanding to move forward without fear of the PID tab.
We do not need to master advanced tuning yet.
We only need to respect it and avoid random changes.
Our Build Philosophy Moving Forward
The philosophy remains the same:
understand first, change later
A beginner should not change settings just because they exist.
Every change should have a reason.
Every adjustment should be tested.
Every problem should be diagnosed before being corrected.
That is how FPV becomes less confusing and more reliable.
Conclusion
PID and filters are important parts of FPV drone performance, but beginners do not need to become tuning experts before the first flight.
PID helps the drone follow commands and correct movement.
Filters help remove noise and vibration from sensor data.
Together, they help the drone fly smoothly, accurately, and reliably.
For our beginner 5-inch FPV build, the best approach is simple:
- start with Betaflight defaults
- avoid random tuning
- fix mechanical problems first
- check motor temperature during early tests
- tune later only if there is a clear reason
Now that we understand the basic purpose of PID and filters, we are ready to move into the final preparation stage.
In the next chapter, we will review the complete pre-flight checklist and prepare the drone for its first safe hover test.
Next Chapter
Final Pre-Flight Checklist Before Your First FPV Drone Hover Test