Now that the physical assembly of our 5-inch FPV drone is complete, we are ready to move into the software configuration phase.
This is a major transition in the build process.
Until now, we focused on hardware:
- frame assembly
- motor installation
- soldering
- ESC and flight controller installation
- FPV camera wiring
- VTX wiring
- receiver wiring
- continuity testing
- smoke stopper testing
- basic safety inspection
Now we need to configure the drone so the hardware can work correctly.
This is where Betaflight comes in.
Betaflight is the software environment used to configure most modern FPV drones. It allows us to set up the flight controller, receiver, motors, flight modes, OSD, failsafe behavior, and many other important functions.
For beginners, Betaflight may look intimidating at first.
There are many tabs, settings, switches, ports, sliders, and technical names.
But do not worry.
In this chapter, we are not going to configure everything at once.
Our goal is much simpler:
install or open Betaflight, connect the drone to the computer, confirm that the flight controller is detected, and understand the basic interface before changing settings.
This chapter is the first step into software configuration.
What Is Betaflight?
Betaflight is flight controller firmware used on FPV drones.
The firmware runs inside the flight controller and controls how the drone behaves.
It manages:
- stabilization
- motor commands
- receiver input
- flight modes
- OSD
- failsafe behavior
- sensor data
- communication between components
In simple terms:
Betaflight is the software brain of the FPV drone.
The flight controller is the physical board.
Betaflight is the software running on that board.
Betaflight App vs Betaflight Firmware
Beginners often confuse two different things:
Betaflight Firmware
This is the software installed on the flight controller.
It controls the drone.
Betaflight App
This is the application used on your computer or browser to configure the flight controller.
You use the Betaflight App to:
- connect to the drone
- inspect settings
- configure ports
- set up the receiver
- configure motor direction
- set flight modes
- configure OSD
- update firmware
- save changes
So the basic idea is:
Betaflight firmware runs on the drone.
Betaflight App runs on your computer or browser.
Why Betaflight Is Important
A drone is not ready to fly just because the wiring is complete.
The flight controller still needs to know:
- what type of receiver is connected
- which UART is used
- how the motors are mapped
- what direction the motors spin
- what switches arm the drone
- how failsafe should behave
- what information appears in the goggles
- how the drone should respond to pilot inputs
Betaflight is where these decisions are configured.
Without correct configuration, the drone may:
- not arm
- not respond to the radio
- spin motors incorrectly
- show no OSD
- fail to detect the receiver
- behave dangerously
That is why we will move slowly and carefully.
Before You Connect the Drone
Before connecting anything, confirm the safety basics.
The drone should have:
- no propellers installed
- passed visual inspection
- passed continuity test
- passed smoke stopper test
- VTX antenna installed
- receiver antenna secured
- no exposed wires touching carbon fiber
- USB port accessible
- battery disconnected
For this first Betaflight connection, we normally begin with USB only.
Do not connect the LiPo battery yet unless a specific step requires it later.
The Most Important Rule
Before working in Betaflight:
remove all propellers
This rule continues to apply throughout the entire configuration phase.
Propellers should stay removed during:
- USB connection
- receiver setup
- motor testing
- motor direction setup
- ESC testing
- failsafe configuration
- bench testing
Motors can spin unexpectedly during setup.
Without propellers, this is usually safe.
With propellers installed, it can become dangerous.
What You Need
To begin, prepare:
- your assembled FPV drone
- a computer
- Betaflight App
- a data-capable USB cable
- internet connection
- smoke stopper
- LiPo battery, only for later tests
- radio controller, for later receiver setup
The USB cable is very important.
Some USB cables are charge-only cables.
A charge-only cable may power the flight controller but will not allow data communication.
If Betaflight does not detect the drone, the USB cable is one of the first things to check.
Installing or Opening Betaflight App
Betaflight can now be accessed as an application or web-based app, depending on the current release method.
The safest approach is to use the official Betaflight website or official GitHub release page.
Avoid downloading Betaflight from random third-party websites.
For beginners, the basic process is:
- Go to the official Betaflight source.
- Open or install the Betaflight App.
- Connect the flight controller by USB.
- Select the correct serial port.
- Click Connect.
Do not change settings yet.
First, we only want to confirm communication.
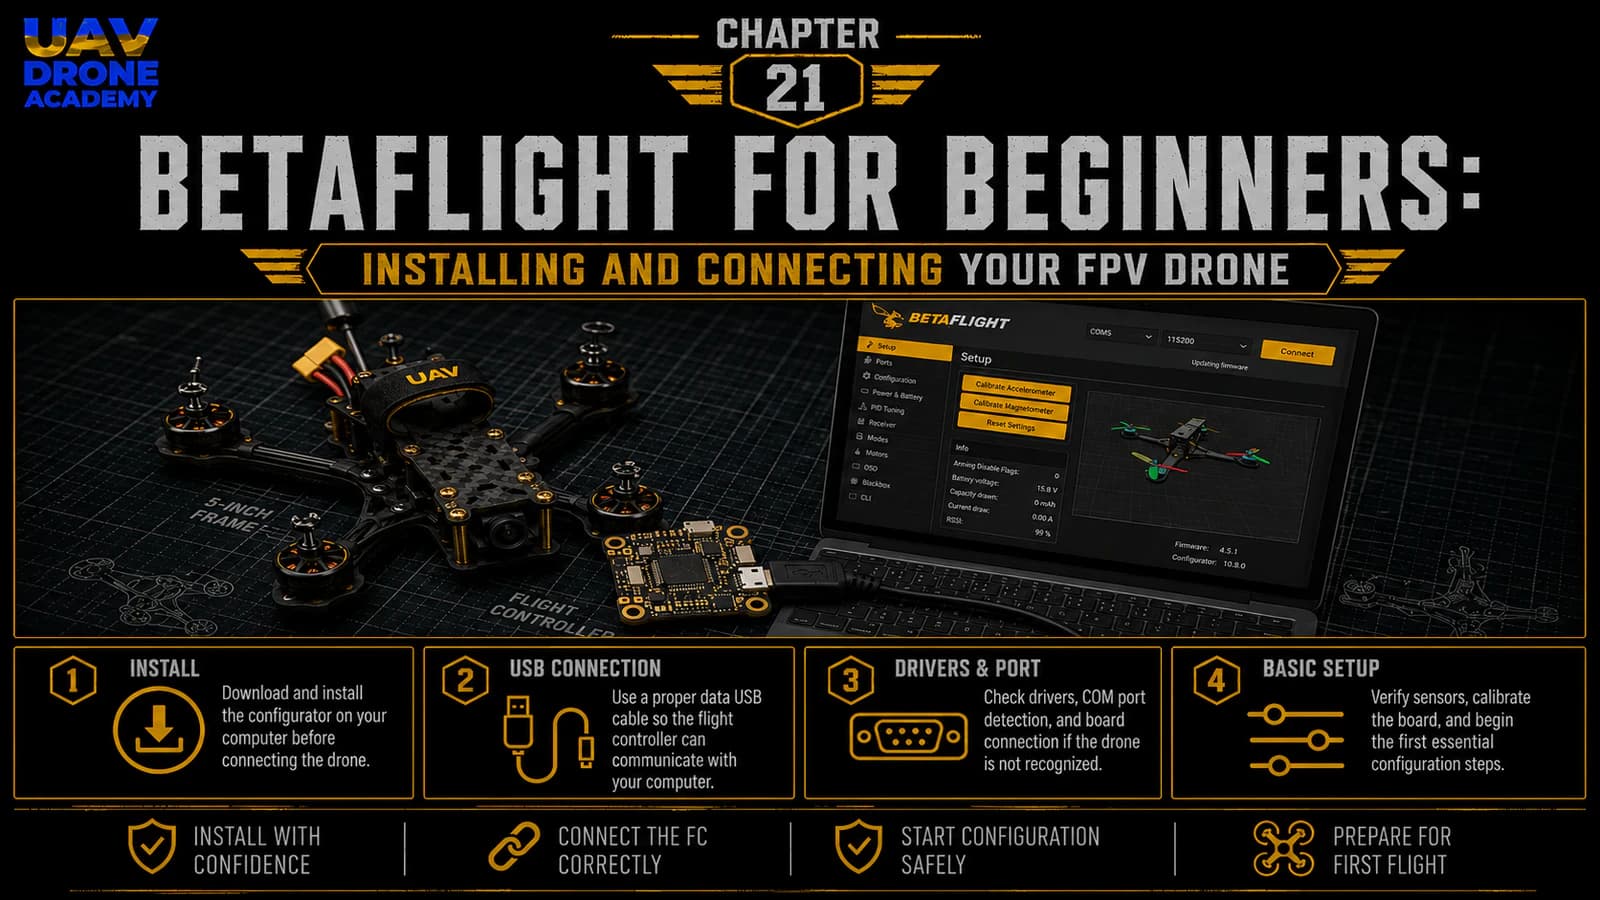
Step 1 — Connect the Drone by USB
Make sure the LiPo battery is disconnected.
Then connect the USB cable from your computer to the flight controller.
You may see LEDs turn on inside the drone.
This is normal.
The flight controller can usually power itself through USB.
However, not all components receive power from USB.
For example:
- VTX may not power from USB
- receiver may or may not power from USB
- camera may not power from USB
- motors will not spin from USB alone
This is normal.
USB is mainly for flight controller communication.
Step 2 — Open Betaflight App
Open Betaflight App on your computer or browser.
You should see a connection area where available ports appear.
Depending on your operating system, the port may appear as something like:
- COM port on Windows
- serial device on macOS
- USB device on Linux
The exact name is not important right now.
The important point is that the flight controller appears as a connectable device.
Step 3 — Select the Correct Port
If the flight controller is detected, select the available port.
Then click:
Connect
If the connection works, Betaflight will open the main interface and show the setup screen.
This means the computer and flight controller are communicating correctly.
That is the first successful software milestone.
What You Should See After Connecting
After connecting, you will usually see:
- a 3D model of the drone
- flight controller information
- firmware version
- board target
- sensor status
- configuration tabs
- setup information
The 3D model should move when you physically move the drone.
This confirms that the flight controller gyro is working and that Betaflight is reading sensor data.
Step 4 — Move the Drone Carefully
With the drone connected by USB and no battery connected, gently move the drone by hand.
Tilt it forward.
Tilt it backward.
Roll it left and right.
Watch the 3D model in Betaflight.
The model should move in the same direction as the real drone.
This is an important early check.
If the model moves incorrectly, the flight controller orientation may need adjustment later.
Do not fix that yet unless you know exactly what you are doing.
For now, simply observe.
Step 5 — Do Not Change Random Settings
This is very important.
Beginners often connect to Betaflight for the first time and start clicking through settings randomly.
Do not do that.
Betaflight is powerful, but random changes can create confusion.
At this stage, our goals are only:
- confirm connection
- confirm board detection
- observe the setup screen
- confirm gyro movement
- understand the interface
- prepare for structured configuration
Configuration will happen step by step in the next chapters.
Understanding the Main Tabs
Betaflight contains several tabs.
You do not need to master all of them now.
But it is helpful to understand what they are for.
Setup Tab
This is the first screen after connection.
It shows:
- drone orientation
- sensor movement
- arming status
- basic system information
This is where we confirm that the flight controller is alive and responding.
Ports Tab
The Ports tab configures communication ports.
This is where we will later enable:
- receiver UART
- VTX control UART
- telemetry features
- other serial devices
This tab is extremely important.
But we will configure it carefully in the next chapter.
Configuration Tab
This tab controls major system settings, such as:
- mixer type
- ESC protocol
- receiver protocol
- motor features
- arming behavior
- system options
Do not change these randomly.
Receiver Tab
This tab shows radio controller input.
Later, we will use it to confirm:
- throttle
- roll
- pitch
- yaw
- switches
- channel mapping
This will be important after binding ExpressLRS.
Modes Tab
This tab allows you to assign switches to functions like:
- Arm
- Angle mode
- Horizon mode
- Beeper
- Flip over after crash
For beginners, setting up the Arm switch correctly is one of the most important steps.
Motors Tab
This tab allows motor testing.
This tab must be treated with extreme caution.
Before using the Motors tab:
propellers must be removed
We will use this tab later to check:
- motor order
- motor direction
- motor response
Do not test motors yet.
OSD Tab
The OSD tab controls what appears in your FPV goggles.
Later, we will configure useful information such as:
- battery voltage
- timer
- flight mode
- warnings
- link quality
- other important data
CLI Tab
CLI means Command Line Interface.
This is an advanced tab where commands can be typed manually.
Beginners should not use the CLI unless following exact instructions.
For now, avoid it.
Step 6 — Check Firmware Information
In Betaflight, check the basic firmware information shown by the app.
This may include:
- Betaflight version
- board target
- flight controller name
- firmware date
- configurator/app version
Do not flash firmware yet unless there is a specific reason.
For a beginner build, the first priority is making sure the board works with its current firmware.
Firmware flashing can come later if needed.
Should Beginners Update Firmware Immediately?
Not always.
Many beginners think the first thing they should do is update everything.
But firmware updates can introduce:
- target selection mistakes
- erased settings
- compatibility confusion
- unnecessary troubleshooting
For a first build, the safer approach is:
connect first, inspect first, configure carefully, update only when necessary
If the flight controller is new and already running a stable Betaflight version, you may not need to flash firmware immediately.
Step 7 — Save a Backup Before Major Changes
Before making major configuration changes, it is a good habit to save a backup.
This can be done later through:
- presets
- CLI dump
- diff all
- backup tools inside Betaflight
The exact backup method may vary depending on Betaflight version.
The important concept is simple:
create a way to return to a known configuration
Beginners often make changes and then forget what they changed.
A backup prevents unnecessary frustration.
Common Connection Problems
Sometimes Betaflight does not connect immediately.
This is common and usually solvable.
Problem 1 — Charge-Only USB Cable
The flight controller lights up, but Betaflight does not detect it.
Possible cause:
USB cable does not support data
Solution:
- try another USB cable
- use a known data cable
- avoid cheap charge-only cables
This is one of the most common beginner problems.
Problem 2 — Missing Drivers
On some systems, especially Windows, drivers may be required.
If the board is not detected:
- check Betaflight driver instructions
- use recommended driver tools if needed
- reconnect the flight controller
- restart the app or computer
Problem 3 — Wrong Port Selected
Sometimes multiple ports appear.
Try selecting the correct one.
If unsure:
- unplug the drone
- see which port disappears
- plug it back in
- select the port that appears
Problem 4 — Damaged USB Port or Cable
If the connection is unstable:
- try another cable
- try another USB port
- inspect the flight controller USB connector
- avoid pulling the cable sideways
USB connectors on flight controllers are small and can be damaged by stress.
Problem 5 — Another Program Is Using the Port
Other software can sometimes block serial ports.
If Betaflight cannot connect:
- close other drone tools
- close serial monitor programs
- close 3D printer software
- restart the computer if needed
Problem 6 — Board Only Enters Bootloader Mode
Sometimes a board may connect in bootloader or DFU mode.
This is normally used for flashing firmware.
If you did not intend to flash firmware, disconnect and reconnect normally.
Do not flash randomly.
First Connection Safety Checklist
Before and during first connection, confirm:
- propellers removed
- battery disconnected
- USB cable supports data
- Betaflight App opened from official source
- correct port selected
- flight controller connects
- 3D model appears
- gyro reacts to movement
- no random settings changed
- no motor testing performed
If all of this works, the first Betaflight connection is successful.
What We Are Not Doing Yet
In this chapter, we are not yet:
- configuring Ports
- binding ELRS
- setting receiver protocol
- assigning Arm switch
- testing motors
- changing motor direction
- configuring OSD
- setting failsafe
- tuning PID
- installing propellers
Those steps will come later in the proper order.
This is important because software configuration must be done methodically.
Why We Are Moving Slowly
FPV configuration can become confusing if everything is done at once.
A beginner might try to:
- bind the receiver
- test motors
- update firmware
- configure OSD
- change PID settings
- set modes
- flash ESCs
all in one session.
That usually creates confusion.
Our method is different.
We will configure the drone step by step.
First:
connect and understand the interface
Then:
configure ports and communication
Then:
configure receiver
Then:
configure motors and safety systems
Then:
configure OSD and final checks
This keeps the process organized and beginner-friendly.
What We Have Completed
At this stage, we have:
- opened or installed Betaflight App
- connected the flight controller by USB
- selected the correct port
- confirmed basic connection
- viewed the Setup tab
- observed gyro movement
- reviewed the main Betaflight tabs
- identified common connection problems
- prepared for structured configuration
This is the first step in turning the physical drone into a properly configured aircraft.
Our Build Philosophy Moving Forward
The philosophy remains the same:
do not rush
A drone that is physically built but poorly configured is not safe.
Software configuration is just as important as soldering and wiring.
From this point forward, every setting must be made intentionally.
No random clicking.
No guessing.
No propellers.
Conclusion
Betaflight is the configuration environment that allows your flight controller to understand and control the drone.
For beginners, the first contact with Betaflight can feel overwhelming, but the process becomes much easier when broken into small steps.
In this chapter, we focused only on:
- opening or installing Betaflight App
- connecting the drone by USB
- confirming flight controller detection
- checking basic gyro movement
- understanding the main tabs
- avoiding random configuration changes
This gives us a safe starting point for the next stage.
In the next chapter, we will begin the real configuration process by setting up the communication ports on the flight controller.
Next Chapter
Betaflight Ports and Configuration: Setting Up the Flight Controller