Your first FPV flights are complete.
The drone has been built, configured, tested, flown, and inspected.npm run dev
That is a major achievement.
But FPV does not end after the first successful flight.
In many ways, this is where the real learning begins.
A 5-inch FPV drone is not a device you build once and forget.
It is a flying machine that will experience:
- vibration
- crashes
- hard landings
- dust
- grass
- heat
- battery stress
- loose screws
- damaged props
- antenna wear
- motor dirt
- electronic stress
This is normal.
FPV drones are meant to be flown, repaired, maintained, and improved.
The goal of this chapter is simple:
learn how to maintain your 5-inch FPV drone so it stays reliable, safe, and ready to fly.
Good maintenance does not need to be complicated.
For beginners, the most important habit is consistency.
Inspect the drone regularly.
Fix small problems early.
Replace cheap parts before they damage expensive parts.
Keep the build clean and secure.
That is how you turn your first FPV drone into a long-term learning platform.
Why Maintenance Matters
FPV drones are exposed to much more stress than most beginner pilots expect.
A normal flight can cause vibration.
A rough landing can loosen screws.
A crash can bend props.
Grass can wrap around motors.
Dust can enter bearings.
A battery can shift during hard movement.
A damaged prop can cause motor heat.
A loose antenna can reduce video range.
A small wire rub can become a short circuit later.
Maintenance matters because small problems can become serious problems if ignored.
A reliable drone is not only built correctly once.
It is kept reliable over time.
Maintenance Is Part of FPV
Many beginners think crashes and repairs mean they are doing something wrong.
That is not true.
FPV includes:
- flying
- crashing
- inspecting
- repairing
- replacing parts
- learning
- flying again
This is part of the hobby.
The difference between a frustrated beginner and a confident pilot is often not flying skill alone.
It is maintenance discipline.
A pilot who maintains the drone well spends more time flying and less time troubleshooting mysterious problems.
The Maintenance Mindset
The right mindset is simple:
fix small issues before they become big failures
Do not wait until the drone falls out of the sky.
Do not ignore strange sounds.
Do not keep flying with damaged props.
Do not fly with loose screws.
Do not fly with a damaged battery.
Do not assume “it was fine last time” means it is still fine today.
FPV drones change over time.
Every flight is a small stress test.
Every crash is a major inspection event.
Maintenance Schedule for Beginners
A simple maintenance rhythm works best:
Before Every Flight Session
Quick inspection.
After Every Crash
Detailed inspection.
After Every Flight Day
Cleaning and battery care.
Every Few Sessions
Screw check, deeper frame inspection, motor check.
After Any Strange Behavior
Stop and troubleshoot before flying again.
You do not need to disassemble the entire drone every time.
But you should know what to check and when.
Before Every Flight Session
Before each flying session, perform a quick check.
This should take only a few minutes.
Check:
- propellers
- motor screws
- frame screws
- battery strap
- XT60 lead
- antennas
- camera lens
- receiver link
- OSD warnings
- battery condition
This is not a full rebuild inspection.
It is a fast safety check.
The goal is to catch obvious problems before takeoff.
After Every Crash
After any crash, inspect more carefully.
Even a small crash can cause hidden damage.
Check:
- props
- motor bells
- motor shafts
- arms
- frame plates
- camera mount
- battery
- wires
- antenna
- stack
- VTX
- receiver antenna
Do not immediately rearm after a crash.
Disarm first.
Disconnect the battery.
Walk to the drone.
Inspect it.
Then decide if it is safe to fly again.
After Every Flight Day
At the end of a flying day, clean and prepare the drone for storage.
Check:
- dirt
- grass
- moisture
- loose screws
- damaged props
- battery voltage
- battery storage level
- broken straps
- damaged wires
This habit makes the next flying session much easier.
You do not want to arrive at the field and discover a problem that could have been fixed at home.
Propeller Maintenance
Propellers are the most frequently damaged parts on an FPV drone.
They are cheap, lightweight, and exposed.
Inspect props often.
Look for:
- cracks
- chips
- bent blades
- white stress marks
- damaged hubs
- grass cuts
- severe imbalance
A damaged propeller can cause vibration.
Vibration can cause:
- poor flight performance
- hot motors
- bad gyro data
- loose screws
- poor video quality
- unstable control
If a prop is damaged, replace it.
Do not try to save a few cents by flying bad props.
When to Replace Propellers
Replace propellers when:
- a blade is cracked
- a blade is bent and does not return properly
- the hub is damaged
- the prop causes vibration
- the drone sounds rough after a prop strike
- the propeller was involved in a hard crash
Some minor grass marks may be acceptable.
But if you are unsure, replace the prop.
Props are cheaper than motors, ESCs, and flight controllers.
Motor Maintenance
Motors work hard.
They spin at high RPM, handle rapid throttle changes, and are exposed to dirt, grass, impacts, and vibration.
After flights, check motors for:
- heat
- rough bearings
- bent shafts
- loose screws
- dirt inside the bell
- grass around the shaft
- bell dents
- damaged wires
Spin each motor by hand.
All four should feel similar.
If one motor feels rough, gritty, or tight, investigate before flying again.
Cleaning Motors
If grass or dirt enters a motor, remove it carefully.
You can use:
- a soft brush
- compressed air carefully
- tweezers for grass
- gentle manual spinning
Do not force debris deeper into the motor.
Do not use excessive liquid.
If a motor is full of mud or sand, it may need more careful cleaning or replacement.
A dirty motor can overheat or fail.
Motor Screws
Motor screws should be tight but not dangerously long.
Check that:
- all screws are present
- screws are tight
- motor does not move
- screws are not touching motor windings
A screw that is too long can damage motor windings.
A loose screw can cause vibration and motor movement.
Both are bad.
If a motor was removed or replaced, always recheck screw length.
Frame Maintenance
The frame protects and supports the entire drone.
A 5-inch freestyle frame is designed to survive abuse, but it is not indestructible.
Inspect the frame for:
- cracked arms
- delaminated carbon
- loose arm screws
- bent plates
- damaged camera plates
- worn battery pad
- loose standoffs
- sharp carbon edges rubbing wires
After hard crashes, flex each arm gently and look for movement or cracks.
A cracked arm may still look mostly normal until it is stressed.
Do not fly with a damaged arm.
Frame Screws and Threadlocker
Frame screws can loosen from vibration.
Check them regularly.
If a screw repeatedly loosens, threadlocker may help.
But use it carefully.
Important rule:
threadlocker should only be used on metal-to-metal screws
Do not let threadlocker touch:
- plastic
- nylon
- electronics
- wires
- flight controller boards
- camera mounts made of soft material
Threadlocker can damage some plastics.
Use a small amount only where appropriate.
Stack Maintenance
The ESC and flight controller stack is the electronic core of the drone.
Inspect the stack regularly.
Check:
- stack screws
- soft mounts
- ESC clearance
- flight controller clearance
- ESC-to-FC harness
- solder joints
- wire routing
- signs of heat
- signs of burnt smell
- dirt or grass inside the stack
The flight controller should not be pressed tightly against other components.
The gyro area should be protected from vibration and pressure.
A clean, secure stack improves reliability.
Wire Maintenance
Wires move during crashes and vibration.
Inspect:
- motor wires
- battery lead
- receiver wires
- camera wires
- VTX wires
- capacitor leads
- ESC-to-FC harness
- antenna coax cables
Look for:
- damaged insulation
- exposed copper
- pinched wires
- wires rubbing on carbon
- wires near propellers
- loose solder joints
Carbon fiber is conductive.
A wire rubbing against carbon can eventually create an electrical problem.
Secure wires before they become dangerous.
XT60 Lead Maintenance
The XT60 battery lead deserves special attention.
Check:
- connector tightness
- solder joints
- insulation
- cable flexibility
- strain relief
- routing away from propellers
A loose or damaged battery lead can cause power loss or short circuits.
Make sure the XT60 cannot swing into propellers.
Secure it with good routing and proper battery placement.
Capacitor Maintenance
The capacitor helps reduce electrical noise and voltage spikes.
Inspect it regularly.
Check:
- capacitor is still attached
- solder joints are solid
- polarity is correct
- legs are insulated
- capacitor body is not damaged
- capacitor is secured to the frame or battery lead
A loose capacitor can break off during a crash.
A damaged capacitor should be replaced.
FPV Camera Maintenance
The FPV camera is your eyes.
Keep it clean and secure.
Check:
- lens is clean
- lens is not cracked
- camera angle has not shifted
- camera screws are tight
- camera wires are not damaged
- camera plates are not bent
- image is clear in the goggles
A dirty lens can make flying harder.
A loose camera can change angle mid-flight and disorient the pilot.
VTX Maintenance
The VTX sends video to your goggles.
Check:
- antenna is always installed before powering
- VTX is mounted securely
- VTX wires are not loose
- antenna connector is tight
- VTX does not overheat on the bench
- video signal is stable
- SmartAudio or VTX control still works if configured
Do not leave the VTX powered for long periods without airflow.
Many VTX units get hot when sitting still.
Antenna Maintenance
Antennas are often damaged in crashes.
Inspect:
- FPV antenna
- receiver antenna
- antenna mounts
- antenna coax
- antenna connector
- antenna orientation
A damaged antenna can reduce:
- video range
- control range
- signal reliability
- link quality
Do not fly far if an antenna is damaged or questionable.
For beginners, a good rule is:
if the antenna looks damaged and signal quality seems worse, replace it
Receiver Maintenance
The receiver is small but critical.
Check:
- receiver is still mounted
- wires are secure
- antenna is not damaged
- antenna is not blocked by carbon
- receiver LED behaves normally
- radio link is stable
- OSD link quality looks normal
If you see frequent RX warnings, investigate before flying again.
Do not assume radio link problems will fix themselves.
Battery Maintenance
LiPo battery care is essential.
Check batteries before and after flying.
Inspect:
- swelling
- punctures
- damaged wrap
- damaged balance lead
- damaged XT60 connector
- cell voltage balance
- unusual heat
- physical impact marks
Do not fly damaged LiPo batteries.
Do not charge damaged LiPo batteries.
Do not store fully charged batteries for long periods.
Use storage voltage when batteries will not be used soon.
Battery Storage
LiPo batteries should normally be stored at storage voltage.
A common storage voltage is around:
3.8V per cell
Do not store batteries fully charged for long periods.
Do not store batteries fully discharged.
Proper storage helps improve battery life and safety.
Use a quality charger with storage mode.
Battery Straps and Pads
Battery straps wear out.
Battery pads lose grip.
Check:
- strap stitching
- strap tension
- strap position
- battery pad grip
- battery movement after flight
- strap damage after crashes
A loose battery can shift in flight or eject during a crash.
Replace worn straps early.
They are cheap and important.
Cleaning the Drone
After flying, clean the drone if needed.
Remove:
- grass
- dirt
- dust
- sand
- small debris
- moisture
Use:
- soft brush
- dry cloth
- gentle compressed air
- tweezers for grass
Avoid spraying liquid on electronics.
If the drone gets wet, disconnect the battery immediately and dry it thoroughly before powering it again.
Moisture and electronics are a bad combination.
Software Maintenance
Maintenance is not only physical.
Software also matters.
Occasionally check:
- Betaflight settings backup
- receiver firmware notes
- radio model settings
- OSD layout
- VTX table/settings
- failsafe behavior
- Arm switch behavior
Before changing software, save a backup.
Do not update firmware randomly before a flying session unless you have time to test everything afterward.
A firmware update can change settings or require reconfiguration.
Backups
After the drone is configured and flying well, save a configuration backup.
This can include:
- Betaflight diff
- Betaflight dump
- screenshots of important tabs
- radio model backup
- ExpressLRS binding phrase record
- VTX table notes
Backups are very useful if:
- settings are lost
- firmware is updated
- the flight controller is replaced
- troubleshooting is needed
Good backups save time.
Spare Parts to Keep
For a beginner 5-inch FPV drone, it is smart to keep basic spare parts.
Recommended spares:
- propellers
- motor screws
- frame screws
- battery straps
- zip ties
- heat shrink
- electrical tape
- spare antenna
- spare motor
- spare arms if your frame supports replaceable arms
- extra XT60 pigtail
- spare receiver antenna if available
You do not need to buy everything at once.
But props, screws, straps, and zip ties are essential.
Maintenance After a Crash
After a crash, follow a more serious checklist.
Do not simply flip the drone over and fly again.
Check:
- battery damage
- propeller damage
- motor movement
- motor bell dents
- frame cracks
- bent arms
- broken antennas
- camera angle shift
- loose stack
- damaged wires
- unusual smell
- OSD warnings
If the crash was hard, bring the drone back and inspect carefully.
A second flight after an unchecked crash can be worse than the crash itself.
Signs You Should Stop Flying
Stop flying if you notice:
- hot motors
- burnt smell
- damaged battery
- swollen LiPo
- cracked frame
- loose motor
- damaged prop
- exposed wires
- poor video signal
- radio link warnings
- strange vibration
- motor grinding
- unstable flight behavior
Do not push through obvious problems.
Landing early is better than repairing more parts later.
Maintenance Log
A simple maintenance log helps a lot.
Write down:
- flight sessions
- crashes
- battery issues
- replaced props
- motor temperature problems
- loose screws
- firmware changes
- repairs
- upgrades
- repeated issues
Over time, this log helps you understand your drone.
You may notice patterns like:
- one motor gets hot
- one arm screw loosens
- one battery sags early
- one antenna position gives poor video
- one prop type vibrates less
This is how maintenance becomes learning.
Beginner Maintenance Checklist
Use this checklist regularly.
Before Flying
- props inspected
- motors spin freely
- motor screws tight
- frame screws checked
- battery strap good
- battery safe
- antennas secure
- camera clean
- wires clear from props
- XT60 lead safe
- OSD warnings checked
After Flying
- battery disconnected
- motor temperature checked
- props inspected
- frame inspected
- battery voltage checked
- wires inspected
- antennas inspected
- dirt removed
- battery stored properly
After a Crash
- disarm
- disconnect battery
- inspect battery first
- inspect props
- inspect motors
- inspect frame
- inspect wires
- inspect stack
- inspect antennas
- test carefully before flying again
What Beginners Should Not Do
Do not:
- fly damaged props
- ignore hot motors
- reuse swollen batteries
- fly with loose screws
- power VTX without antenna
- keep flying after radio warnings
- leave batteries fully charged for days
- update firmware without backups
- use threadlocker near electronics
- assume a crash caused no damage
These habits prevent many common FPV problems.
What We Have Completed
At this stage, we have learned how to keep the drone reliable after the first flights.
We covered:
- propeller maintenance
- motor maintenance
- frame inspection
- screw checks
- wiring inspection
- stack maintenance
- FPV camera and VTX care
- antenna inspection
- receiver checks
- LiPo battery care
- cleaning
- software backups
- spare parts
- crash inspection
- maintenance logs
This is the beginning of long-term FPV ownership.
The drone is no longer just a first build.
It is now a machine you can maintain, repair, and improve.
Our Build Philosophy Moving Forward
The philosophy remains the same:
reliability comes from habits
A reliable FPV drone is not only about expensive components.
It is about:
- clean assembly
- regular inspection
- careful battery care
- replacing damaged parts early
- keeping screws tight
- checking antennas
- respecting warning signs
Good maintenance keeps your drone flying longer.
It also makes you a better builder and pilot.
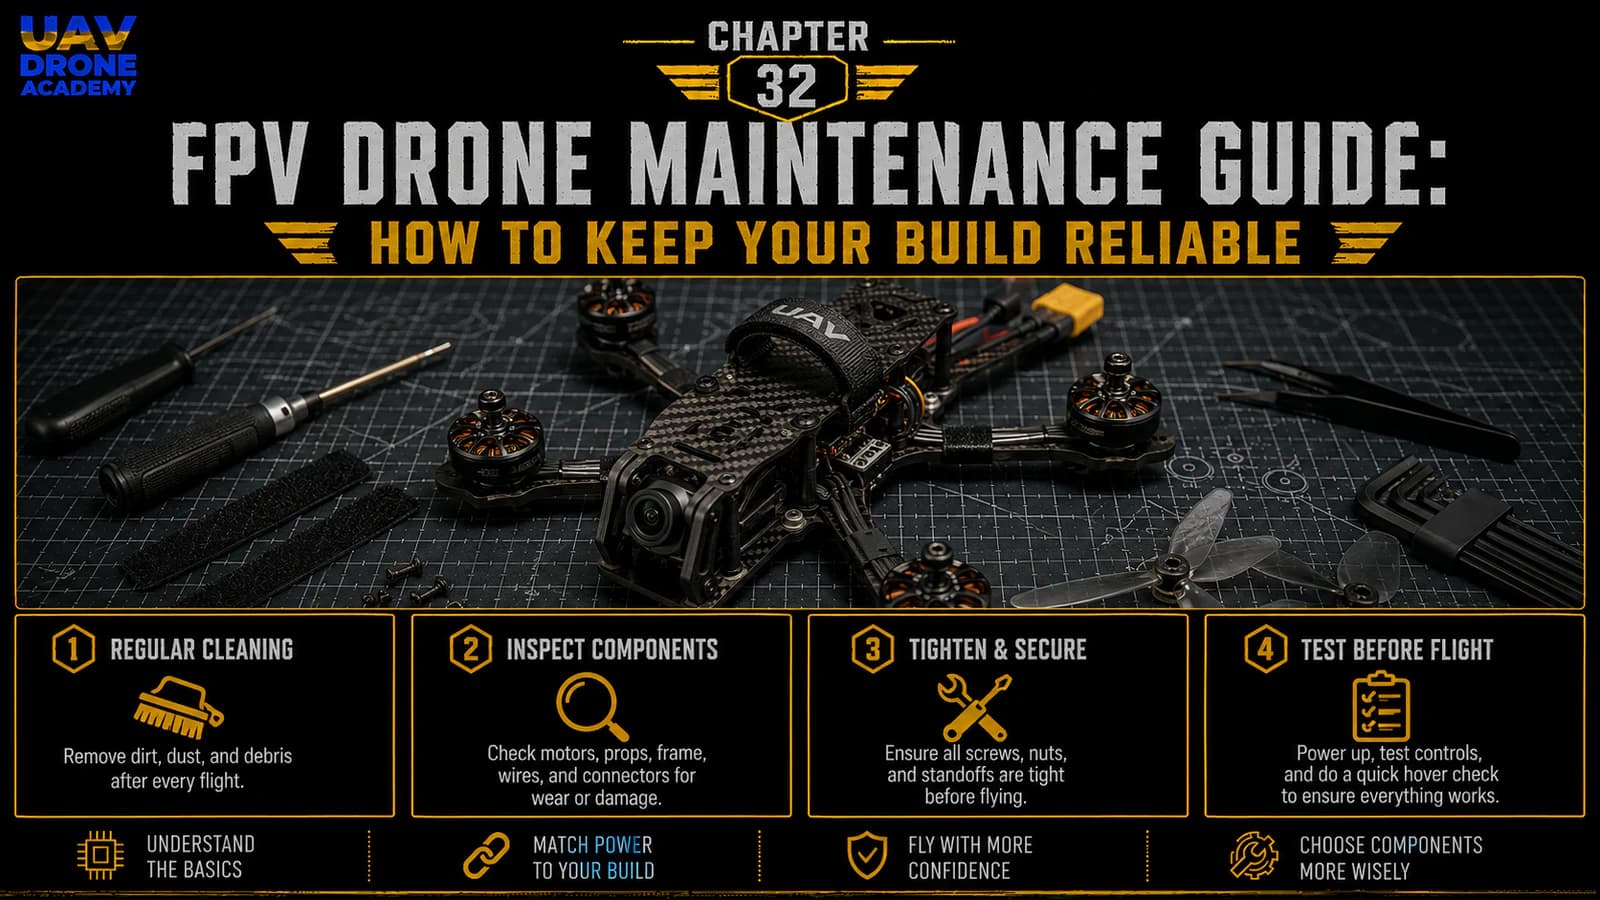
Conclusion
FPV drone maintenance is not complicated, but it must be consistent.
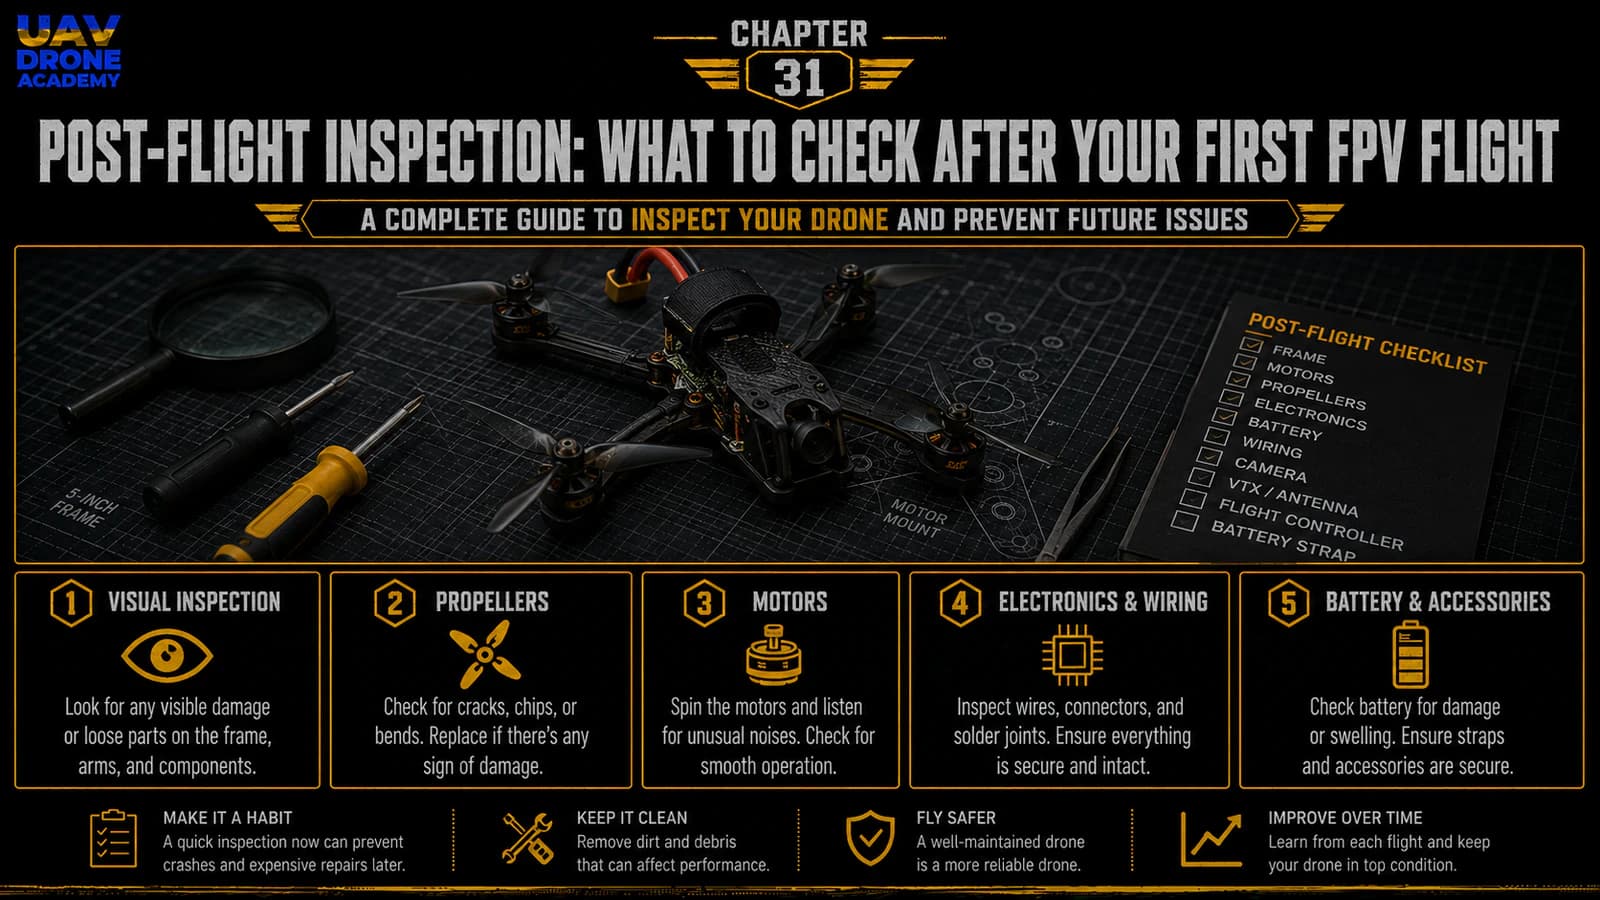
After your first flights, you should regularly inspect:
- propellers
- motors
- frame
- screws
- wiring
- battery
- FPV system
- receiver
- antennas
- software configuration
Small problems should be fixed early.
Damaged props should be replaced.
Hot motors should be investigated.
Batteries should be treated carefully.
Antennas should be checked before every flight.
Maintenance is what keeps your beginner 5-inch FPV drone reliable over time.
Now that we know how to maintain the build, the next chapter will cover what usually breaks first in FPV crashes and how beginners should approach common repairs.
Next Chapter
Common FPV Crashes and Repairs: What Usually Breaks First