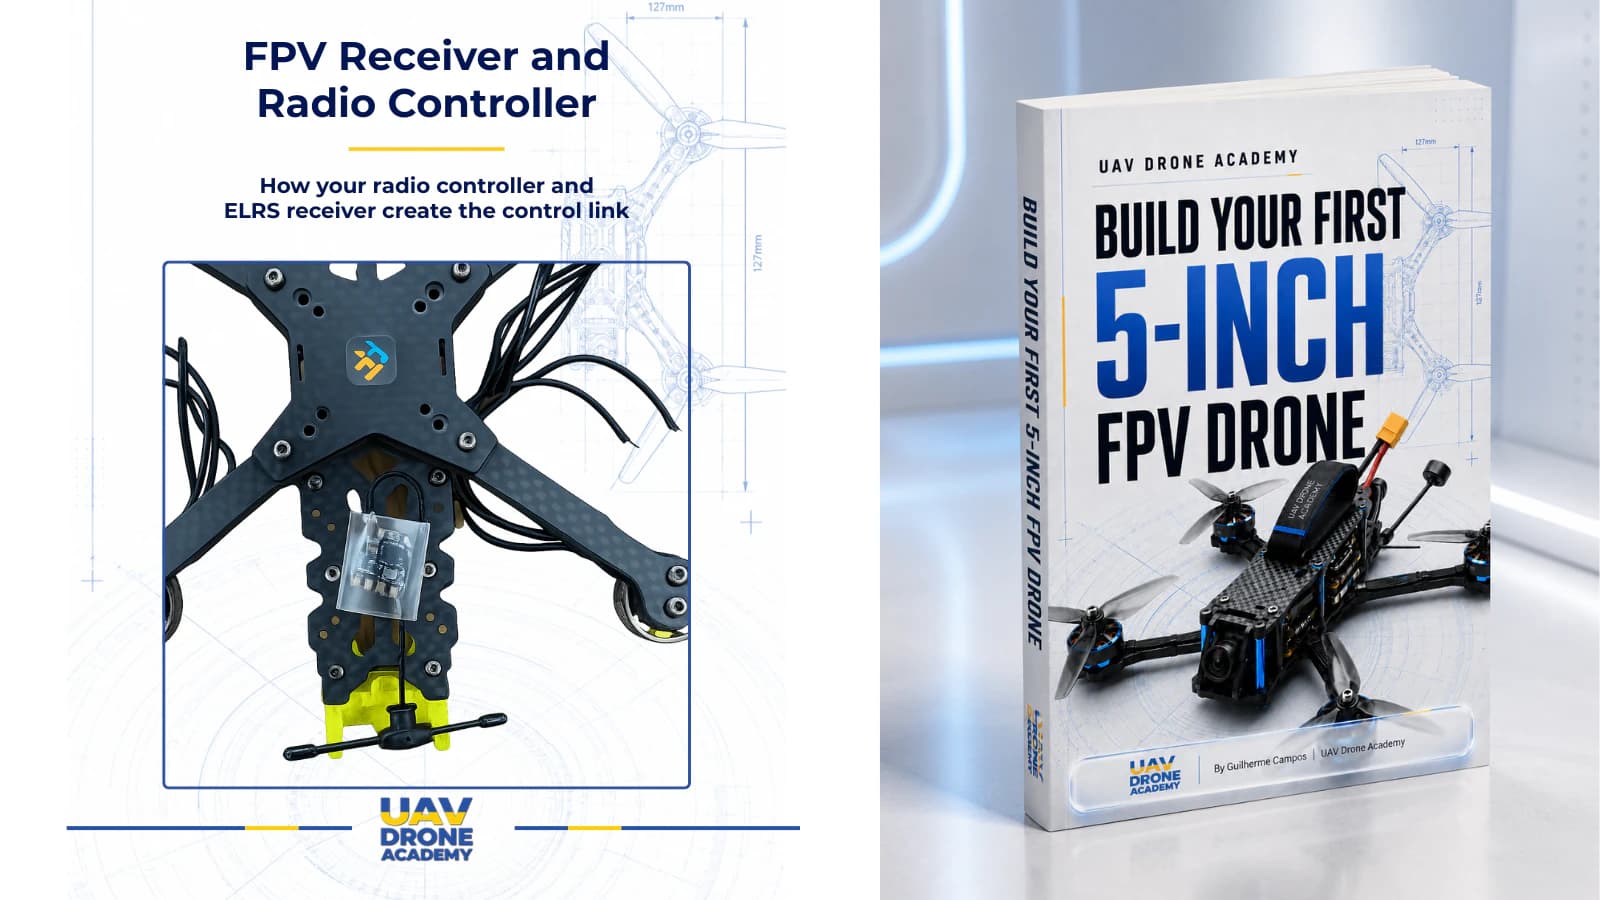
Now that motor order, motor direction, and propeller logic are understood, we can move to another important part of FPV setup:
OSD
OSD means:
On-Screen Display
This is the information shown directly inside your FPV goggles while flying.
The OSD can show important data such as:
- battery voltage
- flight time
- flight mode
- warnings
- link quality
- RSSI dBm
- throttle position
- craft name
- armed status
For beginners, OSD setup is extremely useful because it helps you understand what is happening during flight.
Without OSD, you are flying with less information.
With a clean OSD, you can monitor the drone’s most important status without looking away from the goggles.
In this chapter, we will configure a beginner-friendly FPV OSD layout in Betaflight and understand what information is actually useful.
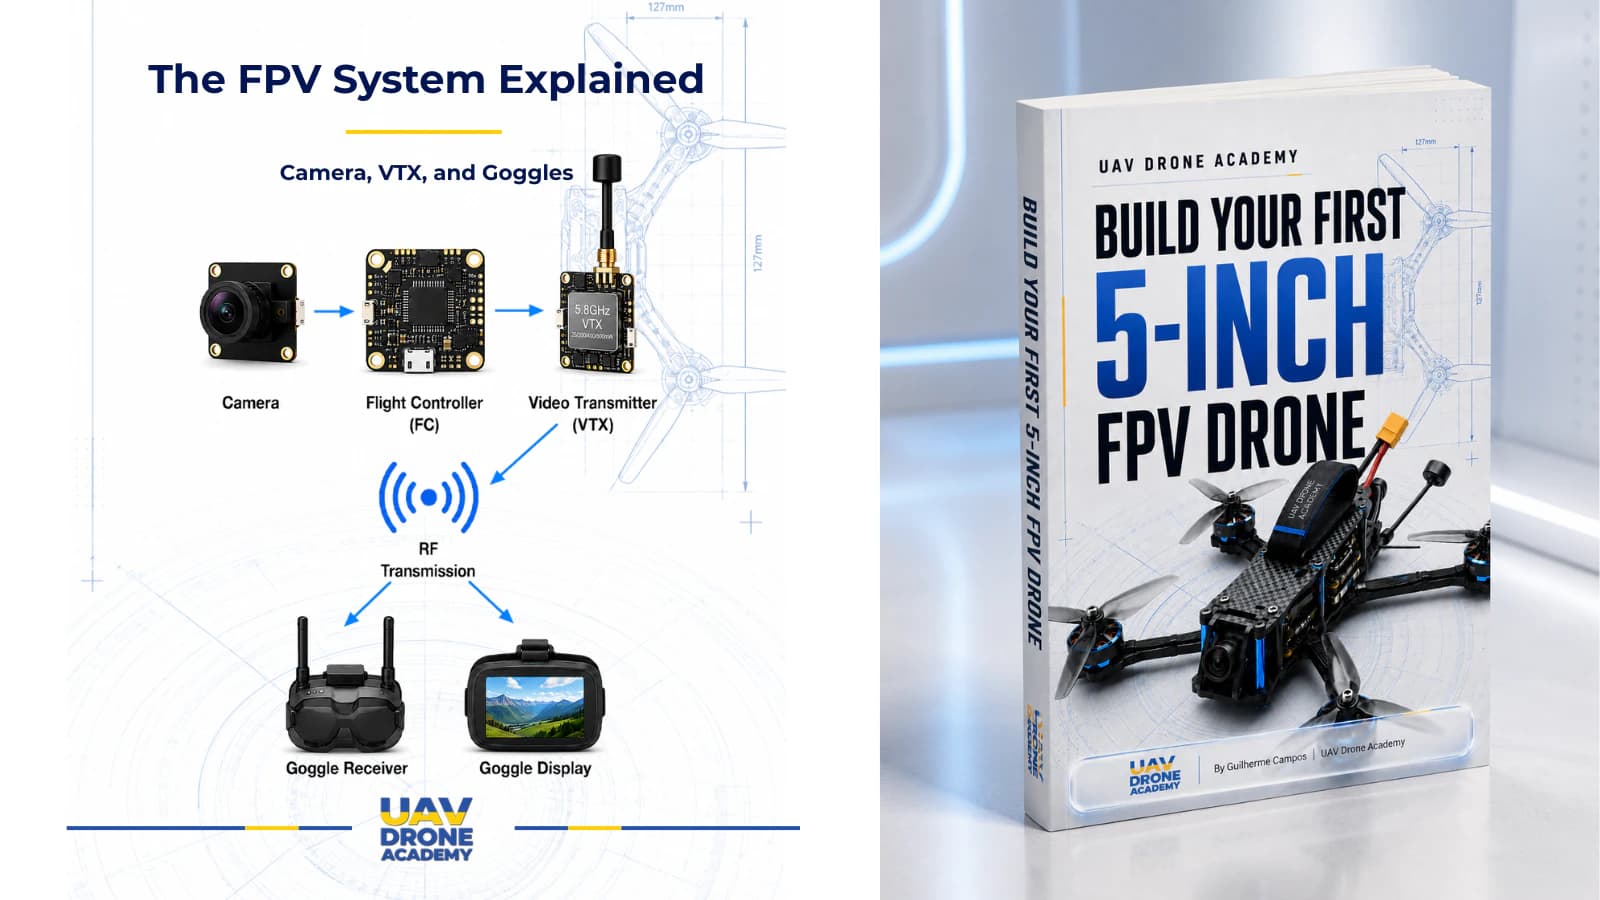
What Is FPV OSD?
FPV OSD is a layer of flight information displayed over the live video feed.
In an analog FPV build, the video path usually works like this:
FPV camera → flight controller → VTX → goggles
The camera sends video to the flight controller.
The flight controller adds OSD information.
Then the video signal goes to the VTX and finally to the goggles.
This allows the pilot to see both:
- the live camera image
- important flight data
at the same time.
Why OSD Matters for Beginners
When learning FPV, the pilot needs situational awareness.
A beginner should know:
- how much battery is left
- whether the drone is armed
- what flight mode is active
- whether warnings are present
- whether the radio link is healthy
- how long the flight has lasted
This information helps prevent mistakes.
For example, if battery voltage drops too low and you do not notice it, you may over-discharge the LiPo battery.
If failsafe or receiver warnings appear, you can land before the situation becomes worse.
OSD is not just decoration.
It is a safety and awareness tool.
Before You Start
Before configuring OSD, confirm:
- Betaflight connects correctly
- receiver setup is complete
- Arm switch works
- failsafe has been reviewed
- motor order and direction have been checked
- VTX antenna is installed
- propellers are removed
- goggles or monitor are available for testing video
The propellers should still remain off.
OSD setup does not require propellers.
Open the OSD Tab
Connect the drone to Betaflight.
Then open:
OSD Tab
This tab allows you to choose which OSD elements appear in the goggles and where they appear on the screen.
You will usually see:
- a preview screen
- selectable OSD elements
- layout options
- warning settings
- video format options
The exact interface may vary depending on Betaflight version, but the logic is the same.
You select what you want to see, place it on the screen, save, and test.
Choose the Correct Video Format
Before arranging OSD elements, check the video format.
Common analog video formats include:
- PAL
- NTSC
- Auto
If the format is wrong, OSD elements may appear cut off, shifted, or missing from the visible screen area.
For beginners, using:
Auto
is often a reasonable starting point if available.
If your goggles or camera clearly use PAL or NTSC, select the correct format.
After changing the video format, check the goggles to confirm the OSD appears correctly.
Keep the OSD Simple
A common beginner mistake is adding too much information.
A crowded OSD can become distracting.
When the goggles are full of numbers, warnings, timers, icons, and labels, it becomes harder to focus on flying.
For a beginner-friendly setup, the goal is:
only show the information that helps you fly safely and understand the drone.
You can always add more later.
Start clean.
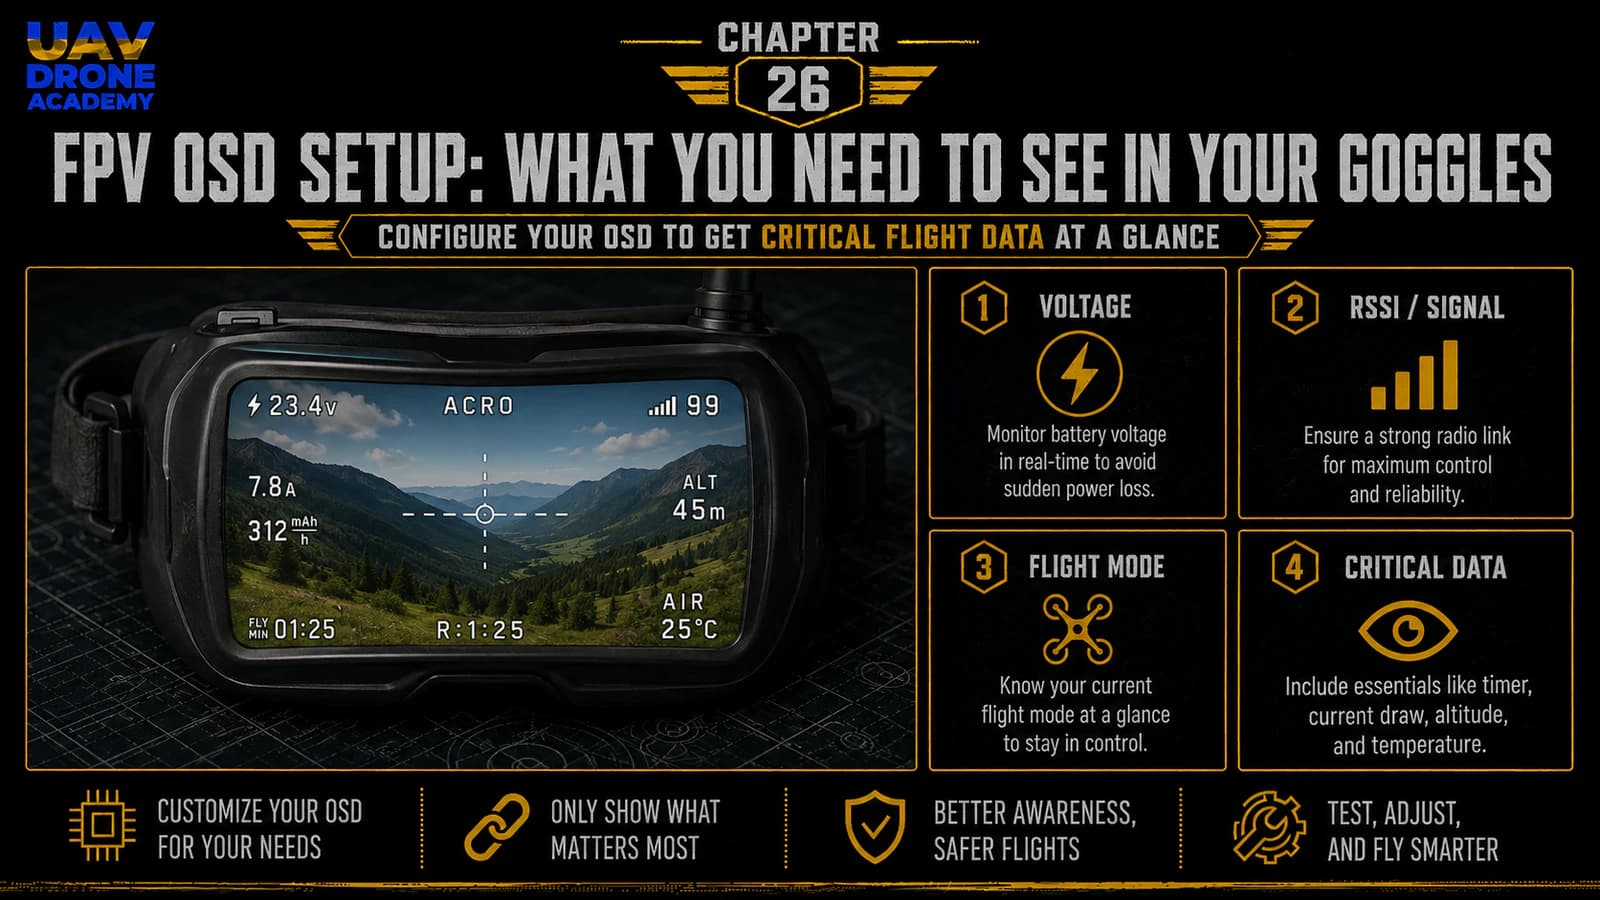
Essential OSD Elements for Beginners
For our beginner build, the most useful OSD elements are:
- main battery voltage
- flight timer
- flight mode
- warnings
- link quality
- RSSI dBm
- craft name, optional
- throttle position, optional
These give enough information without overwhelming the screen.
Main Battery Voltage
The most important OSD element is:
main battery voltage
This tells you the current voltage of the LiPo battery.
For a 6S battery, you need to monitor voltage carefully during flight.
A fully charged 6S LiPo is around:
25.2V
During flight, voltage drops under load.
This is normal.
But you do not want to fly the battery too low.
Battery voltage helps you know when it is time to land.
Why Battery Voltage Matters
Over-discharging a LiPo battery can damage it.
If you fly too long, the battery may suffer:
- reduced lifespan
- lower performance
- increased internal resistance
- unsafe behavior
- weaker future flights
For beginners, watching voltage is one of the most important habits.
At first, do not try to squeeze every second out of the battery.
Land early and safely.
Average Cell Voltage
Some pilots prefer to monitor:
average cell voltage
Instead of showing total pack voltage, average cell voltage shows the approximate voltage per cell.
For example, on a 6S battery:
- 25.2V total means about 4.2V per cell
- 22.2V total means about 3.7V per cell
Average cell voltage is useful because it works across different battery cell counts.
If available, beginners can use average cell voltage instead of, or in addition to, total battery voltage.
Flight Timer
A flight timer helps you understand how long you have been flying.
This is useful because beginners often lose track of time while flying FPV.
There are different timer types, but a simple flight timer is enough at the beginning.
Use it to build awareness.
For example, after several flights, you may learn that your battery usually gives you around a certain number of safe minutes depending on your flying style.
Flight Mode
The flight mode OSD element shows whether the drone is in:
- Acro Mode
- Angle Mode
- Horizon Mode
- other configured modes
This is useful for beginners because it confirms which mode is active before takeoff.
If you expect Angle Mode but the OSD shows Acro, you know something is different before flying.
This helps avoid confusion during early tests.
Warnings
Warnings are extremely important.
Betaflight can show warnings for different conditions, such as:
- low battery
- failsafe
- arming disabled
- RX loss
- throttle warning
- runaway protection
- other system alerts
A warning in the goggles tells you that something needs attention.
For beginners, warnings should be enabled.
Do not hide warnings just to make the screen cleaner.
A clean OSD is good.
But safety information matters more.
Link Quality
For ExpressLRS systems, one of the most useful OSD elements is:
Link Quality
Link Quality helps show the health of the radio control link.
This is especially useful because the control link is what connects the pilot to the drone.
If link quality becomes poor, the pilot should avoid pushing farther and should consider landing or returning closer.
For beginners, link quality builds awareness of radio signal health.
RSSI dBm
Another useful radio link value is:
RSSI dBm
This represents signal strength in decibel-milliwatts.
Beginners do not need to master every technical detail immediately.
But RSSI dBm can help show whether the radio signal is becoming weaker.
Together, Link Quality and RSSI dBm provide a useful picture of receiver link health.
Craft Name
Craft Name is optional.
It can show the name of the drone in the OSD.
This is not required for flight safety, but it can be useful if you have multiple drones later.
For the first beginner build, it is optional.
If you want a clean layout, you can leave it out.
Throttle Position
Throttle position can show how much throttle input is being used.
This can help beginners understand their flying style.
For example, if the drone constantly needs high throttle to hover, that may suggest:
- heavy build
- wrong propellers
- battery issue
- motor or power setup mismatch
However, throttle position is not essential for the first OSD layout.
It can be added later if desired.
Elements Beginners Can Skip at First
Beginners do not need to show every possible OSD element.
At first, you can skip:
- GPS coordinates, if no GPS is installed
- altitude, if no proper sensor is configured
- artificial horizon, unless useful for your training
- power draw, if current sensor is not calibrated
- advanced debug data
- PID data
- blackbox debug information
The goal is not to create a cockpit full of data.
The goal is to display useful flight information.
Recommended Beginner OSD Layout
A clean beginner OSD may include:
- battery voltage or average cell voltage
- flight timer
- flight mode
- warnings
- Link Quality
- RSSI dBm
- craft name, optional
This is enough for early testing and safe learning.
Where to Place OSD Elements
Good OSD layout matters.
Avoid placing too much information in the center of the screen.
The center should remain clear because that is where you fly.
A practical layout is:
Top area
- flight mode
- craft name, optional
Bottom area
- battery voltage
- flight timer
- warnings
Side area
- Link Quality
- RSSI dBm
This keeps the center of the image clean while still showing important data.
Keep the Center Clear
The middle of the screen is where you judge:
- direction
- obstacles
- horizon
- gates
- landing area
- movement
If the center is cluttered, flying becomes harder.
Place OSD elements near the edges.
Beginners especially benefit from a clean center view.
Configure Warnings
In the OSD tab, check the warning options.
Make sure important warnings are enabled.
Useful beginner warnings may include:
- battery warning
- failsafe warning
- arming disabled warnings
- link-related warnings
- system warnings
Do not disable warnings simply because they look annoying.
Warnings exist to help you catch problems early.
Save the OSD Layout
After arranging the OSD elements, click:
Save
Then confirm the layout is still there after saving.
Do not assume changes are saved automatically.
Betaflight usually requires saving after configuration changes.
Test OSD in the Goggles
Now test the OSD through your FPV goggles or monitor.
Before powering the drone by LiPo, confirm:
- propellers removed
- VTX antenna installed
- battery polarity correct
- drone on a safe surface
- VTX has airflow if powered for more than a short time
Power the drone and check the goggles.
You should see the live camera image with OSD elements overlaid.
What If You See Video but No OSD?
If you see camera video but no OSD, possible causes include:
- camera wired directly to VTX instead of through flight controller
- wrong video in or video out wiring
- OSD not enabled
- wrong video format
- OSD elements placed outside visible area
- flight controller OSD chip issue
- digital system configuration mismatch, if using digital
For an analog build, make sure the video path is:
camera → flight controller → VTX
If the camera goes directly to the VTX, Betaflight cannot overlay OSD.
What If You See OSD but No Camera Image?
If you see OSD characters but no camera image, possible causes include:
- camera not powered
- camera video wire disconnected
- camera connected to wrong pad
- camera ground missing
- camera damaged
- wrong camera voltage
- camera lens cap or blocked image
This means the flight controller may be generating OSD, but camera video is not reaching it correctly.
Check camera wiring carefully.
What If the Image Is Rolling or Distorted?
A rolling or distorted image may be caused by:
- PAL/NTSC mismatch
- weak video signal
- poor ground
- wrong camera format
- VTX channel mismatch
- antenna issue
- power noise
Start with simple checks:
- correct video format
- camera powered correctly
- VTX antenna installed
- goggles on correct channel
- video ground connected properly
Do not change many things at once.
Battery Voltage Calibration
If the voltage shown in OSD seems wrong, the voltage sensor may need calibration.
Compare Betaflight voltage reading with a trusted battery checker or multimeter.
Small differences are normal.
Large differences should be corrected before relying on OSD voltage.
For beginners, do not ignore incorrect voltage readings.
Battery voltage is one of the most important OSD values.
Current Sensor and mAh Used
Some flight controllers and ESCs can show current draw and mAh used.
This can be useful later.
However, current sensors often need calibration.
If not calibrated, mAh used may be inaccurate.
For beginners, voltage is usually the most reliable first battery indicator.
You can refine current sensor settings later.
OSD for Analog vs Digital Systems
This beginner build focuses on analog FPV.
In analog FPV, Betaflight OSD is usually added directly through the flight controller’s OSD chip.
Digital FPV systems may handle OSD differently depending on the system.
Some digital systems integrate Betaflight OSD through specific settings or MSP DisplayPort.
For this series, we keep the setup focused on analog FPV because it is simple, affordable, and beginner-friendly.
Do Not Configure Too Much Yet
At this stage, avoid overcomplicating the OSD.
You do not need:
- every telemetry value
- full GPS layout
- advanced debug elements
- complex profiles
- unnecessary icons everywhere
Start with the essentials.
After you fly more, you will understand what extra information you personally want.
Beginner OSD Checklist
Before moving forward, confirm:
- propellers removed
- VTX antenna installed
- OSD tab opens in Betaflight
- correct video format selected
- battery voltage or average cell voltage enabled
- flight timer enabled
- flight mode enabled
- warnings enabled
- Link Quality enabled if available
- RSSI dBm enabled if available
- center of screen remains clear
- OSD layout saved
- goggles show video
- goggles show OSD
- voltage reading looks reasonable
If all of this is correct, the OSD setup is ready for early flight testing later.
Common Beginner Mistakes
Adding Too Many OSD Elements
Too much information can distract from flying.
Start simple.
Hiding Important Warnings
Warnings are useful.
Do not remove them just to make the screen look cleaner.
Ignoring Incorrect Voltage
If voltage is wrong, battery decisions become unsafe.
Verify voltage readings.
Blocking the Center of the Screen
Keep the center clear for flying.
Place data near the edges.
Powering the VTX Without Antenna
Never power a VTX without an antenna.
This rule still applies.
Leaving the VTX Powered Too Long on the Bench
VTX units can get hot without airflow.
Use short tests or a small fan.
Forgetting to Save
Always save OSD changes before disconnecting.
What We Have Completed
At this stage, we have:
- opened the Betaflight OSD tab
- understood what OSD does
- selected useful beginner OSD elements
- arranged a clean screen layout
- enabled important warnings
- tested OSD in the goggles
- reviewed common video and OSD problems
- prepared the drone for final pre-flight configuration steps
The drone is now much closer to being ready for controlled flight testing.
Our Build Philosophy Moving Forward
The same principle continues:
use information to make safer decisions
OSD is not about decoration.
It is about awareness.
A good OSD helps the pilot understand:
- battery status
- flight mode
- radio link health
- warnings
- time in the air
This makes beginner flying safer and more controlled.
Conclusion
FPV OSD is one of the most useful tools for beginner pilots.
It gives important flight information directly inside the goggles, without distracting from the live camera view.
In this chapter, we configured a beginner-friendly OSD layout focused on:
- battery voltage
- flight timer
- flight mode
- warnings
- Link Quality
- RSSI dBm
- clean screen organization
For beginners, the most important rule is:
show what helps you fly safely, and avoid clutter.
Now that the OSD is configured, the next step is preparing the drone for final safety checks before the first controlled hover test.
In the next chapter, we will review the complete pre-flight checklist and prepare the drone for its first safe test flight.
Next Chapter
Final Pre-Flight Checklist Before Your First FPV Drone Hover Test