We have now reached one of the most exciting moments in the entire build process.
The drone is assembled.
The electronics are installed.
The receiver is configured.
The motors have been checked.
The OSD is working.
The basic PID and filter concepts are understood.
Now we are getting close to the first real flight.
But before taking the drone outside and trying to fly, we need to stop and perform a complete pre-flight checklist.
This step is extremely important.
A first flight should never be rushed.
Many beginner crashes happen not because the pilot cannot fly, but because something simple was missed before takeoff:
- a loose screw
- wrong propeller direction
- weak battery strap
- incorrect flight mode
- bad failsafe setup
- damaged propeller
- missing VTX antenna
- wrong motor direction
- low battery voltage
The purpose of this chapter is simple:
verify that the drone is mechanically, electrically, and operationally ready for its first controlled flight.
This checklist will help us reduce avoidable mistakes and make the first flight safer, calmer, and more successful.
Why a Pre-Flight Checklist Matters
FPV drones are powerful machines.
A 5-inch FPV drone can accelerate quickly, spin propellers at very high speed, and react instantly to control inputs.
That is why preparation matters.
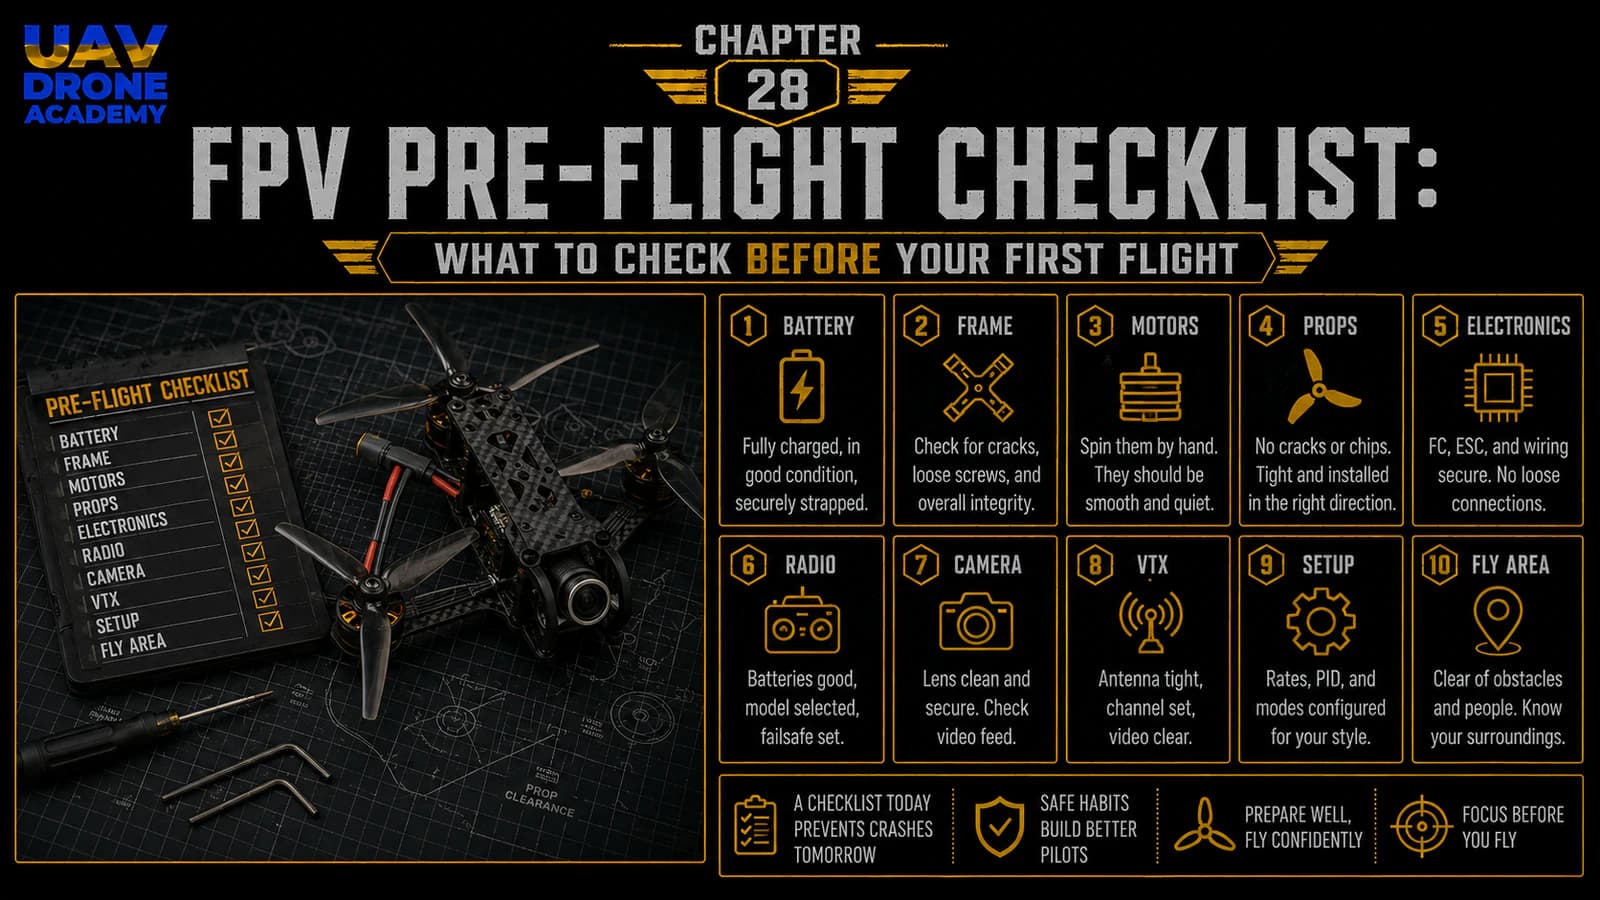
A pre-flight checklist helps confirm:
- the drone is structurally safe
- the electronics are working
- the radio link is stable
- failsafe behavior is correct
- the battery is safe
- propellers are installed correctly
- the flight area is appropriate
Professional aviation uses checklists for a reason.
FPV pilots should also build that habit from the beginning.
The Goal of the First Flight
Before checking the drone, we need to define the goal of the first flight.
The first flight is not for:
- freestyle tricks
- high-speed flying
- long-range testing
- power loops
- cinematic footage
- aggressive maneuvers
The first flight is only for:
basic validation
We want to confirm that the drone can:
- arm safely
- lift off smoothly
- hover
- respond correctly to controls
- land safely
- show no major problems
That is enough.
The first flight should be short, calm, and controlled.
Important Safety Reminder
Before the final outdoor test:
do not install propellers until the correct moment
Propellers should only be installed after:
- final bench checks
- motor direction verification
- receiver setup verification
- failsafe confirmation
- flight area inspection
Once propellers are installed, treat the drone as dangerous.
Do not handle it casually.
Do not stand close to the propeller disc.
Do not arm near people.
Part 1 — Home Bench Checklist
Before going to the flight location, check the drone at home on the bench.
At this stage, propellers should still be removed.
1. Frame Check
Inspect the frame carefully.
Check:
- arms are tight
- top plate is secure
- bottom plate is secure
- standoffs are tight
- no carbon cracks are visible
- camera plates are secure
- battery strap path is clear
A loose frame can create vibrations and unstable flight behavior.
If anything moves, tighten it before continuing.
2. Motor Mounting Check
Check each motor.
Confirm:
- all motor screws are installed
- screws are not too long
- motors sit flat on the arms
- motor bells spin freely
- no grinding or scraping
- no wires touching motor bells
Spin each motor by hand.
They should all feel similar.
If one motor feels rough or stiff, inspect it before flying.
3. Motor Wire Check
Inspect all motor wires.
Check that:
- wires are secured along the arms
- no wire can touch a propeller
- insulation is not damaged
- solder joints are clean
- no loose strands are visible
Motor wires are exposed during crashes, so they must be routed cleanly.
4. Stack Check
Inspect the ESC and flight controller stack.
Confirm:
- stack screws are secure
- soft mounts are not crushed
- ESC is not touching carbon fiber
- flight controller is not touching ESC solder joints
- ESC-to-FC harness is connected
- USB port is accessible
- no wires are pressing against the gyro area
A clean stack helps reduce vibration and configuration problems.
5. Battery Lead Check
Inspect the XT60 battery lead.
Check:
- positive and negative wires are correct
- solder joints are solid
- connector is secure
- wire is not damaged
- lead cannot reach propellers
- lead has enough strain relief
The battery lead carries the full power of the drone.
It must be secure.
6. Capacitor Check
Inspect the capacitor.
Confirm:
- polarity is correct
- solder joints are clean
- capacitor is secured
- legs are insulated if needed
- it cannot hit propellers
- it does not block the top plate
A loose capacitor can break off during a crash or vibration.
7. Camera Check
Inspect the FPV camera.
Confirm:
- camera is mounted securely
- lens is clean
- angle is reasonable for first flight
- wires are not pinched
- camera screws are not overtightened
- image appears in goggles
For the first flight, avoid an extreme camera angle.
A moderate angle makes hovering and slow flight easier.
8. VTX and Antenna Check
Inspect the VTX and antenna.
Confirm:
- VTX is mounted securely
- wires are not under tension
- antenna is connected
- antenna connector is tight
- antenna is away from propeller paths
- antenna is not blocked by carbon fiber
- VTX is not overheating during bench tests
Never power the VTX without an antenna.
This can damage the VTX.
9. Receiver and Antenna Check
Inspect the ExpressLRS receiver.
Confirm:
- receiver is mounted securely
- wires are not under tension
- antenna is positioned clearly
- antenna is not buried in carbon fiber
- receiver powers correctly
- radio link works
A poor antenna position can reduce link quality.
10. Battery Check
Inspect the LiPo battery.
Do not fly with a damaged battery.
Check:
- no swelling
- no punctures
- no damaged wires
- no damaged balance lead
- XT60 connector is solid
- battery is fully charged
- cell voltages are balanced
A fully charged LiPo cell should be around 4.2V.
For a 6S battery, a fully charged pack is around 25.2V.
If the battery looks damaged, do not use it.
11. Betaflight Connection Check
Connect the drone to Betaflight with USB.
Confirm:
- flight controller connects
- 3D model moves correctly
- receiver inputs work
- Arm switch works
- modes work
- OSD is configured
- no strange warnings appear
- settings are saved
Do not change random settings at this stage.
Only verify.
12. Arming Disable Flags Check
Betaflight uses arming disable flags to prevent unsafe arming conditions.
This is a safety feature, not an enemy.
If the drone refuses to arm, Betaflight usually explains why.
For example, official Betaflight documentation lists flags such as RXLOSS or RX_FAILSAFE when no valid receiver signal is detected, BADRX or NOT_DISARMED after receiver failsafe recovery while the arm switch is still on, and RUNAWAY if runaway takeoff prevention has been triggered.
Do not disable safety features randomly.
Fix the real problem.
13. Failsafe Check
Failsafe should already have been checked in earlier configuration.
Before the first flight, confirm it again.
With propellers removed:
- Power the drone.
- Confirm receiver connection.
- Confirm stick movement.
- Turn off the radio or simulate signal loss safely.
- Confirm Betaflight detects receiver loss.
- Turn the radio back on.
- Confirm signal returns.
Betaflight’s current failsafe documentation emphasizes that failsafe behavior is important because the craft must react safely when receiver signal is lost or invalid.
For our beginner build, the safe basic strategy is still:
signal loss should not cause uncontrolled flight
14. Motor Order and Direction Check
Before installing propellers, check motor order and direction one more time.
Use Betaflight Motors tab.
Confirm:
- each slider spins the correct motor
- each motor spins in the correct direction
- motor direction matches your selected props in or props out configuration
- motors spin smoothly
- no motor gets hot quickly
Do this with propellers removed.
Betaflight’s setup guidance specifically instructs users to remove propellers before testing motors in the Motors tab.
Part 2 — Flight Location Checklist
Now we move from the bench to the outdoor flying environment.
For the first flight, location matters a lot.
Do not choose a difficult or risky place.
15. Choose a Safe Open Area
For the first flight, choose a location that is:
- open
- flat
- away from people
- away from roads
- away from animals
- away from buildings
- away from power lines
- away from trees
- legal to fly in
- easy to recover the drone from
Avoid:
- parking lots with cars
- crowded parks
- urban areas
- narrow spaces
- rooftops
- indoor areas
- forests
- water
- tall grass
The first flight should happen in a forgiving environment.
16. Check Local Rules
Before flying, make sure you are allowed to fly in that location.
Drone laws vary by country, region, and airspace.
Check local rules about:
- drone registration
- maximum altitude
- restricted airspace
- proximity to airports
- privacy rules
- FPV spotter requirements
- local safety regulations
This course teaches technical FPV building, but every pilot is responsible for flying legally and safely.
17. Check Weather
Weather matters, especially for beginners.
Avoid flying in:
- strong wind
- rain
- snow
- fog
- low visibility
- extreme cold
- extreme heat
For a first flight, calm weather is best.
Light wind is manageable, but strong gusts make learning harder.
18. Check Sun Position and Visibility
FPV cameras can struggle with direct sunlight or rapid light changes.
Before flying, check:
- sun direction
- glare
- shadows
- obstacles
- landing area visibility
Avoid pointing directly into the sun during first tests if possible.
19. Prepare a Takeoff and Landing Zone
Choose a clear takeoff area.
The ground should be:
- flat
- dry
- free from loose stones
- free from tall grass
- free from people
- away from obstacles
A small landing pad is useful but not required.
Avoid launching from dusty or sandy ground when possible.
Dust can enter motors.
Part 3 — Final Field Checklist
At the flight location, before installing propellers, repeat key checks.
This may feel repetitive.
That is the point.
Checklists prevent mistakes.
20. Radio Controller Check
Turn on the radio controller first.
Confirm:
- correct model selected
- battery level is good
- switches are in safe positions
- Arm switch is off
- throttle is low
- ExpressLRS link is ready
- antenna is positioned correctly
Always turn on the radio before powering the drone.
21. Goggles Check
Turn on the goggles or FPV monitor.
Confirm:
- battery level is good
- correct band and channel
- video receiver works
- antennas are installed
- screen is visible
- recording option is ready if used
Do not troubleshoot goggles after the drone is already armed.
Prepare everything first.
22. Drone Power-On Check
Place the drone in the takeoff area.
Confirm again:
- propellers still removed at this point
- VTX antenna installed
- battery strap ready
- no loose wires
- no visible damage
Connect the LiPo battery.
Watch and listen:
- normal ESC tones
- normal LEDs
- no smoke
- no burning smell
- no strange sounds
If anything seems wrong, disconnect immediately.
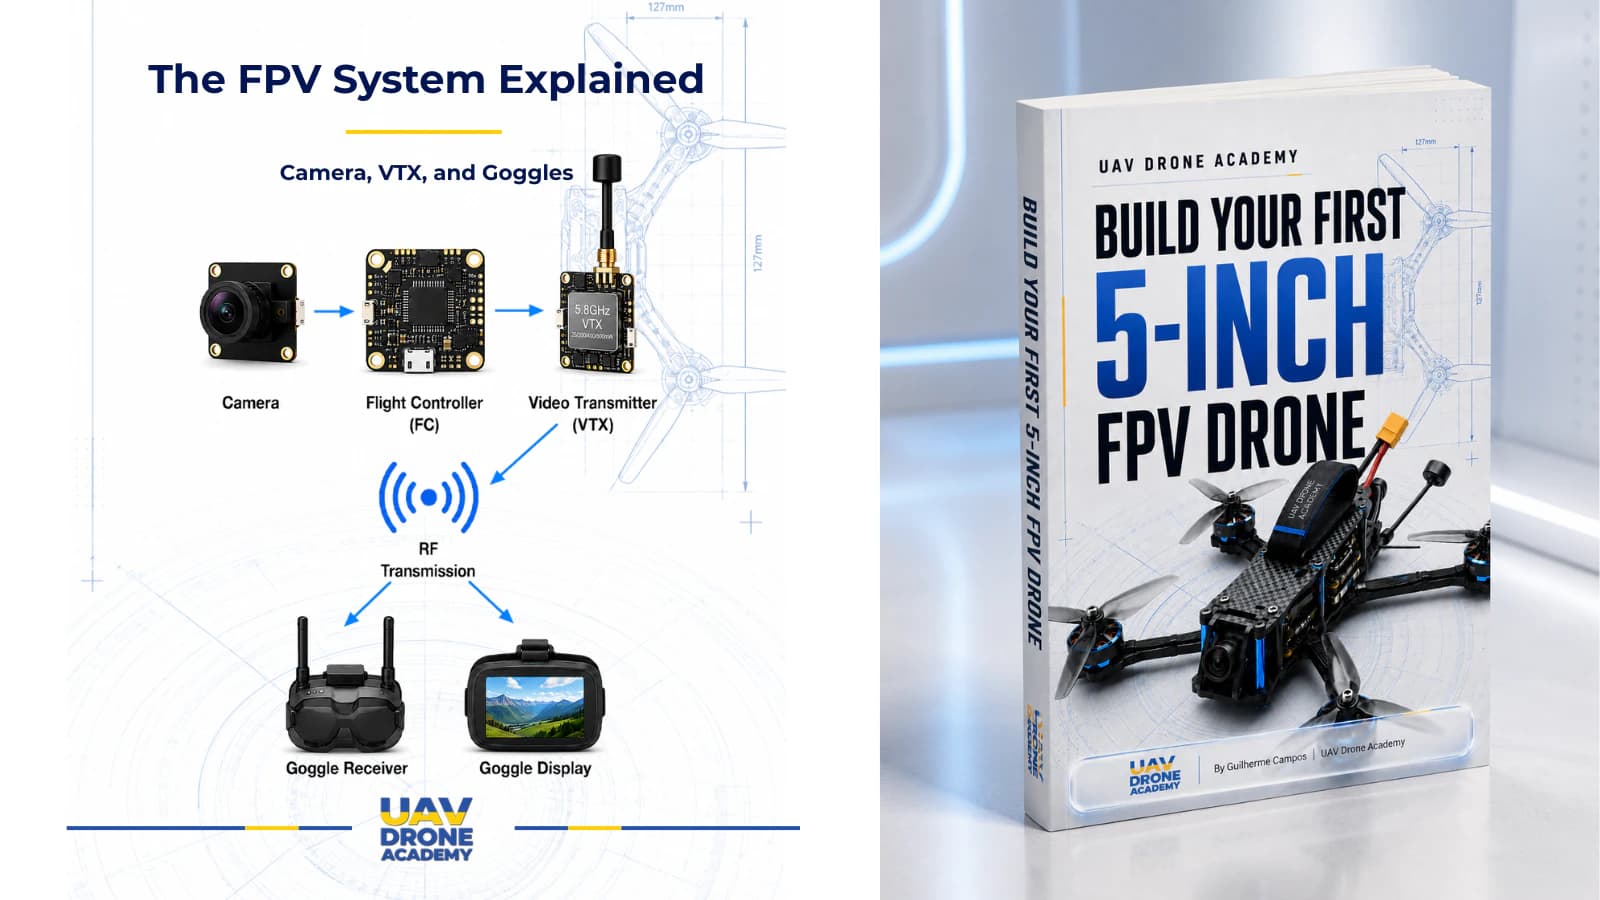
23. Video and OSD Check
Look through the goggles.
Confirm:
- video feed is clear
- OSD appears
- battery voltage appears
- flight mode appears
- warnings are visible
- link quality or RSSI indicator appears if configured
- camera view is not blocked
If OSD shows a warning, understand it before flying.
Do not ignore warnings.
24. Receiver Link Check
Confirm the radio link is active.
Check:
- receiver connected
- no RXLOSS warning
- link quality looks normal
- switches behave correctly
- Arm switch is still off
If radio link is unstable on the ground, do not fly.
25. Short Range Control Check
With propellers still removed, confirm basic control response if needed:
- Arm switch indicator works
- Angle Mode switch works if configured
- Beeper works if configured
- OSD changes flight mode correctly
This is just a final verification.
Do not run motors aggressively.
Part 4 — Propeller Installation Checklist
Only now do we install propellers.
This is the point where safety becomes even more important.
Once propellers are installed:
treat the drone as active and dangerous
26. Confirm Motor Direction Before Prop Installation
Before installing props, confirm again:
- chosen motor direction
- props in or props out setting
- Betaflight motor direction diagram
- each motor’s spin direction
Do not guess.
Use the diagram from your actual Betaflight configuration.
27. Install the Correct Propeller on Each Motor
Each motor needs the propeller that matches its rotation direction.
Check:
- clockwise prop on clockwise motor
- counterclockwise prop on counterclockwise motor
- printed side facing upward
- propeller fully seated
- prop nut tightened securely
- propeller not damaged
Do not install props based only on color.
Blade direction matters.
28. Tighten Prop Nuts Correctly
Prop nuts should be tight enough that the propeller does not slip.
But avoid excessive force that damages the prop hub or motor shaft.
After tightening, gently try to move the prop by hand.
It should not spin freely on the motor shaft.
29. Final Propeller Visual Check
Look at the drone from above.
Confirm:
- all four props installed
- correct direction
- printed side up
- no cracks or chips
- no propeller touching frame
- no propeller touching wires
- battery lead clear from props
- antenna clear from props
This is the last moment to catch prop mistakes before arming.
Part 5 — Final Pre-Arm Checklist
Now the drone has propellers installed.
From this point onward, be extra careful.
30. Stand Behind the Drone
For the first test, stand behind the drone.
This helps maintain orientation.
Do not stand directly over it.
Do not hold it.
Do not arm it in your hand.
Betaflight’s runaway takeoff prevention documentation warns that unsafe hardware or configuration issues can cause a violent out-of-control spin after arming or throttle increase, and it specifically warns against holding the craft in hand with props installed.
Place the drone on the ground and step back.
31. Confirm Takeoff Area Is Clear
Before arming, check:
- no people nearby
- no animals nearby
- no loose objects near props
- no one standing in front of the drone
- no obstacles immediately around the drone
- clear emergency disarm path
If someone approaches, do not arm.
32. Confirm Radio Switches
Before arming:
- throttle low
- Arm switch off
- correct flight mode selected
- Angle Mode selected if using it for first hover
- no failsafe warning
- no OSD warnings you do not understand
The first hover test should be calm and controlled.
33. Arm Briefly and Observe
Arm the drone briefly.
Do not take off immediately.
Listen and observe:
- motors spin normally
- no violent movement
- no strange vibration
- no grinding noise
- no immediate warning
- drone stays stable on the ground
If something seems wrong:
disarm immediately
Do not try to “power through” a problem.
34. Do Not Hold the Drone While Armed
Never hold an armed drone with propellers installed.
Even if you think you are being careful, a sudden motor response can cause serious injury.
If you need to inspect something:
- disarm
- disconnect battery
- wait for motors to stop
- then approach
35. Be Ready to Disarm
Before the first takeoff, mentally prepare to disarm quickly.
If the drone:
- flips
- spins
- vibrates violently
- drifts uncontrollably
- responds incorrectly
- behaves unexpectedly
disarm immediately.
The Arm switch is also your emergency stop.
First Flight Readiness Summary
Before moving to the first hover test, confirm:
- frame secure
- motors secure
- motor screws correct
- motor direction checked
- motor order checked
- receiver working
- Arm switch working
- failsafe checked
- OSD working
- battery healthy
- VTX antenna installed
- flight location safe
- weather calm
- props installed correctly
- radio on
- goggles on
- takeoff area clear
- pilot ready to disarm
If all of this is true, the drone is ready for its first controlled hover test.
Common Beginner Mistakes
Rushing the First Flight
Excitement causes mistakes.
Slow down and follow the checklist.
Flying in a Bad Location
The first flight should happen in a wide, open, safe area.
Not near people, cars, buildings, or trees.
Installing Props Before Final Checks
Props should be installed only near the end of the checklist.
Ignoring OSD Warnings
If Betaflight is warning you, stop and understand why.
Forgetting Battery Voltage
Do not start a first flight with a low battery.
Taking Off Aggressively
The first flight is not a freestyle session.
It is a controlled hover test.
Not Being Ready to Disarm
Beginners should always be ready to disarm immediately if something behaves incorrectly.
Beginner Pre-Flight Checklist
Use this simplified checklist before the first hover:
At Home
- frame checked
- motors checked
- wires checked
- stack checked
- receiver checked
- VTX antenna checked
- OSD checked
- failsafe checked
- motor direction checked
- motor order checked
- battery charged
- props still removed
At the Field
- safe open area
- weather acceptable
- radio on
- goggles on
- drone powered
- video working
- OSD working
- receiver link working
- no unexpected warnings
Before Arming
- props installed correctly
- battery secured
- takeoff area clear
- throttle low
- correct flight mode
- Arm switch ready
- pilot standing safely behind drone
- ready to disarm
What We Have Completed
At this stage, we have completed the full pre-flight inspection.
We have checked:
- mechanical safety
- electrical safety
- radio control
- video system
- OSD
- failsafe
- motor system
- propeller setup
- flight location
- final arming readiness
This prepares us for the next step:
the first hover test
The first hover is not about performance.
It is about confirming that the drone can lift off safely and respond correctly.
Our Build Philosophy Moving Forward
The philosophy remains the same:
verify before flying
Every successful FPV pilot develops good pre-flight habits.
Good habits prevent crashes.
Good habits protect equipment.
Good habits protect people.
The more carefully you prepare, the more confident your first flight will feel.
Conclusion
The pre-flight checklist is one of the most important habits a beginner FPV pilot can develop.
Before the first flight, you must confirm that the drone is:
- mechanically secure
- electrically safe
- correctly configured
- properly linked to the radio
- showing useful OSD data
- using the correct propellers
- located in a safe flying area
Do not rush this stage.
The first flight should be short, calm, and controlled.
The goal is not to impress anyone.
The goal is to validate the build safely.
Now that the drone has passed the pre-flight checklist, we are ready for the first controlled hover test.
Next Chapter
Your First FPV Hover Test: How to Safely Test Your Build