Soldering is one of the most important skills in FPV drone building.
For many beginners, it is also one of the most intimidating parts of the process.
This is understandable.
When you first look at a flight controller or ESC, you see:
- small solder pads
- thin wires
- battery leads
- motor wires
- signal wires
- expensive electronics
It is normal to feel nervous.
But here is the good news:
FPV soldering is a learnable skill.
You do not need to be an electronics expert.
You do not need years of experience.
You only need:
- the right tools
- basic technique
- patience
- careful inspection
In this chapter, we will cover the fundamentals of FPV soldering in a beginner-friendly way.
The goal is not to make you a professional electronics technician.
The goal is to help you create clean, strong, reliable solder joints for your first 5-inch FPV drone.
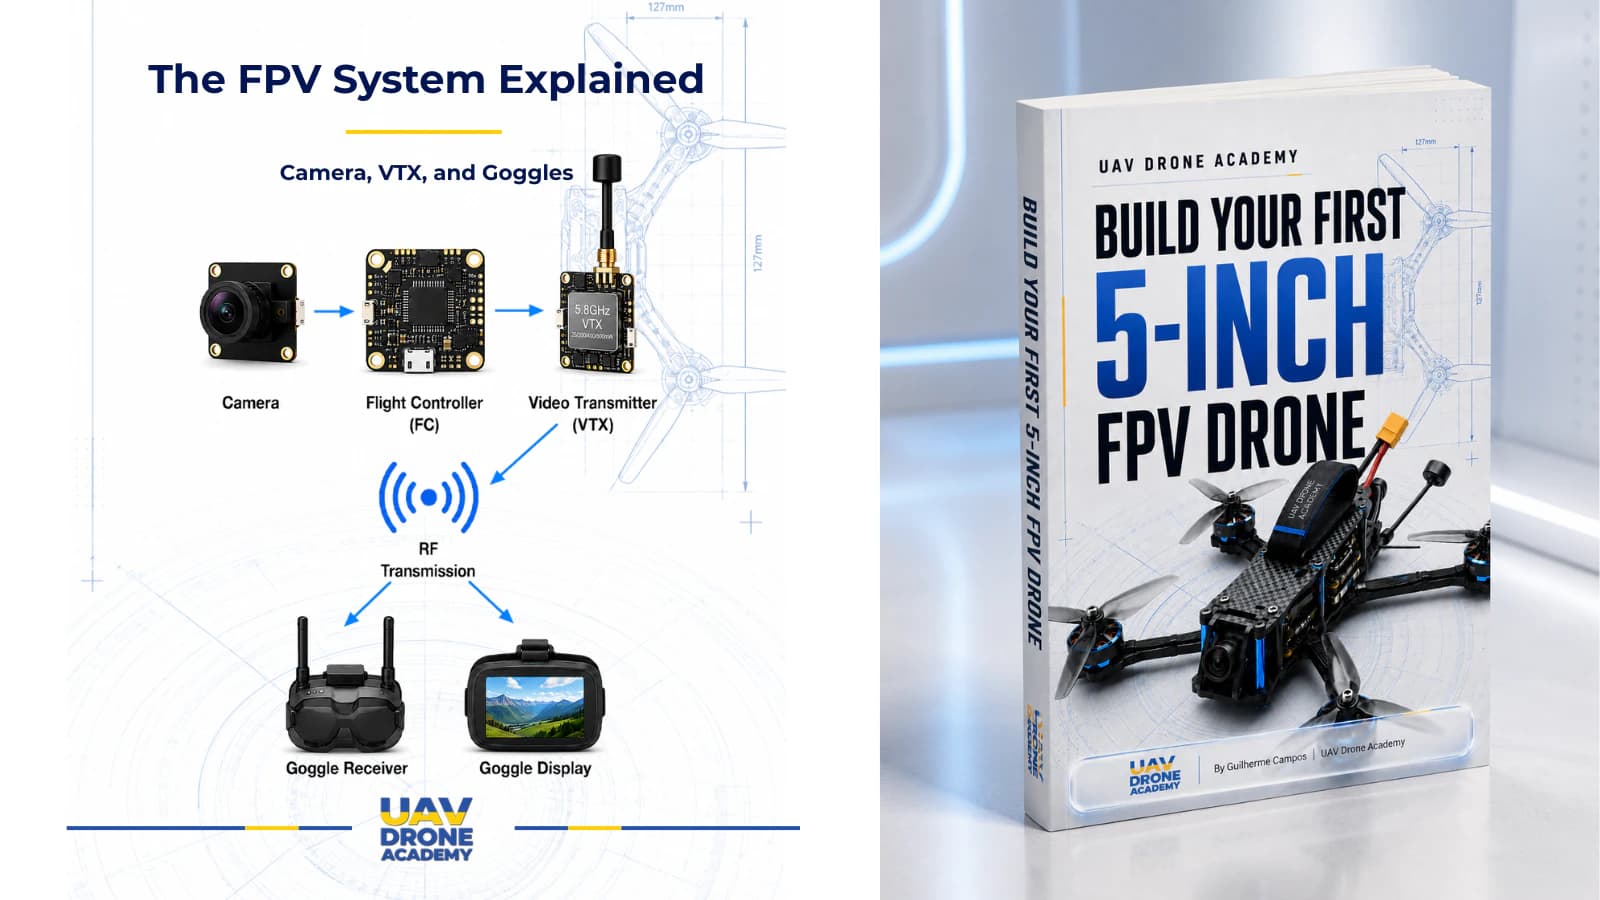
Why Soldering Matters in FPV
Soldering creates the electrical connections between the drone’s components.
In our build, soldering will be used for:
- motor wires
- battery leads
- capacitor
- FPV camera wires
- VTX wires
- receiver wires
- sometimes accessory wires
A good solder joint provides:
- strong electrical connection
- mechanical stability
- low resistance
- long-term reliability
A bad solder joint can cause:
- random signal loss
- motor failure
- video problems
- voltage issues
- failsafe events
- crashes
In FPV, soldering quality directly affects flight reliability.
What Is Soldering?
Soldering is the process of joining metal parts using melted solder.
The solder melts, flows between the wire and pad, then cools into a solid electrical connection.
A proper solder joint should be:
- shiny
- smooth
- solid
- clean
- mechanically stable
It should not look like a dull blob sitting loosely on top of the pad.
The Basic Soldering Concept
A good solder joint requires three things:
Heat
The pad and wire must become hot enough for solder to flow properly.
Solder
The metal alloy that forms the connection.
Flux
A chemical helper that allows solder to flow cleanly and bond properly.
When these three work together correctly, soldering becomes much easier.
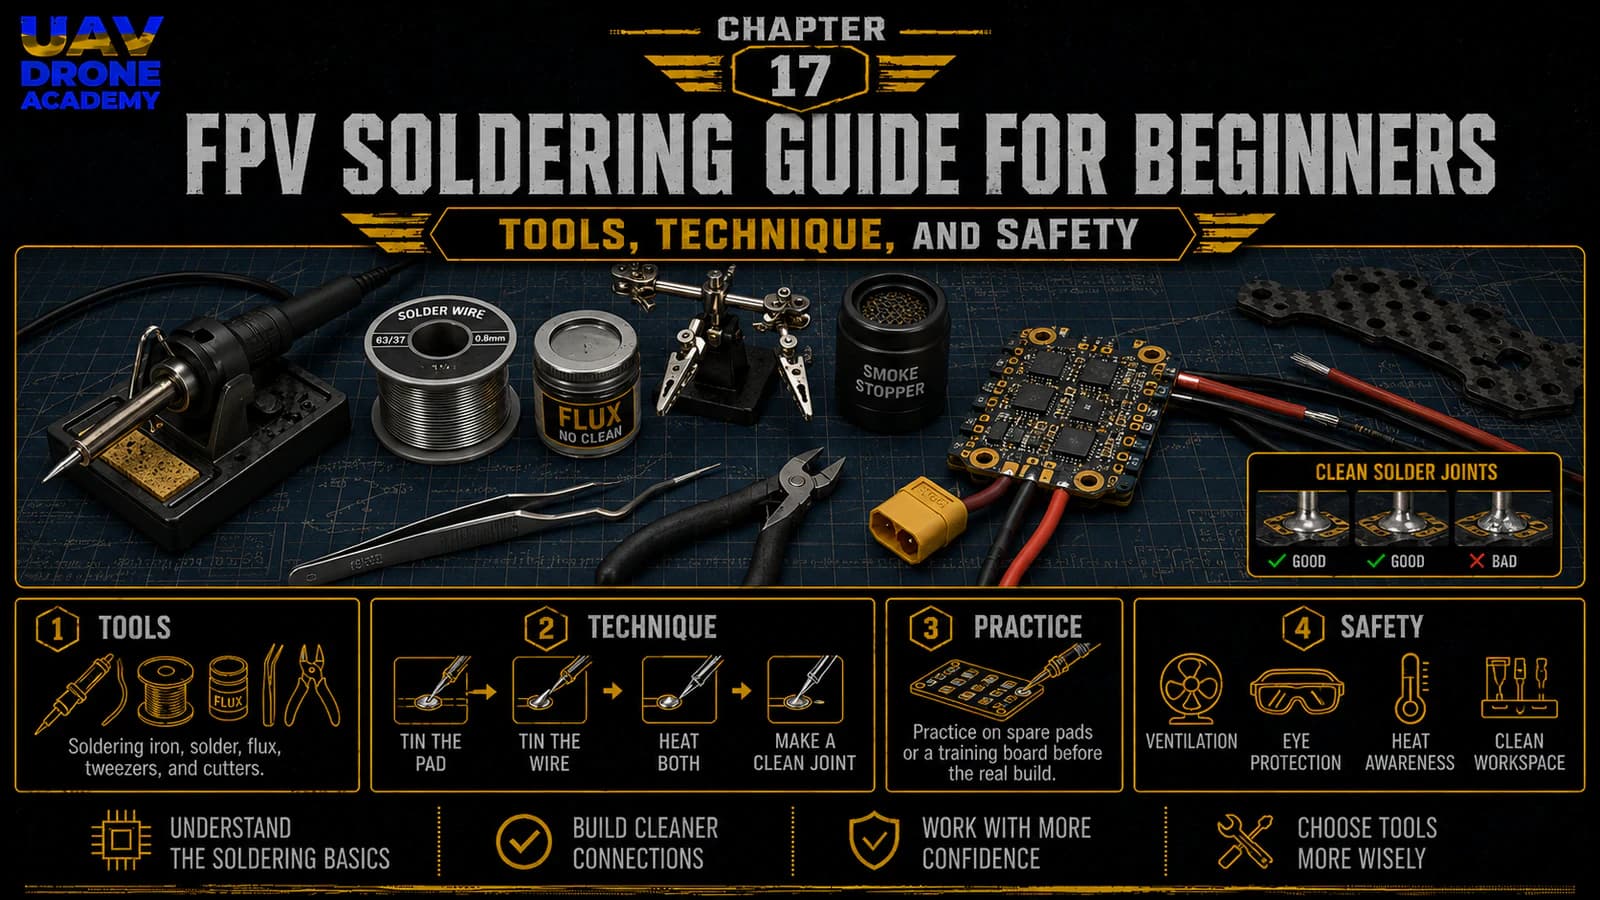
Essential Soldering Tools
Before soldering your FPV drone, prepare:
- temperature-controlled soldering iron
- solder
- flux
- soldering tip cleaner
- helping hands or PCB holder
- wire cutters
- wire strippers
- tweezers
- heat shrink tubing
- multimeter
- smoke stopper
- safety glasses
- ventilation
You do not need expensive tools, but you do need reliable basic tools.
Soldering Iron
The soldering iron is the main tool.
For FPV work, use a:
temperature-controlled soldering iron
This allows you to adjust heat depending on the job.
Small signal wires need less heat.
Large battery pads need more heat.
A weak soldering iron makes FPV soldering much harder than it needs to be.
Soldering Tip
For most FPV work, a:
medium chisel tip
is very useful.
It transfers heat better than a tiny pointed tip.
Many beginners think a very small tip is better because the pads are small.
But in FPV, heat transfer matters more.
A tiny tip often struggles with ESC pads and battery leads.
Solder
For beginners, the easiest solder to work with is usually:
63/37 leaded solder
It melts smoothly and creates clean joints more easily.
Lead-free solder can work, but it usually requires:
- higher temperature
- better technique
- more patience
If using leaded solder:
- work with ventilation
- avoid touching your face
- wash your hands afterward
Flux
Flux is extremely important.
Flux helps solder:
- flow smoothly
- stick properly
- avoid oxidation
- create cleaner joints
For beginners, flux often makes the difference between frustration and success.
Use flux especially on:
- motor pads
- battery pads
- wires
- older solder joints
- difficult connections
Tip Cleaner
Keep your soldering iron tip clean.
A dirty tip:
- transfers heat poorly
- makes solder behave badly
- creates messy joints
Use:
- brass wool
- or a damp sponge
Brass wool is often preferred because it cleans the tip without cooling it too much.
Understanding Solder Pads
A solder pad is the exposed metal area on the board where wires are attached.
Common FPV solder pads include:
- motor pads
- battery positive pad
- battery negative pad
- 5V pad
- ground pad
- signal pads
- UART pads
Before soldering, always identify the pad correctly.
Wrong pad connections can damage components.
Large Pads vs Small Pads
Not all solder pads behave the same.
Large Pads
Examples:
- battery pads
- motor pads
- ESC power pads
These require more heat because they absorb heat quickly.
Small Pads
Examples:
- receiver signal pads
- camera signal pads
- VTX control pads
These require less heat and more precision.
Understanding this difference prevents many beginner mistakes.
The Most Important Rule
Before soldering anything to your actual drone:
practice first
Use:
- spare wires
- old electronics
- practice boards
- unused pads
- scrap connectors
Do not make your first solder joint on an expensive flight controller.
Even 20 minutes of practice can dramatically improve confidence.
Step 1 — Prepare the Workspace
Before soldering, prepare a clean and safe area.
You need:
- good lighting
- stable table
- ventilation
- tool organization
- no loose LiPo batteries nearby
- no flammable materials close to the iron
Soldering requires focus.
A messy workspace increases mistakes.
Step 2 — Secure the Board
Use helping hands or a PCB holder to keep the board stable.
Do not try to solder while the board moves around.
A stable board helps you:
- control heat
- position wires correctly
- avoid accidental bridges
- create cleaner joints
Step 3 — Tin the Soldering Iron Tip
“Tinning” the tip means coating it with a small amount of fresh solder.
A properly tinned tip:
- transfers heat better
- prevents oxidation
- makes soldering smoother
Before each solder joint:
- clean the tip
- add a small amount of fresh solder
- then solder the connection
Step 4 — Tin the Pad
Before attaching a wire, add solder to the pad.
This is called:
tinning the pad
To tin a pad:
- apply a little flux
- heat the pad
- add solder
- let the solder flow smoothly onto the pad
- remove the iron
- let it cool
The solder should form a smooth, shiny surface.
Step 5 — Tin the Wire
Next, tin the wire.
To tin a wire:
- strip a small amount of insulation
- twist the copper strands gently
- apply flux
- heat the wire
- add solder until the strands absorb it
The wire should look coated, not overloaded.
Do not create a large solder blob on the wire.
Step 6 — Join the Wire to the Pad
Now both parts are prepared:
- the pad has solder
- the wire has solder
To join them:
- place the tinned wire on the tinned pad
- heat both together with the iron
- wait for the solder to melt and flow together
- remove the iron
- keep the wire still while the joint cools
Do not move the wire while the solder is cooling.
Movement can create a weak joint.
What a Good Solder Joint Looks Like
A good solder joint should be:
- shiny
- smooth
- solid
- rounded but not excessive
- clearly connected to both pad and wire
It should look like one continuous connection.
Not like a ball sitting on top of the pad.
What a Bad Solder Joint Looks Like
A bad solder joint may look:
- dull
- cracked
- grainy
- loose
- blobby
- uneven
- barely attached
Bad joints are often called:
cold solder joints
Cold joints happen when solder does not properly bond to the pad or wire.
They can cause intermittent electrical failures.
How to Fix a Bad Solder Joint
Usually, the fix is simple:
- add flux
- reheat the joint
- allow the solder to flow properly
- add a small amount of solder if needed
- let it cool without movement
Flux is often the key.
Do not keep heating the board for too long.
Excess heat can damage pads.
Avoiding Solder Bridges
A solder bridge happens when solder accidentally connects two pads that should remain separate.
This can create a short circuit.
Solder bridges are especially dangerous between:
- battery positive
- battery negative
- nearby signal pads
Always inspect carefully.
Use a magnifying glass if needed.
Battery Pads Require Extra Care
The battery pads are among the most important solder joints in the build.
They handle high current.
These joints must be:
- strong
- clean
- properly heated
- mechanically secure
Battery lead soldering often requires:
- higher temperature
- larger tip
- more patience
Do not rush battery pads.
Motor Pads
Motor wires are usually soldered to the ESC motor pads.
Each motor has three wires.
At this stage, motor wire order does not usually matter because motor direction can be changed later in software.
What matters now is:
- clean soldering
- no bridges
- strong mechanical connection
- proper wire routing
Small Signal Wires
Receiver, camera, and VTX wires are much smaller.
These require:
- less heat
- less solder
- more precision
Do not overload small pads with too much solder.
Signal wires do not need huge solder joints.
They need clean, reliable joints.
Heat Shrink and Wire Protection
After soldering some connections, heat shrink can protect exposed wires.
Use heat shrink for:
- wire joints
- antenna-related cables
- capacitor legs
- exposed conductors
- small accessories
Heat shrink helps prevent shorts and improves build cleanliness.
The Multimeter Check
After soldering, always inspect with a multimeter.
The most important test is:
continuity check
Before plugging in a battery, check whether battery positive and battery negative are accidentally shorted.
This is one of the most important habits in FPV building.
Smoke Stopper Test
After soldering major power connections, use a smoke stopper during first power-up.
A smoke stopper helps limit current if a short exists.
This can save:
- ESC
- flight controller
- VTX
- receiver
- other electronics
A smoke stopper does not replace careful inspection, but it adds important protection.
Soldering Safety
Soldering involves:
- heat
- fumes
- sharp wires
- electrical components
Always work carefully.
Safety Rules
Do Not Touch the Iron Tip
The soldering iron tip is extremely hot.
Always return it to its stand when not in use.
Work With Ventilation
Avoid breathing solder fumes directly.
Use a fan or fume extractor when possible.
Wear Safety Glasses
Small solder splashes or clipped wire ends can fly unexpectedly.
Keep LiPo Batteries Away
Do not solder near loose LiPo batteries.
Wash Hands After Soldering
Especially when using leaded solder.
Common Beginner Mistakes
Using Too Little Heat
If the pad is not hot enough, solder will not flow properly.
This creates cold joints.
Using Too Much Heat for Too Long
Excessive heat can lift pads or damage electronics.
Heat the joint efficiently, then stop.
Not Using Flux
Flux makes soldering much easier.
Skipping flux often creates messy joints.
Moving the Wire While Cooling
This can weaken the joint.
Hold the wire still until the solder solidifies.
Using Too Much Solder
More solder does not mean a stronger joint.
Too much solder can create bridges and messy connections.
Forgetting to Check for Shorts
Never plug in a battery without checking for shorts first.
Practical Beginner Soldering Order
For a 5-inch FPV drone, a logical soldering order is:
- Practice on spare wires first.
- Tin the ESC motor pads.
- Tin the motor wires.
- Solder motor wires to ESC.
- Solder XT60 battery lead.
- Solder capacitor.
- Solder receiver wires.
- Solder FPV camera wires.
- Solder VTX wires.
- Inspect all joints.
- Check continuity with multimeter.
- Power through smoke stopper.
This order keeps the process organized and reduces confusion.
What You Should Practice First
Before soldering the real drone, practice:
- tinning wires
- tinning pads
- joining wire to pad
- removing and reworking a joint
- checking continuity
- identifying cold joints
- avoiding solder bridges
This practice will make the real build much less stressful.
How Much Solder Is Enough?
A good joint does not need a large amount of solder.
Use enough solder to:
- fully cover the pad
- bond the wire securely
- create a smooth connection
Avoid large blobs.
A clean small joint is better than a messy large joint.
Soldering Mindset
Good soldering requires patience.
Do not rush.
Do not panic if the first attempts are not perfect.
Almost everyone struggles at the beginning.
The key is to:
- practice
- use flux
- keep the tip clean
- inspect carefully
- improve with each joint
Beginner Build Tip
Take close-up photos of your solder joints before powering the drone.
Zoom in and inspect them.
Sometimes problems are easier to see in a photo than with the naked eye.
Look for:
- solder bridges
- loose strands
- dull joints
- excess solder
- exposed wires
- reversed polarity
This simple habit can prevent expensive mistakes.
What We Have Learned
In this chapter, we learned:
- why soldering matters
- what tools are required
- how to tin pads and wires
- how to create a proper solder joint
- how to identify bad joints
- how to avoid solder bridges
- why multimeter checks are essential
- why smoke stoppers protect electronics
- how to approach soldering safely
This prepares us for the next step of the build.
Our Build Philosophy Moving Forward
As we continue assembling the drone, remember:
reliability comes from clean work
A powerful drone with poor soldering is not reliable.
A simple drone with clean soldering is much better for beginners.
The goal is not speed.
The goal is:
- safety
- understanding
- reliability
- confidence
Conclusion
Soldering is one of the most important practical skills in FPV drone building.
At first, it may feel intimidating.
But with the right tools, careful technique, and a little practice, it becomes manageable.
Good soldering creates:
- reliable electrical connections
- safer power delivery
- cleaner wiring
- fewer failures
- better long-term performance
Now that we understand the basics of FPV soldering, we are ready to install the ESC and flight controller stack — the electronic core of the drone.
Next Chapter
How to Install the ESC and Flight Controller Stack