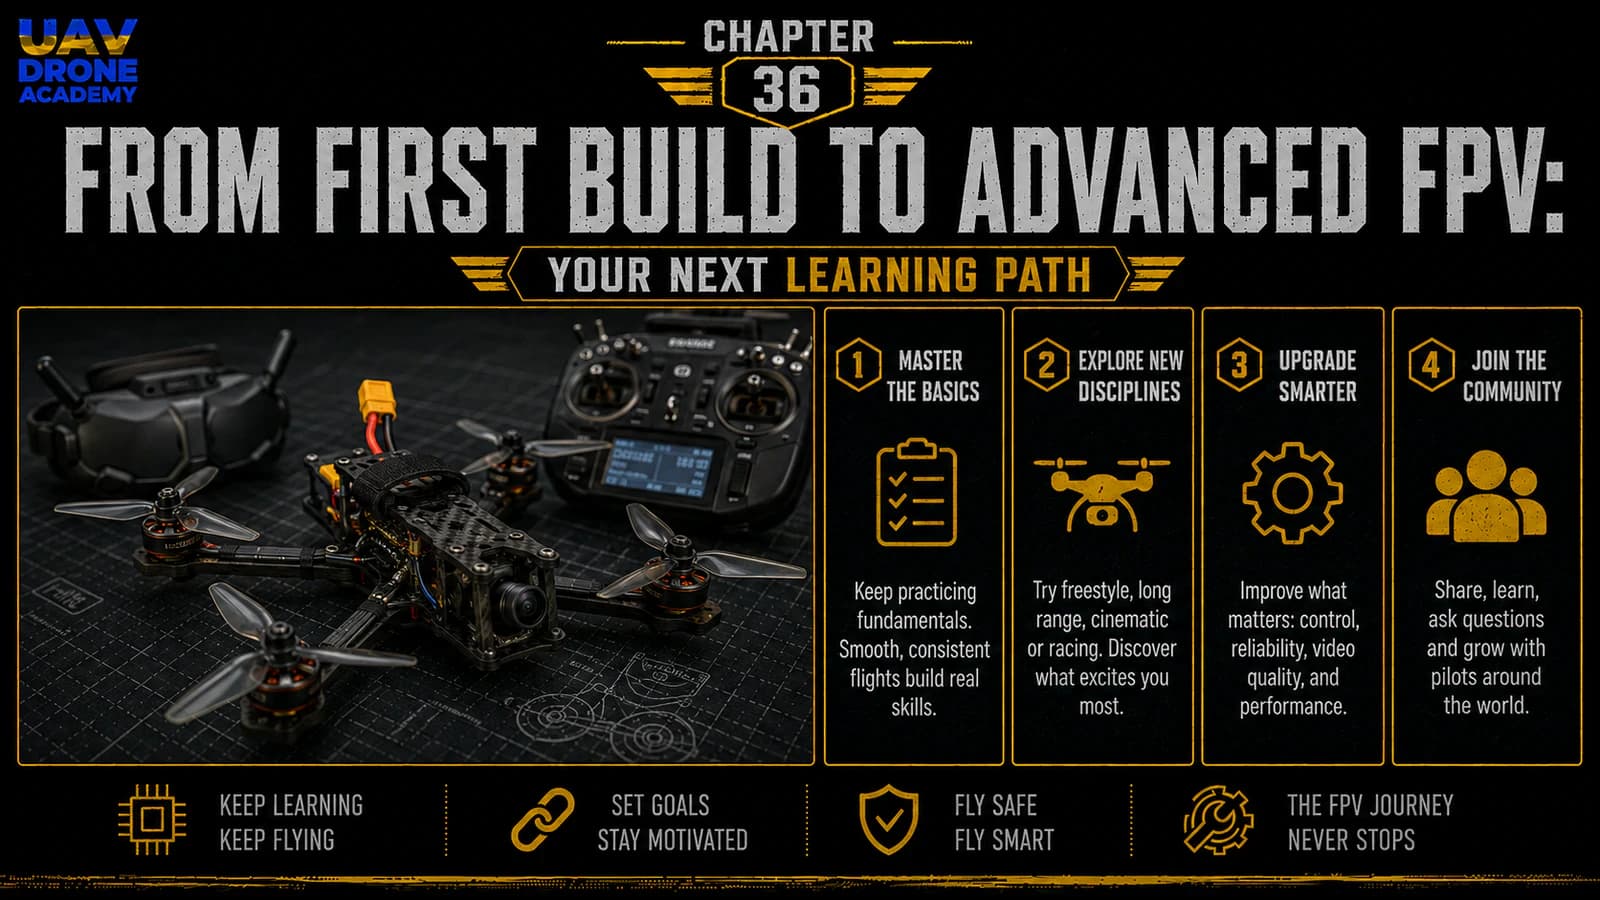
You have reached the final chapter of this series.
At the beginning, a 5-inch FPV drone may have looked complicated, intimidating, and full of unknown parts.
There were many questions:
- What is a 5-inch FPV drone?
- Which components do I need?
- How do the systems connect?
- What does the flight controller do?
- What is an ESC?
- Which motors should I choose?
- How do I solder everything?
- How do I configure Betaflight?
- How do I bind ExpressLRS?
- How do I check motor direction?
- How do I fly safely?
- How do I maintain and repair the drone?
- When should I upgrade?
Now those questions are no longer mysterious.
You have followed the complete process:
- understanding FPV fundamentals
- choosing beginner-friendly components
- assembling the frame
- installing motors
- soldering electronics
- wiring the FPV system
- configuring Betaflight
- setting up the receiver
- testing motors
- configuring OSD
- performing pre-flight checks
- completing the first hover
- flying carefully
- inspecting after flight
- maintaining the drone
- repairing common crash damage
- thinking about future upgrades
This is a major achievement.
You did not just learn how to assemble a drone.
You learned how to think like an FPV builder.
The goal of this final chapter is simple:
define your next learning path after your first successful 5-inch FPV build.
Your first build is not the end.
It is the foundation.
What You Have Actually Learned
Building a 5-inch FPV drone teaches much more than drone assembly.
You have learned practical skills across several areas.
You learned:
- mechanical assembly
- electrical wiring
- soldering
- radio control
- video transmission
- battery safety
- flight controller configuration
- software setup
- troubleshooting
- inspection
- repair
- upgrade planning
That is a powerful combination.
FPV is not just flying.
FPV is a complete technical ecosystem.
And now you have entered that ecosystem with a real foundation.
Your First Drone Is a Learning Platform
The drone you built in this series is not only a first aircraft.
It is a learning platform.
It can teach you:
- how components interact
- how crashes affect hardware
- how tuning affects flight feel
- how antennas affect signal
- how batteries affect performance
- how Betaflight settings affect behavior
- how maintenance improves reliability
- how upgrades change the aircraft
This is why we built a simple, repairable, beginner-friendly 5-inch drone.
A good first drone should not be something you are afraid to touch.
It should be something you can open, inspect, repair, and improve.
That is exactly what this build was designed to be.
Do Not Rush Past the Basics
After finishing a first build, many beginners immediately want to move into advanced topics.
That is understandable.
FPV has many exciting paths:
- freestyle
- racing
- cinematic flying
- long range
- digital FPV
- GPS Rescue
- custom Betaflight tuning
- autonomous systems
- larger drones
- smaller drones
- payload drones
- UAV engineering
- professional drone work
But the basics still matter.
Before moving too fast, make sure you can confidently:
- take off safely
- land consistently
- fly without panic
- monitor battery voltage
- recover from small mistakes
- inspect after crashes
- replace props
- identify loose screws
- understand OSD warnings
- keep batteries safe
- maintain your radio link
- troubleshoot basic problems
Advanced FPV is built on basic reliability.
Learning Path 1 — Become a Better Pilot
The first path is improving your flying skill.
This is the most obvious path, and also one of the most important.
A better pilot crashes less, flies more confidently, and understands the drone more deeply.
To improve as a pilot, focus on:
Simulator Practice
Use an FPV simulator regularly.
Practice:
- throttle control
- turns
- figure eights
- recovery
- Acro Mode
- landing
- obstacle avoidance
- smooth lines
Simulator time is cheaper than broken parts.
Controlled Real Flights
Do not only fly aggressively.
Practice simple exercises:
- hovering
- straight lines
- large circles
- figure eights
- smooth landings
- low-speed cruising
- emergency disarm awareness
Acro Mode Progression
If you started in Angle Mode, gradually move toward Acro Mode.
Acro Mode is the standard for freestyle FPV.
At first, Acro may feel difficult.
That is normal.
Train slowly.
Battery Discipline
Practice landing before the battery is too low.
Learn how your battery voltage behaves under load.
Good battery management protects your packs and improves safety.
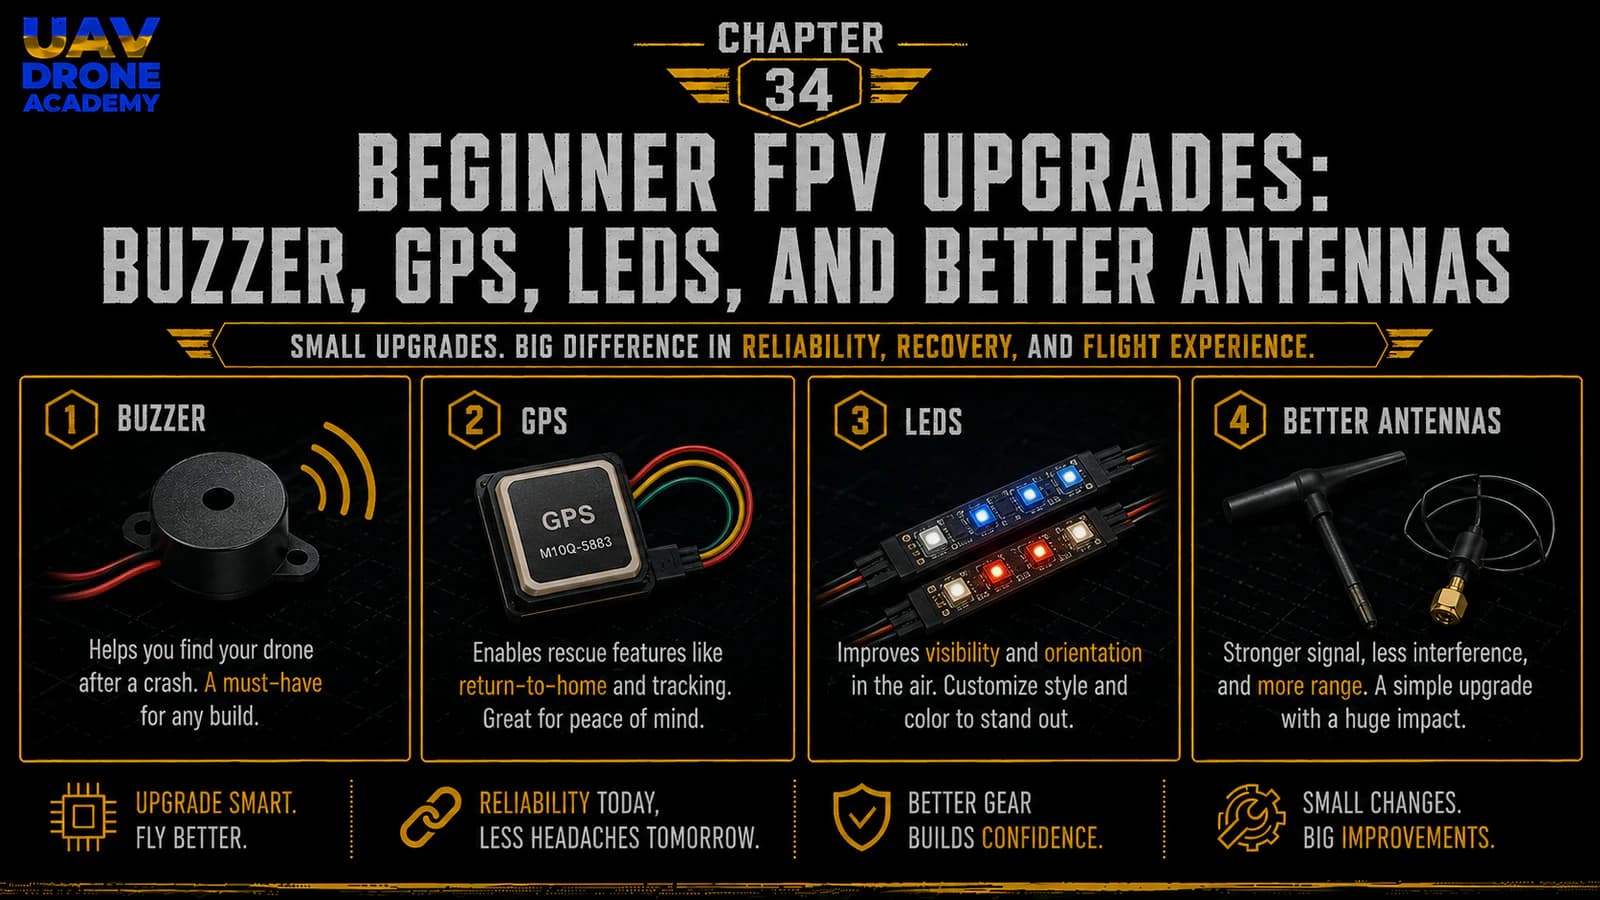
Learning Path 2 — Improve Maintenance and Repair Skills
The second path is becoming better at maintaining and repairing your drone.
This is one of the biggest differences between beginners and experienced FPV pilots.
A beginner sees a crash and feels lost.
An experienced pilot sees a crash and starts inspecting.
Improve your repair skills by learning how to:
- replace arms
- replace motors
- repair motor wires
- resolder damaged pads
- replace antennas
- replace VTX cables
- clean motors
- diagnose hot motors
- identify frame cracks
- inspect LiPo batteries
- use a multimeter confidently
The more comfortable you are with repairs, the more confident you become as a pilot.
FPV becomes much less stressful when you know you can fix the drone.
Learning Path 3 — Learn Betaflight More Deeply
In this beginner series, we used Betaflight carefully and avoided unnecessary advanced tuning.
That was the right approach.
But after the drone is flying reliably, you can begin learning Betaflight more deeply.
Topics to study next include:
- rates
- PID profiles
- filter sliders
- blackbox logging
- dynamic idle
- RPM filtering
- DShot Beacon
- presets
- VTX tables
- GPS Rescue
- arming disable flags
- CLI backups
- resource remapping
Do not try to learn all of this at once.
Choose one topic at a time.
For example, start with rates.
Rates directly affect how the drone feels on the sticks.
Changing rates is usually a better beginner learning step than changing PID values too early.
Learning Path 4 — Understand Tuning
PID and filter tuning are powerful topics.
But they should come after:
- clean assembly
- reliable flight
- healthy motors
- good props
- stable frame
- basic pilot skill
When you are ready to learn tuning, start with observation.
Ask:
- Does the drone oscillate?
- Does it bounce back after flips?
- Does it have prop wash?
- Are motors hot?
- Does it feel too soft?
- Does it feel too sharp?
- Does it vibrate in certain throttle ranges?
Then learn how tuning changes behavior.
Do not copy random numbers blindly.
A good tune depends on:
- frame
- motors
- props
- battery
- weight
- firmware version
- filters
- flying style
- mechanical condition
Tuning is not magic.
It is controlled adjustment based on symptoms.
Learning Path 5 — Improve Your FPV Video System
If you are still flying analog, you can improve your analog system before moving to digital.
Useful improvements include:
- better antennas
- better antenna placement
- cleaner VTX mounting
- correct VTX power settings
- better camera angle
- better camera quality
- cleaner OSD layout
- better goggle antennas
Analog FPV can perform very well when installed correctly.
Do not assume every video problem requires switching to digital.
Sometimes the fix is simply:
- a better antenna
- correct polarization
- better placement
- cleaner wiring
- avoiding blocked signal paths
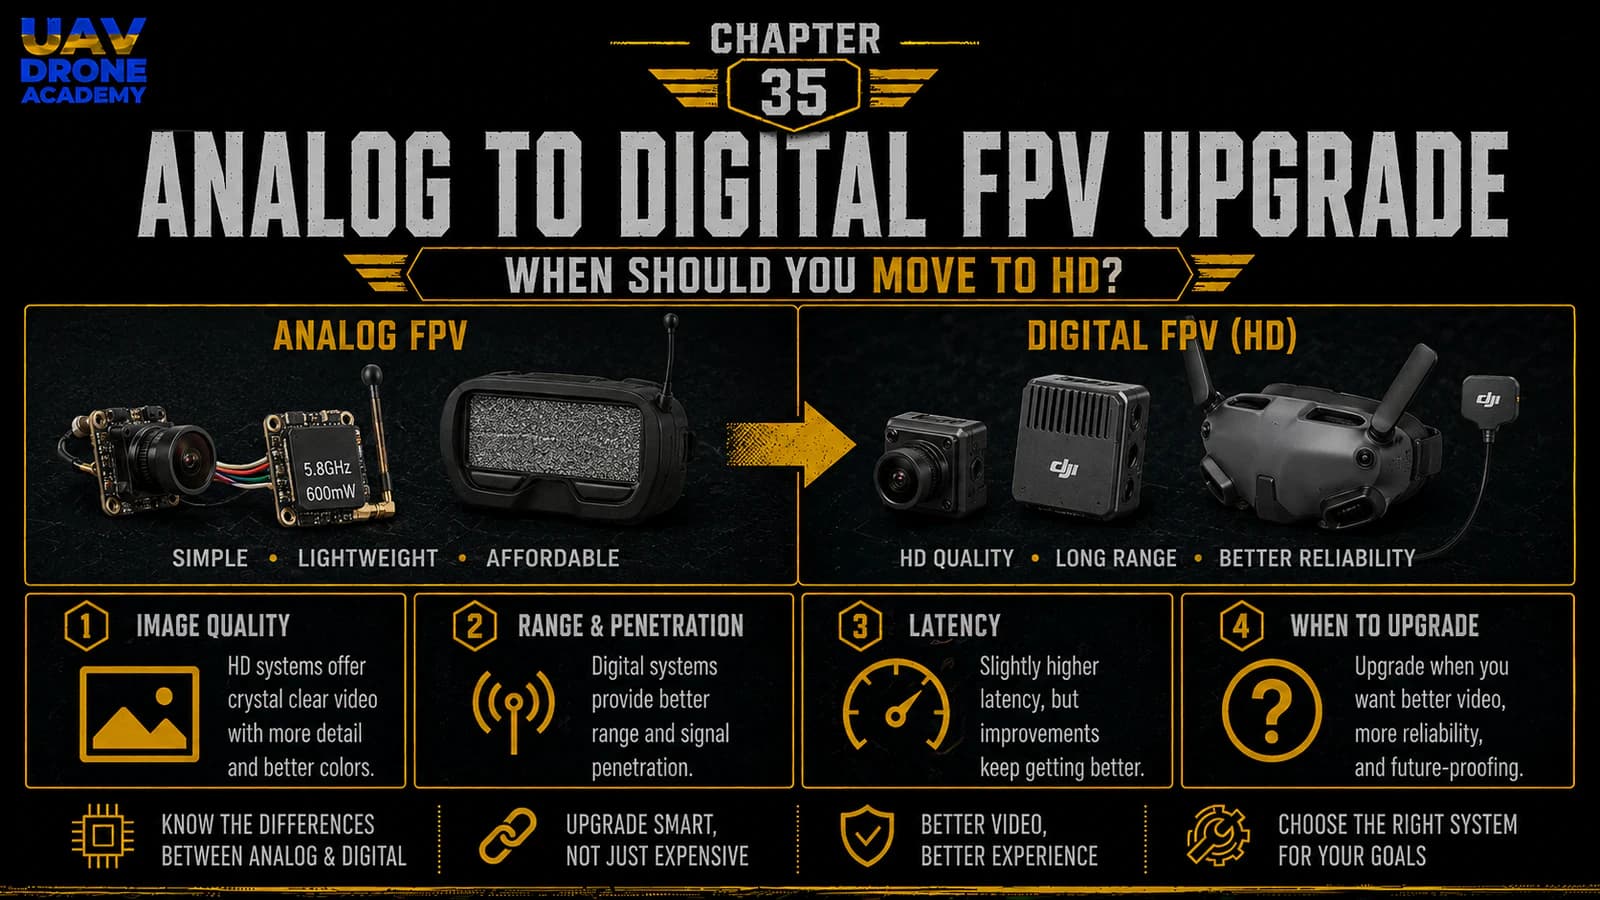
Learning Path 6 — Move to Digital FPV
If you are ready, digital FPV can be a major upgrade.
Digital systems can provide:
- clearer image
- better DVR
- easier obstacle visibility
- more immersive flying
- better footage review
But remember the previous chapter.
Digital FPV adds:
- cost
- weight
- heat
- compatibility choices
- repair expense
- installation complexity
Move to digital when:
- your flying is more controlled
- your drone is reliable
- you crash less often
- your budget allows it
- you understand the ecosystem you are choosing
For many pilots, the best strategy is to keep the first analog drone as a practice platform and build a second digital drone later.
Learning Path 7 — Add GPS and Recovery Features
GPS is a useful upgrade after the basics are stable.
It can add:
- satellite count
- coordinates
- distance from home
- home direction
- GPS speed
- GPS Rescue features
But GPS should not be treated as magic.
It requires:
- good module placement
- sky visibility
- correct UART configuration
- correct Betaflight settings
- OSD setup
- careful testing
GPS Rescue can be helpful, but it is not a replacement for pilot skill.
Learn it slowly.
Test it in safe open areas.
Understand how to activate, cancel, and recover from it.
Learning Path 8 — Build a Second Drone
After your first build is flying well, a second drone can teach you even more.
A second drone could be:
- another 5-inch freestyle build
- a digital FPV version
- a 3.5-inch freestyle drone
- a cinewhoop
- a long-range cruiser
- a racing quad
- a 7-inch endurance build
- a lightweight training drone
Each type teaches different lessons.
Another 5-Inch Build
Good for refining your assembly and comparing parts.
3.5-Inch Drone
Smaller, lighter, and often easier to fly in smaller areas.
Cinewhoop
Good for protected props and cinematic indoor or close-range flying.
7-Inch Drone
Better for efficient cruising and longer-range style flying, but more advanced.
Racing Drone
Teaches precision, speed, and low-latency control.
Do not build the second drone randomly.
Choose it based on your next goal.
Learning Path 9 — Study UAV Systems More Broadly
FPV drones are one part of the larger UAV world.
After building your first FPV drone, you can expand into broader UAV topics.
These include:
- aerodynamics
- propulsion
- battery systems
- RF communication
- antennas
- autopilots
- GPS navigation
- mission planning
- telemetry
- ground control stations
- payload integration
- fixed-wing UAVs
- VTOL systems
- mapping drones
- inspection drones
- defense-oriented UAV systems
Your 5-inch FPV drone gives you a practical foundation.
It teaches real systems thinking.
You learn how power, control, video, radio, software, and structure work together.
That mindset is valuable beyond hobby FPV.
Learning Path 10 — Build Better Habits
One of the most important next steps is not buying new parts.
It is building better habits.
Good FPV habits include:
- checking props before every flight
- checking battery voltage
- checking antennas
- watching OSD warnings
- keeping a flight log
- backing up Betaflight settings
- storing LiPos properly
- replacing damaged parts early
- using safe arming habits
- landing before problems become serious
- inspecting after crashes
- practicing in the simulator
Habits make you safer.
Habits save money.
Habits keep you flying.
What to Practice Next
After completing this series, a good beginner practice plan could look like this:
Stage 1 — Confidence
Practice:
- takeoff
- hover
- landing
- low-speed movement
- basic turns
Stage 2 — Orientation
Practice:
- flying away
- flying toward yourself
- side orientation
- nose-in hover
- large circles
- figure eights
Stage 3 — Acro Control
Practice:
- simulator Acro Mode
- gentle real-world Acro cruising
- throttle management
- smooth turns
- controlled descents
Stage 4 — Precision
Practice:
- landing on a target
- flying through wide gaps
- controlled altitude changes
- consistent turns
- flying planned lines
Stage 5 — Freestyle Basics
Practice:
- rolls
- flips
- split-S in simulator first
- power loops in safe open areas
- recovery from mistakes
Do not rush stages.
Progression matters.
What to Study Next
A good technical study path after this series is:
- Betaflight rates
- Blackbox basics
- PID tuning fundamentals
- ESC firmware and RPM filtering
- Antenna theory
- ExpressLRS advanced settings
- GPS Rescue
- Digital FPV systems
- LiPo performance and internal resistance
- Frame geometry and flight behavior
Each topic can become its own lesson.
You do not need everything immediately.
Learn based on the problems and goals you actually have.
What to Upgrade Next
A practical upgrade path could be:
First
- more propellers
- better battery straps
- spare screws
- spare arms
- buzzer
Then
- better antennas
- better FPV camera
- GPS
- improved mounts
Later
- digital FPV
- action camera
- second drone
- advanced tuning tools
- more specialized frames
This order keeps the drone useful and repairable.
What Not to Do Next
Do not immediately:
- buy every upgrade
- install random presets
- flash firmware without backups
- chase advanced tuning before learning flight control
- fly long range without experience
- ignore battery safety
- copy advanced pilots blindly
- fly in unsafe areas
- skip inspections
- fly damaged props
- push through radio or video warnings
FPV rewards patience.
The pilots who progress fastest are often the ones who make fewer preventable mistakes.
The Value of a Simple Build
This series focused on a minimalist 5-inch FPV drone for a reason.
A simple build teaches clearly.
It makes troubleshooting easier.
It keeps costs reasonable.
It makes repairs possible.
It helps beginners understand every system.
That simplicity is not a limitation.
It is a learning advantage.
Once you understand a simple drone, advanced drones become much easier to understand.
From Builder to Pilot
At the beginning, you were building a machine.
Now you are becoming a pilot.
That means your focus expands.
You now need to think about:
- where to fly
- how to fly safely
- how to manage risk
- how to improve control
- how to inspect equipment
- how to maintain batteries
- how to respect other people
- how to avoid dangerous situations
- how to make good decisions
Flying skill is not only stick movement.
It is judgment.
From Pilot to Technician
You are also becoming a technician.
You now understand:
- frames
- motors
- ESCs
- flight controllers
- receivers
- VTX systems
- antennas
- batteries
- soldering
- configuration
- troubleshooting
This technical knowledge is one of the most valuable parts of FPV.
Many people can buy a drone.
Fewer people understand how it works.
Even fewer can repair and improve it confidently.
That is the direction you are moving.
From Technician to Systems Thinker
The final step is becoming a systems thinker.
A drone is not just a collection of parts.
It is a system.
Every part affects the others.
For example:
- heavier batteries change flight feel
- damaged props heat motors
- bad antenna placement reduces signal
- poor wiring causes noise
- loose screws create vibration
- camera angle affects flying style
- frame geometry affects handling
- software settings affect motor behavior
- pilot habits affect crash risk
Understanding these relationships is what makes you better.
That is the real value of building your own drone.
Your First Build Is Not Perfect — And That Is Fine
Your first drone does not need to be perfect.
It may have:
- imperfect solder joints
- messy wiring
- scratches
- replaced props
- repaired arms
- changed antennas
- modified mounts
- small mistakes
- lessons learned the hard way
That is normal.
A perfect-looking drone that never flies teaches less than a scratched drone that helped you learn.
Do not judge your progress by perfection.
Judge it by understanding.
Keep the Drone Flying
The best thing you can do now is keep flying and keep learning.
Not recklessly.
Not randomly.
But consistently.
Fly short sessions.
Inspect often.
Practice intentionally.
Repair properly.
Study one topic at a time.
Upgrade with purpose.
This is how your first FPV drone becomes the beginning of a much bigger journey.
The Complete Series Recap
This series was organized into six parts.
Part 1 — FPV Fundamentals
You learned what a 5-inch FPV drone is, how it works, and why this platform is so popular.
Part 2 — Choosing Components
You learned how to choose a beginner-friendly frame, stack, motors, props, analog FPV system, ExpressLRS receiver, batteries, and complete parts list.
Part 3 — Physical Assembly
You learned how to assemble the frame, install motors, solder, mount the ESC and flight controller, wire the FPV system, and complete final wiring checks.
Part 4 — Configuration
You learned how to connect Betaflight, configure ports, bind ExpressLRS, set up the receiver, check motors, configure OSD, and understand PID and filters.
Part 5 — First Flight
You learned how to perform pre-flight checks, complete the first hover, fly carefully, avoid beginner mistakes, and inspect the drone after flight.
Part 6 — Evolution, Maintenance, and Upgrades
You learned how to maintain the drone, repair common crash damage, choose beginner upgrades, evaluate digital FPV, and plan your next learning path.
That is the complete journey from beginner confusion to a working FPV foundation.
Final Beginner Checklist
Before calling your first build complete, make sure you can:
- explain what every major component does
- inspect the drone before flight
- check battery voltage
- identify propeller direction
- replace damaged props
- connect to Betaflight
- verify receiver movement
- check motor direction
- understand Arm switch behavior
- recognize basic OSD warnings
- perform a safe hover
- land calmly
- inspect after flight
- identify common crash damage
- store LiPos safely
- decide whether the drone is safe to fly again
If you can do these things, you are no longer just following instructions.
You are beginning to understand FPV.
Where to Go From Here
Your next steps depend on your goal.
If your goal is freestyle:
- practice Acro Mode
- learn rates
- train in a simulator
- improve durability
- study prop wash and tuning
If your goal is cinematic FPV:
- improve smooth control
- study camera angles
- consider digital FPV
- learn stabilization workflows
- practice planned lines
If your goal is racing:
- focus on low latency
- practice gates
- improve precision
- use lightweight builds
- study race rates and track strategy
If your goal is long range:
- learn GPS
- improve antennas
- study battery efficiency
- understand failsafe deeply
- fly legally and conservatively
If your goal is UAV engineering:
- study systems integration
- telemetry
- autopilots
- RF links
- mission planning
- propulsion
- reliability
Your first 5-inch drone can be the starting point for all of these paths.
Conclusion
This series began with a simple idea:
build your first 5-inch FPV drone
But the real goal was bigger than assembling parts.
The real goal was to help you understand the system.
A beginner FPV drone is not only a machine.
It is a teacher.
It teaches electronics.
It teaches soldering.
It teaches radio systems.
It teaches video transmission.
It teaches software configuration.
It teaches maintenance.
It teaches repair.
It teaches patience.
It teaches discipline.
It teaches risk management.
And most importantly, it teaches you how to keep learning.
Your first build is not the final destination.
It is the foundation.
From here, you can become a better pilot, a better builder, a better technician, and eventually a more advanced UAV systems thinker.
Fly carefully.
Inspect often.
Repair properly.
Upgrade with purpose.
Keep learning.
End of Series
Build Your First 5-Inch FPV Drone: Complete Beginner’s Guide