Now we are finally moving from theory into physical assembly.
Until this point, we have studied:
- how FPV drones work
- what each component does
- why we chose a minimalist 5-inch platform
- which parts make sense for beginners
- which tools are required for the build
Now it is time to start building the actual drone.
The first physical step is assembling the frame.
The frame is the structural foundation of the entire aircraft. Every other component depends on it:
- motors
- flight controller
- ESC
- camera
- VTX
- receiver
- antennas
- battery
- wiring
A clean frame assembly makes the rest of the build easier.
A poor frame assembly can create problems later, including:
- vibration
- loose hardware
- difficult wiring
- poor component placement
- frustrating repairs
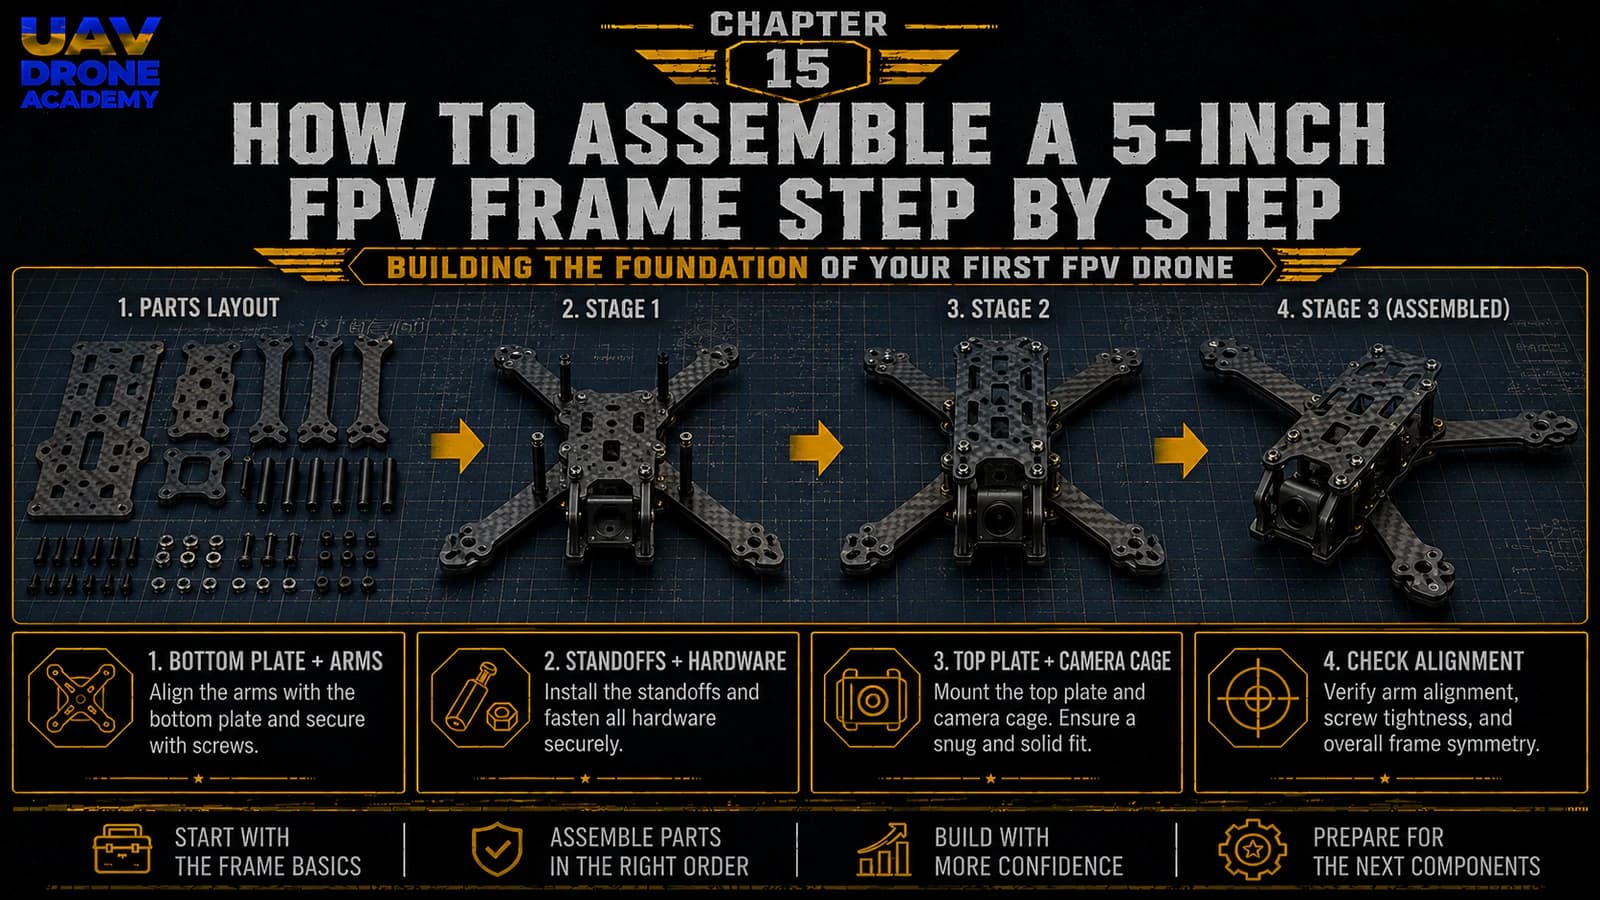
In this chapter, we will assemble the 5-inch FPV frame step by step and prepare it for the electronics installation that comes later.
Before You Start
Before assembling the frame, prepare your workspace.
You should have:
- a clean table
- good lighting
- metric hex drivers
- small parts tray
- frame hardware
- frame plates
- arms
- standoffs
- screws
- the frame manual or diagram, if available
Do not rush this step.
Frame assembly looks simple, but small mistakes here can create problems later.
Step 1 — Identify All Frame Parts
Most 5-inch FPV frames include:
- bottom plate
- top plate
- arms
- camera plates or side plates
- standoffs
- screws
- nuts
- battery pad
- battery strap
- sometimes 3D printed parts
Before building, lay everything on the table.
Try to identify:
- which plate is the bottom
- which plate is the top
- which arms go where
- where the stack will mount
- where the camera will sit
- where the battery will be placed
This gives you a clear mental map before assembly.
Step 2 — Check the Carbon Fiber Parts
Before installing screws, inspect the carbon fiber.
Look for:
- cracks
- delamination
- sharp edges
- damaged holes
- manufacturing defects
Most frames are fine out of the box, but checking now is much easier than discovering a problem later.
Important Note About Carbon Fiber
Carbon fiber is strong, but carbon fiber dust is harmful.
If you need to sand or file sharp edges:
- do it carefully
- avoid breathing the dust
- clean the area afterward
- wash your hands
For most beginner builds, you should not need major sanding.
A light edge check is usually enough.
Step 3 — Understand the Frame Orientation
Before tightening anything, identify the front and rear of the frame.
This matters because:
- the camera must face forward
- the battery strap may have a preferred direction
- the antenna mount may be at the rear
- the stack may have a preferred orientation
- motor numbering later depends on orientation
Many beginner mistakes happen because the frame is assembled backwards.
Take a moment to confirm the correct direction.
Step 4 — Test Fit the Arms
Now place the arms on the bottom plate without fully tightening them.
The goal is to understand how the structure fits together.
Check:
- arm alignment
- screw hole alignment
- plate fitment
- center section overlap
- available space for the stack
Do not force carbon fiber parts.
If something does not align, stop and check the orientation.
Step 5 — Install the Arms
Once the layout is clear, install the arms using the correct screws.
Tighten the screws gradually.
Do not fully tighten one screw while the others are still loose.
Instead, tighten them in stages:
- place all screws
- lightly tighten each one
- check alignment
- fully tighten gradually
This helps the frame sit evenly.
Why Arm Alignment Matters
The arms hold the motors.
If the arms are misaligned, the drone may suffer from:
- vibration
- uneven motor placement
- difficult tuning
- poor flight behavior
A clean mechanical foundation improves the entire build.
Step 6 — Install the Bottom Hardware
Some frames use nuts or press nuts to secure the arms.
Others use interlocking plates or sandwich-style construction.
Follow the frame design carefully.
Make sure:
- screws are not cross-threaded
- nuts are seated correctly
- arms do not move
- no screw is missing
The center structure should feel solid.
Step 7 — Check Screw Length
This is very important.
Wrong screw length can cause problems later, especially around motors and electronics.
For the frame itself, screws should:
- tighten securely
- not stick out excessively
- not interfere with electronics
- not touch moving parts
Later, when installing motors, screw length becomes even more critical because screws that are too long can damage motor windings.
For now, simply build the habit of checking screw length carefully.
Step 8 — Install the Standoffs
Standoffs create vertical space between the bottom plate and top plate.
They also define the internal space for electronics.
Install the standoffs in the correct positions.
Make sure they are:
- straight
- firmly seated
- evenly tightened
- not cross-threaded
Do not overtighten them.
Carbon fiber is strong, but overtightening can damage hardware or create stress points.
Step 9 — Test Fit the Top Plate
Before installing electronics, place the top plate on the frame.
This is only a test fit.
Check:
- top plate alignment
- screw hole alignment
- internal height
- battery strap path
- camera clearance
- antenna mount area
- access to USB port location
This helps you understand the available working space.
Then remove the top plate again.
Most of the build will happen with the top plate removed.
Step 10 — Plan the Electronics Layout
Before installing any electronics, imagine where each major component will go.
For a beginner 5-inch analog build, the layout usually looks like this:
- stack in the center
- FPV camera at the front
- VTX toward the rear or top-rear area
- receiver near the rear or side
- antenna exiting the rear
- battery on top
- XT60 lead toward the rear or side
This layout keeps the build clean and logical.
Why Layout Planning Matters
Good layout planning helps prevent:
- wires crossing over the flight controller
- antenna cables touching propellers
- battery leads getting chopped
- VTX overheating
- receiver antennas being blocked by carbon fiber
- USB ports becoming inaccessible
A few minutes of planning now can save hours later.
Step 11 — Check Stack Mounting Holes
Most beginner-friendly 5-inch frames support:
30x30 mm stack mounting
This is where the flight controller and ESC will be installed later.
Check that:
- the mounting holes match your stack
- there is enough vertical space
- soft mounts fit properly
- USB access is possible
- solder pads will remain accessible
Do not install the stack yet.
For now, we only confirm compatibility.
Step 12 — Check Camera Mounting Area
Next, inspect the front of the frame.
The camera area should support your FPV camera size.
Common analog FPV camera sizes include:
- micro
- nano
- mini
For most modern 5-inch builds, micro cameras are very common.
Check:
- side plate alignment
- camera screw holes
- camera angle range
- lens protection
- clearance from the top plate
A good camera mount protects the camera without blocking too much of the image.
Step 13 — Check Battery Strap Path
Before installing electronics, confirm how the battery strap passes through the frame.
This is very important because the battery strap often passes near or under the stack area.
Make sure the strap:
- can pass cleanly through the frame
- does not interfere with stack screws
- does not press directly against electronics
- can hold the battery firmly
Some builders forget the battery strap until after installing the stack.
That can make the build much harder.
Step 14 — Install the Battery Pad
Most frames use a rubber or foam battery pad on the top plate.
This helps prevent the battery from sliding during flight.
Install the pad only after confirming the top plate orientation.
The battery pad should:
- sit centered
- provide good grip
- not block screw access
- align with the battery strap
Battery mounting seems simple, but it matters a lot in flight.
A loose battery can shift the center of gravity and make the drone feel unstable.
Step 15 — Check Antenna Mounting Options
For analog FPV, antenna placement is important.
Before wiring the VTX later, check where the antenna will exit the frame.
Usually, the FPV antenna is mounted at the rear.
Good antenna placement should:
- keep the antenna away from propellers
- avoid being blocked by carbon fiber
- reduce strain on the VTX connector
- protect the antenna during crashes
If your frame includes a 3D printed antenna mount, test fit it now.
Step 16 — Check Receiver Antenna Placement
The ExpressLRS receiver antenna also needs clean placement.
For 2.4GHz ELRS, common antenna setups include:
- small ceramic antenna
- T-style antenna
- external wire antenna
The important rule is:
avoid hiding antennas inside carbon fiber
Carbon fiber can block or weaken radio signals.
Plan a location where the antenna has a clean path away from the frame.
Step 17 — Check Propeller Clearance
Even though we are not installing propellers yet, it is useful to understand the propeller area.
On a 5-inch frame, the propellers will spin very close to:
- arms
- motor wires
- battery leads
- antennas
- zip ties
This is why clean wire routing is so important.
Later, every loose wire must be kept away from propeller paths.
Step 18 — Verify Frame Rigidity
After the basic frame is assembled, gently check the structure.
The frame should feel:
- rigid
- square
- solid
- without loose arms
- without rattling hardware
If something moves now, it will be worse in flight.
Tighten carefully where needed.
Step 19 — Do Not Fully Finalize Everything Yet
This is important.
At this stage, the frame should be assembled enough to understand the structure.
But do not permanently lock everything down yet.
Why?
Because we still need to:
- install motors
- route motor wires
- install the stack
- solder components
- mount the FPV system
- route antennas
- test fit the full build
Some parts may need to be removed or adjusted.
Build cleanly, but stay flexible.
Step 20 — Prepare for Motor Installation
Once the frame structure is confirmed, the next logical step is motor installation.
Before moving forward, make sure:
- all four arms are secure
- motor mounting holes are clean
- correct motor screws are available
- the frame orientation is confirmed
- the top plate can still be removed easily
- the workspace remains organized
Now the frame is ready to receive the motors.
Common Beginner Mistakes
Assembling the Frame Backwards
Always confirm front and rear orientation before tightening everything.
Overtightening Screws
Tight is good.
Overtightened is not.
You can strip hardware or damage parts.
Forgetting the Battery Strap
Check the battery strap path before installing electronics.
This is a very common beginner mistake.
Ignoring USB Access
Make sure the flight controller USB port will remain accessible later.
If the USB port is blocked, configuration becomes frustrating.
Not Planning Antenna Placement
Antenna routing should be considered early.
Bad placement can reduce video or radio performance.
Leaving Loose Hardware
Loose screws create vibration and reliability problems.
Always check hardware before moving forward.
Beginner Build Tip
At this stage, take photos of the frame from:
- top
- bottom
- front
- rear
- side
This helps you remember the layout and compare progress later.
It also makes troubleshooting easier if you need help from the FPV community.
Clear photos are extremely useful.
What We Have Completed
At this point, we have:
- identified the frame parts
- inspected the carbon fiber
- assembled the arms
- installed the standoffs
- test fitted the top plate
- checked stack position
- checked camera location
- planned battery strap routing
- reviewed antenna placement
- confirmed frame rigidity
This means the structural foundation of the drone is ready.
Our Build Philosophy Moving Forward
As we move deeper into physical assembly, the same principles still apply:
- work slowly
- test fit before tightening
- plan before soldering
- keep wiring clean
- avoid unnecessary complexity
- prioritize reliability
A clean build is not only easier to look at.
It is easier to repair, easier to troubleshoot, and usually more reliable in the air.
Conclusion
Assembling the frame is the first real physical step in building your 5-inch FPV drone.
It may seem simple, but it defines the foundation for everything that comes next.
A well-assembled frame makes it easier to install:
- motors
- electronics
- camera
- VTX
- receiver
- antennas
- battery system
For beginners, the key is not speed.
The key is building carefully and understanding why each step matters.
Now that the frame is assembled and prepared, the next step is installing the motors — the components that will generate the rotational power needed for flight.
Next Chapter
How to Install Motors on a 5-Inch FPV Drone