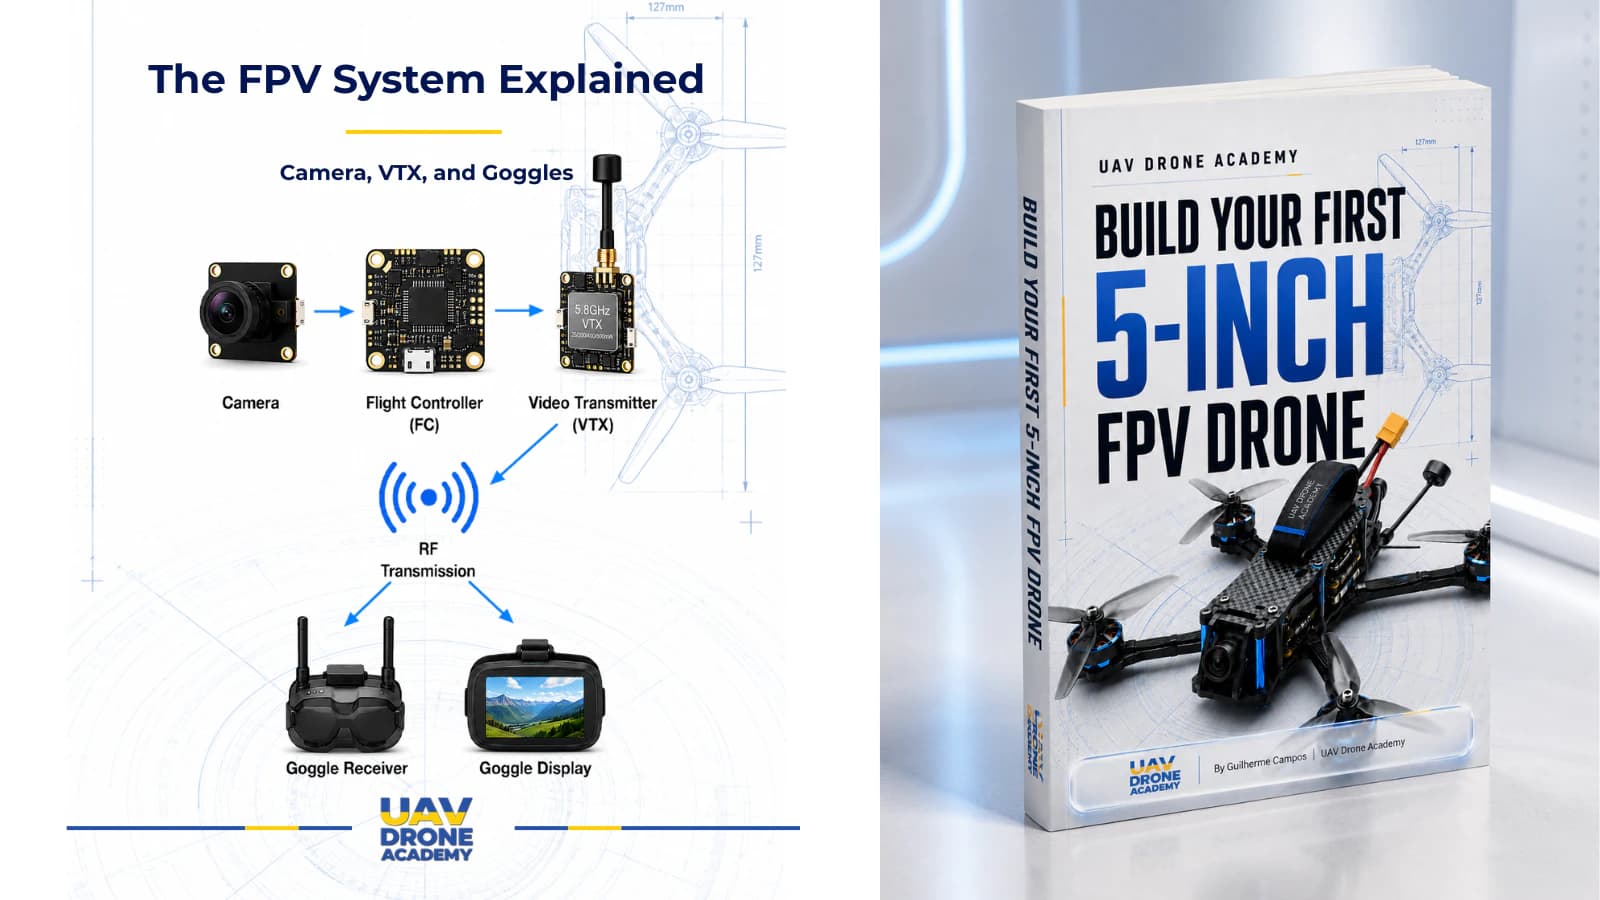
Now that the flight controller ports are configured in Betaflight, the next step is connecting the pilot’s radio controller to the drone.
This process is called:
binding
Binding means creating a communication link between:
- the radio controller
- the ExpressLRS receiver inside the drone
Without binding, the drone cannot receive pilot commands.
The flight controller may be configured correctly.
The receiver may be wired correctly.
The radio may be powered on.
But if the receiver and radio are not connected to each other, the drone will not respond to stick movements or switches.
For beginners, ExpressLRS binding can feel confusing at first because there are multiple ways to bind:
- binding phrase
- traditional bind mode
- receiver WiFi
- ExpressLRS Lua Script
- firmware flashing
- version compatibility
Do not worry.
In this chapter, we will keep things practical and beginner-friendly.
Our goal is simple:
connect the ExpressLRS receiver to the radio controller and prepare the system for receiver setup in Betaflight.
What Is ExpressLRS Binding?
ExpressLRS binding is the process that allows your transmitter and receiver to recognize each other.
The transmitter is inside or attached to your radio controller.
The receiver is installed inside the drone.
When binding is successful:
- the radio controller sends commands
- the receiver receives those commands
- the receiver sends them to the flight controller
- Betaflight can read stick movements and switch positions
In simple terms:
binding connects your hands to the drone
What You Need Before Binding
Before starting, prepare:
- assembled drone
- ExpressLRS receiver installed and wired
- radio controller with ExpressLRS
- charged radio battery
- Betaflight App
- USB cable
- LiPo battery
- smoke stopper
- VTX antenna installed
- propellers removed
The drone should already have:
- receiver wired to the correct UART
- Serial RX enabled on that UART
- receiver protocol set to CRSF
- no propellers installed
If these steps are not complete, go back to the previous chapter before continuing.
Safety First
Before binding or powering the drone:
remove all propellers
This is not optional.
During receiver setup, arming setup, and configuration, motors can behave unexpectedly if something is configured incorrectly.
Propellers should remain removed until the final pre-flight stage.
Also confirm:
- VTX antenna is installed
- drone passed continuity test
- smoke stopper is available
- battery polarity is correct
- no loose wires are near motor bells
Understanding the Two Main Binding Methods
There are two main ways to connect ExpressLRS devices:
- Binding Phrase
- Traditional Bind Mode
Both methods can work.
But for modern ExpressLRS setups, the preferred method is usually:
Binding Phrase
This is cleaner, easier, and more scalable once understood.
Method 1 — Binding Phrase
A binding phrase is a unique phrase programmed into both:
- the ExpressLRS transmitter
- the ExpressLRS receiver
If both devices have the same binding phrase, they connect automatically.
This means you do not need to manually press bind buttons every time.
The official ExpressLRS documentation recommends using a unique binding phrase, and both TX and RX must have the same phrase for automatic binding to work.
Why Binding Phrase Is Recommended
Binding phrase is useful because it:
- avoids repeated manual binding
- works well across multiple receivers
- simplifies future drone builds
- creates consistent radio setup
- reduces confusion after firmware updates
For example, if you build multiple drones later, you can flash each receiver with the same binding phrase and your radio will connect automatically.
This is very convenient.
Important Warning About Binding Phrase
Your binding phrase should be unique.
Do not use obvious phrases like:
- password
- expresslrs
- 123456
- default
- drone
Anyone using the same binding phrase could potentially connect to devices using that phrase.
Use something memorable but personal.
Also, write it down somewhere safe.
If you forget it, future setup becomes more annoying.
Method 2 — Traditional Bind Mode
Traditional bind mode is the manual method.
In this method:
- the receiver is placed into bind mode
- the transmitter is placed into bind mode
- both devices connect
- the bind is saved
This method can be useful if:
- the receiver was not flashed with your binding phrase
- you do not know the receiver’s binding phrase
- you are using a pre-flashed receiver
- you are troubleshooting
- you are setting up a drone quickly
However, for long-term use, binding phrase is usually cleaner.
Firmware Version Compatibility
Before binding, understand one important point:
transmitter and receiver firmware versions should be compatible
If your radio module and receiver are running incompatible ExpressLRS versions, binding may fail.
For beginners, this can be frustrating because the wiring may be correct, but the devices still refuse to connect.
If binding does not work, one of the first things to check is:
- transmitter ExpressLRS version
- receiver ExpressLRS version
- whether both are on compatible major versions
- whether both use the same frequency band
- whether both use the same binding phrase
Frequency Must Match
ExpressLRS commonly uses:
- 2.4GHz
- 900MHz
A 2.4GHz transmitter will not bind to a 900MHz receiver.
A 900MHz transmitter will not bind to a 2.4GHz receiver.
For our beginner build, we are using:
2.4GHz ExpressLRS
So both the radio controller and receiver must be 2.4GHz ELRS devices.
Internal ELRS vs External ELRS Module
Some radios have:
internal ExpressLRS
This means the ELRS transmitter is built into the radio.
Other radios use:
external ExpressLRS modules
These plug into the back of the radio.
For beginners, internal ELRS is usually simpler because there is less hardware to configure.
But both systems can work well.
The important point is that the selected model on the radio must use the correct ExpressLRS transmitter module.
Preparing the Radio Controller
Before binding, create or select a model on your radio controller.
For a beginner FPV drone, the model should be configured for:
- multirotor use
- ExpressLRS internal or external module
- correct RF mode
- correct channel output
- no unusual mixes
- no advanced settings yet
Do not overcomplicate the radio model.
At this stage, we only need a basic model that can communicate with the receiver.
ExpressLRS Lua Script
Most EdgeTX or OpenTX radios use the:
ExpressLRS Lua Script
This script allows you to configure and monitor the ExpressLRS transmitter module.
Through the Lua Script, you can access settings such as:
- packet rate
- telemetry ratio
- WiFi mode
- bind mode
- model match
- transmitter power
- other ELRS options
For beginners, the Lua Script is important because it confirms whether the ELRS module is working.
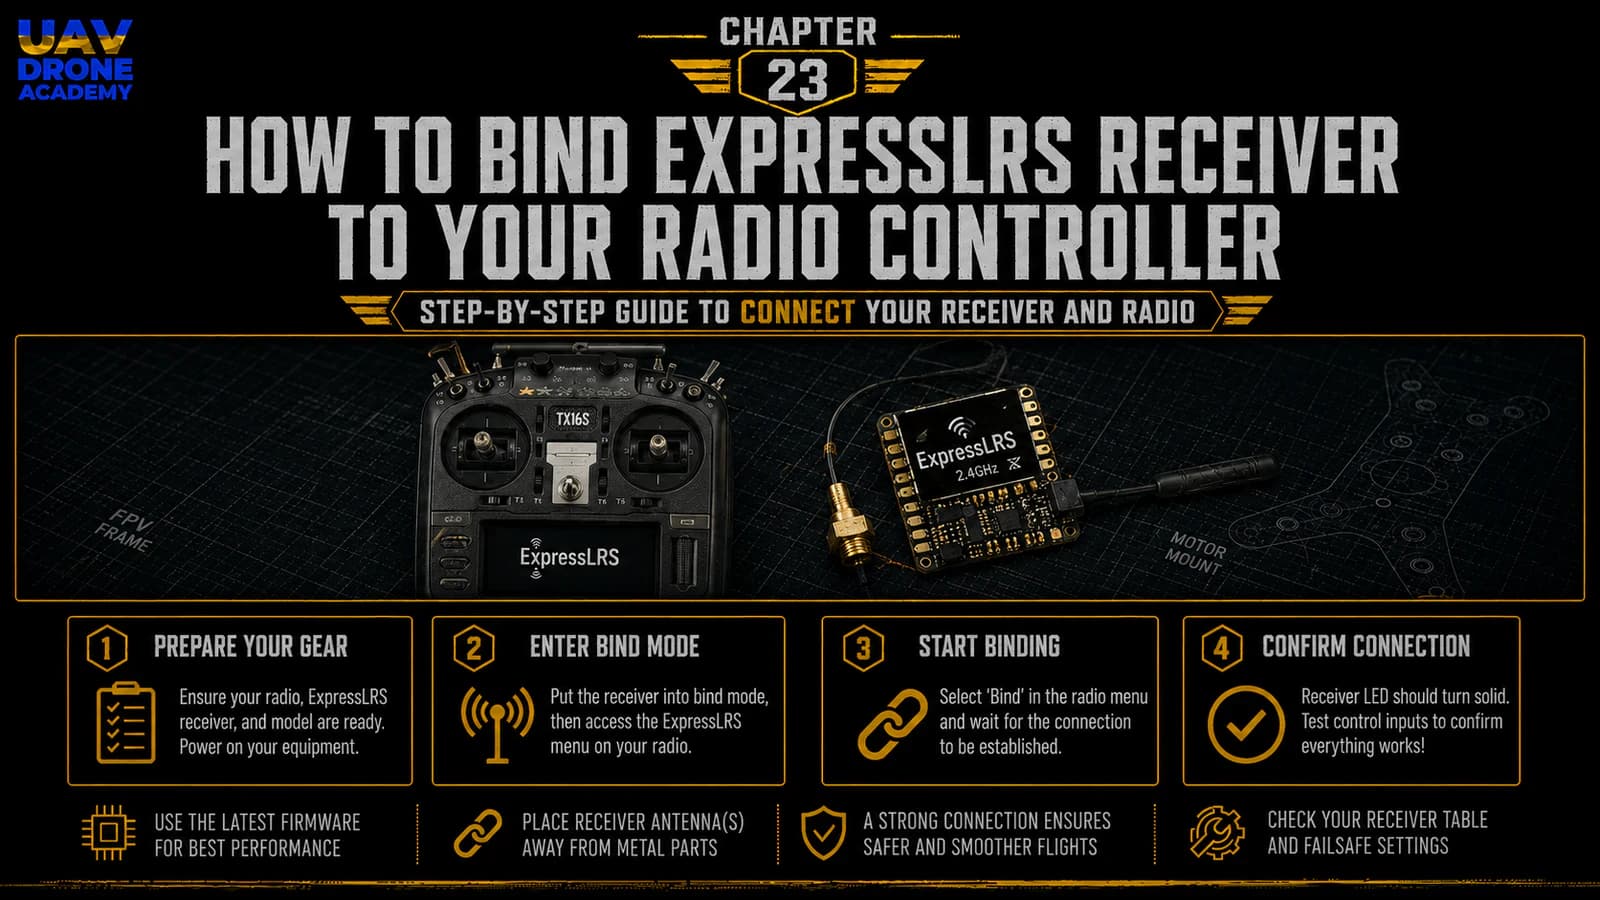
Step 1 — Confirm the Radio Sees ExpressLRS
On the radio controller:
- Turn on the radio.
- Open the Tools or System menu.
- Find the ExpressLRS Lua Script.
- Run it.
If the Lua Script loads successfully, the radio is communicating with the ELRS module.
If the script is stuck on loading, the transmitter module may not be configured correctly.
Do not continue binding until the radio can communicate with the ELRS module.
Step 2 — Power the Drone Safely
Now power the drone safely.
Before connecting the LiPo:
- propellers removed
- VTX antenna installed
- drone on safe surface
- smoke stopper ready
- radio powered on
- no metal tools touching the frame
For early setup, using a smoke stopper is still a good idea.
Connect the battery carefully.
The receiver should power on.
Most ExpressLRS receivers have an LED that indicates status.
Understanding Receiver LED Behavior
Receiver LED behavior depends on the specific hardware and firmware.
But generally:
- fast blinking often means not connected
- solid light or slower pattern may indicate connected
- WiFi mode has its own LED behavior
- bind mode may have a different pattern
Always check the manual for your exact receiver if you are unsure.
Do not rely only on generic LED behavior.
Different receivers may behave differently.
Binding With Binding Phrase
If both transmitter and receiver already have the same binding phrase, binding should happen automatically.
The process is simple:
- Turn on the radio.
- Power the drone.
- Wait a few seconds.
- Watch the receiver LED.
- Check the ExpressLRS Lua Script.
- Confirm connection status.
If everything matches, the receiver should connect to the transmitter automatically.
This is the cleanest method.
How to Set a Binding Phrase
A binding phrase is normally set when flashing ExpressLRS firmware.
This can be done through:
- ExpressLRS Configurator
- ExpressLRS Web UI
- manufacturer tools
- supported update methods
The important rule is:
the same binding phrase must be used on both transmitter and receiver
If the phrase is different, they will not connect automatically.
Binding With Traditional Bind Mode
If you are not using a binding phrase, or if the receiver was not flashed with your phrase, you may need traditional bind mode.
The general process is:
- Put the receiver into bind mode.
- Put the transmitter into bind mode.
- Wait for connection.
- Confirm successful bind.
- Reboot both devices if needed.
Different receivers may enter bind mode differently.
Common methods include:
- receiver bind button
- power cycling sequence
- Betaflight Receiver tab bind button for some SPI receivers
- ExpressLRS Lua Script bind command
- Web UI options
Always follow the specific instructions for your receiver.
Using the ExpressLRS Lua Script Bind Option
Some ExpressLRS setups allow bind mode through the Lua Script.
In the ExpressLRS Lua Script, you may find an option such as:
Bind
or:
Enter Bind Mode
This puts the transmitter or receiver into a binding state, depending on the supported method and firmware version.
For beginners, the exact menu wording may vary depending on ELRS version.
So focus on the concept:
one side enters bind mode, the other side connects to it
Using Receiver WiFi Mode
Many ExpressLRS receivers can create a WiFi access point after being powered for a period of time without connecting.
Through receiver WiFi, you may access the receiver Web UI and update settings such as:
- firmware
- binding phrase
- WiFi credentials
- device information
This can be useful for troubleshooting.
However, for beginners, WiFi setup can feel more advanced.
Use it carefully and follow official ExpressLRS instructions.
What If the Receiver Does Not Bind?
If binding fails, do not panic.
Work through the problem logically.
Check the following:
Frequency Match
Both devices must be 2.4GHz or both must be 900MHz.
They cannot mix.
Firmware Compatibility
TX and RX should use compatible ExpressLRS versions.
Binding Phrase
If using binding phrase, both sides must have the exact same phrase.
Even one different character will prevent automatic binding.
Receiver Power
Make sure the receiver is actually powered.
Check receiver LED activity.
Correct UART Wiring
Receiver TX should go to flight controller RX.
Receiver RX should go to flight controller TX.
Betaflight Ports
Serial RX must be enabled on the correct UART.
Receiver Protocol
Betaflight should use serial receiver mode and CRSF provider.
Radio Model Setup
The radio model must use the correct internal or external ELRS module.
Binding vs Betaflight Receiver Movement
This is an important distinction.
Binding only connects:
- radio controller
- receiver
But Betaflight stick movement requires:
- receiver bound
- receiver wired correctly
- correct UART enabled
- correct receiver protocol selected
- correct radio output
So if the receiver is bound but Betaflight shows no stick movement, the problem may not be binding.
It may be:
- UART setup
- TX/RX wiring
- receiver protocol
- channel mapping
- radio model configuration
We will check stick movement in the next chapter.
Do Not Install Propellers
Even after successful binding:
do not install propellers
We still need to:
- verify receiver movement
- assign arm switch
- configure failsafe
- check motor order
- check motor direction
- configure OSD
- perform final pre-flight checks
The drone is still not flight-ready.
Common Beginner Mistakes
Assuming ELRS Works Without Matching Versions
Firmware compatibility matters.
If binding fails, check TX and RX versions.
Using Different Binding Phrases
The phrase must match exactly.
Capital letters, numbers, and spelling matter.
Mixing 2.4GHz and 900MHz Hardware
Different frequency bands will not bind to each other.
Forgetting to Select the Correct Radio Module
The radio model must use the correct internal or external ELRS transmitter.
Confusing Binding With Receiver Setup
Binding is only one part of the process.
Betaflight must still be configured correctly to read the receiver.
Installing Propellers Too Early
Successful binding does not mean the drone is ready to fly.
Keep props off.
Beginner Binding Checklist
Before moving to the next chapter, confirm:
- propellers removed
- radio controller powered
- correct model selected
- ExpressLRS module active
- ExpressLRS Lua Script loads
- drone powered safely
- receiver receives power
- TX and RX are same frequency band
- TX and RX firmware versions are compatible
- binding phrase matches, or traditional bind completed
- receiver shows connected status
- Betaflight ports already configured
- receiver protocol set to CRSF
- no motor testing performed yet
If these points are correct, the radio link is ready for receiver setup.
What We Have Completed
At this point, we have:
- understood what binding means
- understood binding phrase
- understood traditional bind mode
- reviewed firmware compatibility
- confirmed frequency matching
- prepared the radio controller
- powered the receiver safely
- attempted or completed ExpressLRS binding
- prepared the system for receiver verification in Betaflight
This is a major step.
The radio controller and the drone can now communicate.
But we still need to verify that Betaflight is correctly reading the pilot’s commands.
That will happen in the next chapter.
Our Build Philosophy Moving Forward
The same method continues:
configure one system at a time
Do not rush ahead.
Do not test motors before receiver setup.
Do not install propellers.
Do not assume that binding alone means the drone is ready to fly.
We are building confidence through verification.
That is what makes the process safe and beginner-friendly.
Conclusion
Binding the ExpressLRS receiver to the radio controller is the step that connects the pilot to the drone.
Without this connection, the drone cannot receive commands.
For beginners, ExpressLRS binding may seem confusing because there are multiple methods and settings involved.
But the core idea is simple:
the transmitter and receiver must use compatible firmware, the same frequency band, and either the same binding phrase or a successful traditional bind.
Once the receiver is bound, the next step is to confirm that Betaflight can read the pilot’s controls correctly.
In the next chapter, we will configure the receiver in Betaflight, verify stick movement, assign channels, configure the arm switch, and prepare failsafe behavior.
Next Chapter
Receiver Setup in Betaflight: Channels, Modes, Arm Switch, and Failsafe