Now that the receiver is working in Betaflight and the radio controller is correctly sending commands to the drone, we can move to one of the most important configuration steps before flight:
motor direction and propeller setup
This chapter is critical.
A 5-inch FPV drone can be perfectly assembled, correctly soldered, properly bound to the radio, and still fail immediately on takeoff if the motors or propellers are wrong.
Incorrect motor direction or incorrect propeller installation can cause the drone to:
- flip over instantly
- spin uncontrollably
- refuse to lift correctly
- fight against itself
- trigger runaway protection
- crash immediately after takeoff
For beginners, this can be frustrating and dangerous.
The good news is that these problems are preventable.
In this chapter, we will carefully check:
- motor order
- motor direction
- Betaflight motor direction setting
- props in vs props out
- propeller orientation
- final safety rules before propellers are ever installed
The goal is simple:
make sure each motor spins in the correct position and direction before the drone ever tries to fly.
Safety First
Before doing anything in this chapter:
remove all propellers
This is not optional.
This entire chapter involves motor testing.
Motors may spin during setup.
If propellers are installed, the drone can become extremely dangerous even on the bench.
Betaflight’s own setup guidance specifically instructs users to remove propellers before testing motors, connect a battery, confirm the safety checkbox, and raise the motor slider carefully.
So the rule is simple:
no props during motor testing
Propellers will only be installed at the end, after all checks are complete.
What We Need for This Chapter
Prepare:
- assembled drone
- Betaflight App
- computer
- USB cable
- LiPo battery
- smoke stopper, optional but recommended
- radio controller
- propellers, but not installed yet
- clear workspace
Before continuing, confirm:
- receiver setup is complete
- Arm switch is configured
- failsafe has been checked
- VTX antenna is installed
- no loose wires are near motors
- motor bells spin freely by hand
- propellers are removed
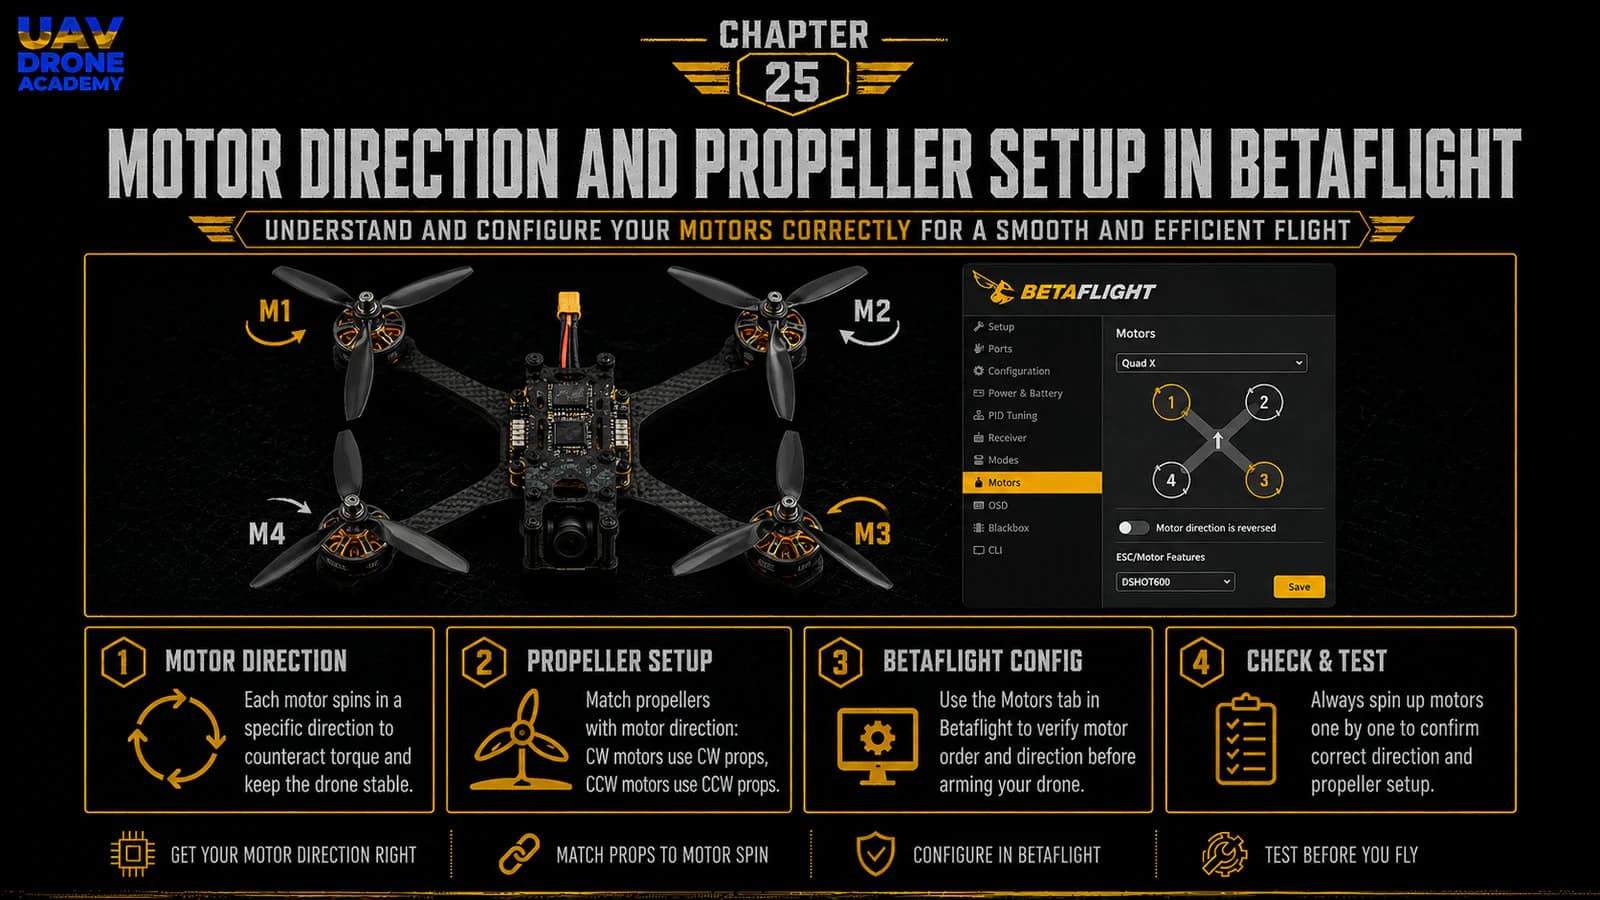
Understanding Motor Order
Betaflight expects each motor to be in a specific position.
This is called:
motor order
Motor order tells Betaflight which motor is:
- front right
- rear right
- rear left
- front left
If the motor order is wrong, Betaflight may send correction commands to the wrong motor.
This can cause the drone to flip or behave violently.
Why Motor Order Matters
Imagine the drone starts tilting forward.
The flight controller needs to increase power on the correct motors to correct the tilt.
If Betaflight thinks the rear motor is actually a front motor, it may send correction power to the wrong place.
Instead of stabilizing, the drone makes the problem worse.
That is why motor order must be checked carefully.
Betaflight Motor Layout
Betaflight shows a motor diagram inside the Motors tab.
Use that diagram as your reference.
Do not rely only on memory.
Open:
Motors Tab
You will see motor sliders and a diagram showing motor numbers and directions.
The exact diagram may vary depending on configuration and Betaflight version.
Always follow the diagram shown in your Betaflight App for your current setup.
Step 1 — Open the Motors Tab
Connect the drone to Betaflight.
Then open:
Motors Tab
This tab is used to configure and test motor output and ESC-related behavior. Betaflight’s Motors tab documentation describes it as the area for motor and ESC settings, including motor direction and mixing.
Before the motor sliders become active, Betaflight usually requires you to confirm that the propellers are removed.
This warning exists for a reason.
Only continue if propellers are removed.
Step 2 — Connect Battery Power
Motor testing requires battery power.
USB alone usually powers the flight controller, but it does not power the motors.
Before connecting the LiPo:
- propellers removed
- VTX antenna installed
- drone on stable surface
- no wires near motor bells
- radio nearby
- smoke stopper if desired
Connect the battery carefully.
You may hear ESC startup tones.
This is normal.
Step 3 — Test Each Motor Individually
In the Motors tab, use individual motor sliders.
Raise only one motor slider at a time.
Raise it slowly.
You only need enough throttle for the motor to spin gently.
Do not run motors at high throttle on the bench.
Check which physical motor spins.
Compare it to the Betaflight motor diagram.
For example:
- if slider Motor 1 is raised, physical Motor 1 should spin
- if slider Motor 2 is raised, physical Motor 2 should spin
- and so on
If each slider spins the motor shown in the diagram, motor order is correct.
Step 4 — What If Motor Order Is Wrong?
If the wrong motor spins when you move a slider, motor order is incorrect.
Do not ignore this.
Wrong motor order can cause an instant flip on takeoff.
Depending on your Betaflight version and ESC protocol, motor remapping may be possible through:
- Betaflight motor order tools
- resource remapping
- ESC configuration tools
- rewiring motor signal connections
For beginners, the best approach is:
identify the problem first, then fix it carefully using the method supported by your flight controller and Betaflight version
Do not randomly move wires or change CLI commands without understanding what is wrong.
Write down:
- which slider was moved
- which motor actually spun
- what Betaflight expected
Then correct the mapping methodically.
Understanding Motor Direction
Motor direction is different from motor order.
Motor order answers:
which motor is which?
Motor direction answers:
which way does each motor spin?
Both must be correct.
A drone needs motors spinning in specific directions to balance torque and generate stable control.
Props In vs Props Out
FPV drones commonly use one of two motor rotation patterns:
Props In
This is the traditional default style.
The front propellers rotate inward toward the centerline at the front.
Props Out
This reverses the rotation direction.
The front propellers rotate outward away from the centerline at the front.
Both can work.
Many modern FPV pilots prefer props out because it can help push debris away from the camera and reduce certain types of prop wash or dirt hitting the lens.
But the most important thing is not which one you choose.
The most important thing is:
Betaflight setting, motor direction, and propeller orientation must all match
Betaflight’s setup guide refers to this through the “Motor direction is reversed” setting, also commonly known as Props In vs. Props Out.
Which Direction Should Beginners Use?
For this beginner build, either props in or props out can work.
To avoid confusion, beginners should follow:
the Betaflight motor direction diagram shown in the Motors tab
Do not mix diagrams from different tutorials if your Betaflight setting is different.
If you choose props out, make sure Betaflight knows that motor direction is reversed.
If you choose props in, make sure Betaflight expects normal motor direction.
Consistency is everything.
Step 5 — Check Motor Direction
With the Motors tab open and propellers removed:
- Confirm propellers are removed.
- Power the drone with LiPo.
- Raise one motor slider slowly.
- Touch the motor bell lightly from the side or use a small piece of paper to feel direction.
- Compare rotation to the Betaflight diagram.
- Repeat for each motor.
Betaflight’s own troubleshooting guidance gives the same general process: remove props, plug into Betaflight, connect LiPo with props off, go to the Motors tab, raise the motor slider gently, and confirm the direction matches the reference image.
Do this slowly and carefully.
How to Check Spin Direction Safely
You can check motor direction by:
Looking at the Motor Bell
Some motors have markings or visible bell rotation.
Touching the Side Lightly
Very gently touch the side of the motor bell while it spins slowly.
Do not touch the top shaft aggressively.
Using a Small Paper Strip
Hold a tiny piece of paper near the side of the bell or airflow to see direction.
Do not let anything get caught in the motor.
Do not use loose clothing, long hair, or metal tools near spinning motors.
Step 6 — Reverse Motor Direction If Needed
If a motor spins the wrong way, its direction must be reversed.
There are several possible methods depending on your ESC and Betaflight version:
- Betaflight motor direction tools
- ESC configuration tools
- BLHeli-based tools
- Bluejay/ESC configurator
- swapping two motor wires physically
For beginners, the preferred method is usually software-based when supported.
Swapping two motor wires works electrically, but it requires desoldering and resoldering.
Software is cleaner if available.
The important rule is:
only reverse the motors that are spinning incorrectly
Do not change everything randomly.
Step 7 — Confirm Direction Again
After changing motor direction, test again.
Do not assume it worked.
Repeat the check:
- Motor 1 direction
- Motor 2 direction
- Motor 3 direction
- Motor 4 direction
Each motor must match the Betaflight diagram.
Only move forward when all four are correct.
Understanding Propeller Orientation
Once motor order and direction are correct, we can discuss propellers.
But do not install them yet during bench testing.
First, understand how propellers work.
Each propeller has:
- a leading edge
- a trailing edge
- a top side
- a direction of rotation
A propeller must be installed on a motor spinning in the correct direction.
If the propeller is upside down or on the wrong motor, the drone will not generate proper lift.
Propeller Top Side
Most propellers have text or numbers printed on the top side.
In most normal setups:
the printed side faces upward
This is the usual rule for standard top-mounted motors on a quadcopter.
If props are upside down, they may still push some air, but performance will be wrong and the drone may not lift correctly.
Clockwise and Counterclockwise Props
A quadcopter uses two clockwise propellers and two counterclockwise propellers.
These match the motor rotation pattern.
If a motor spins clockwise, it needs a clockwise prop.
If a motor spins counterclockwise, it needs a counterclockwise prop.
The propeller blade shape tells you which direction it is designed to spin.
Step 8 — Match Props to Motor Direction
Once you know each motor direction, place the correct propeller near each motor.
Do not install yet.
Just organize them.
For each motor, confirm:
- motor direction
- correct propeller direction
- printed side up
- propeller clears the frame
- propeller is not damaged
This helps prevent mistakes during final installation later.
Step 9 — When to Install Propellers
Propellers should only be installed after:
- motor order is correct
- motor direction is correct
- receiver setup is complete
- Arm switch works correctly
- failsafe works correctly
- OSD is configured
- pre-flight checklist is complete
- you are ready for controlled flight testing
In other words:
propellers are installed near the end, not during configuration
For this chapter, we are learning propeller setup and orientation.
But the drone should remain props-off until final flight preparation.
Why Wrong Prop Setup Causes Instant Flip
A very common beginner problem is the drone flipping immediately on takeoff.
This often happens because:
- one or more motors spin the wrong direction
- propellers are installed on the wrong motors
- props are upside down
- motor order is wrong
- Betaflight expects props out but motors are configured props in
- flight controller orientation is wrong
If the drone flips instantly, do not keep trying to take off.
Stop and inspect motor order, motor direction, propeller orientation, and board orientation.
Runaway Takeoff Protection
Betaflight includes protection systems designed to detect dangerous behavior such as runaway conditions.
However, safety features are not a substitute for correct setup.
Betaflight documentation warns never to hold an armed craft with props installed and explains that unusual behavior can trigger disarm or runaway protection.
For beginners, the lesson is simple:
configure correctly before attempting flight
Do not rely on software protection to save a bad setup.
Step 10 — Check Motor Idle Behavior
When testing motors, they should spin smoothly once the slider is raised slightly.
At very low values, some motors may stutter briefly.
Betaflight’s setup guide notes that motors may stutter at very low values but should spin smoothly at slightly higher values.
For beginners, the important point is:
- do not overreact to tiny low-throttle stutters
- check smooth operation at a slightly higher low value
- do not run motors aggressively on the bench
If a motor behaves very differently from the others, inspect:
- solder joints
- motor screws
- ESC pad connections
- motor damage
- debris inside the motor
Step 11 — Check for Motor Heat
After short motor tests, disconnect the battery and carefully check motor temperature.
Motors should not become hot after a brief low-power bench test.
If one motor heats quickly, there may be:
- screw contact with windings
- damaged motor
- bad solder joint
- ESC issue
- incorrect settings
- mechanical friction
Do not continue until the cause is understood.
Step 12 — Final Motor System Checklist
Before leaving this chapter, confirm:
- propellers removed
- Motors tab opens
- battery connected safely
- each motor slider spins the correct physical motor
- each motor spins in the direction shown by Betaflight
- motor direction setting matches chosen props in/props out style
- all motors spin smoothly
- no motor gets hot quickly
- no wires touch motor bells
- no loose hardware near motors
- propeller orientation is understood
- propellers are not installed yet
If all of this is correct, the motor system is ready for the next configuration steps.
Common Beginner Mistakes
Testing Motors With Propellers Installed
This is extremely dangerous.
Never do it.
Checking Only Motor Direction but Not Motor Order
Both must be correct.
A motor can spin the correct direction but still be in the wrong position.
Installing Props Based Only on Color
Propeller color does not define direction.
Blade shape defines direction.
Installing Props Upside Down
Most props should be installed with the printed side up on standard builds.
Ignoring Betaflight Motor Direction Setting
Motor direction and Betaflight’s expected direction must match.
Running Motors Too Fast on the Bench
Bench testing only requires low throttle.
Do not stress motors unnecessarily.
Forgetting to Recheck After Changes
Any time you change motor direction or mapping, test again.
Beginner Tip
Take a photo or screenshot of the Betaflight motor direction diagram for your exact configuration.
Then compare your drone directly to that diagram.
This prevents confusion when watching tutorials that may use different motor rotation settings.
Your drone must match your Betaflight configuration.
Not someone else’s diagram.
What We Have Completed
At this stage, we have:
- opened the Motors tab
- powered the drone safely for motor testing
- checked individual motor order
- checked motor direction
- understood props in vs props out
- understood propeller orientation
- reviewed common causes of instant flip
- prepared the drone for final configuration steps before first flight
This is one of the most important safety milestones in the build.
The drone now has:
- working receiver input
- configured Arm switch
- checked failsafe behavior
- verified motor order
- verified motor direction
- a clear plan for propeller installation later
Our Build Philosophy Moving Forward
The same principle continues:
verify before trusting
Do not assume motors are correct.
Test them.
Do not assume props are correct.
Match them.
Do not rush to fly.
Complete every safety step first.
That is how beginners build confidence and avoid unnecessary crashes.
Conclusion
Motor direction and propeller setup are critical for safe FPV flight.
A drone with incorrect motor order, wrong motor direction, or incorrect propeller installation can flip instantly on takeoff.
In this chapter, we checked:
- motor order
- motor direction
- props in vs props out
- Betaflight motor direction settings
- propeller orientation
- safe bench testing procedures
The most important lessons are:
- always remove propellers during motor testing
- test each motor individually
- follow the Betaflight motor diagram
- make sure motor direction and propeller direction match
- do not install props until the drone is fully configured and ready for flight testing
Now that the motor system is correctly configured, the next step is setting up the information we want to see while flying.
In the next chapter, we will configure the FPV OSD so important flight data appears directly in the goggles.
Next Chapter
FPV OSD Setup: What You Need to See in Your Goggles