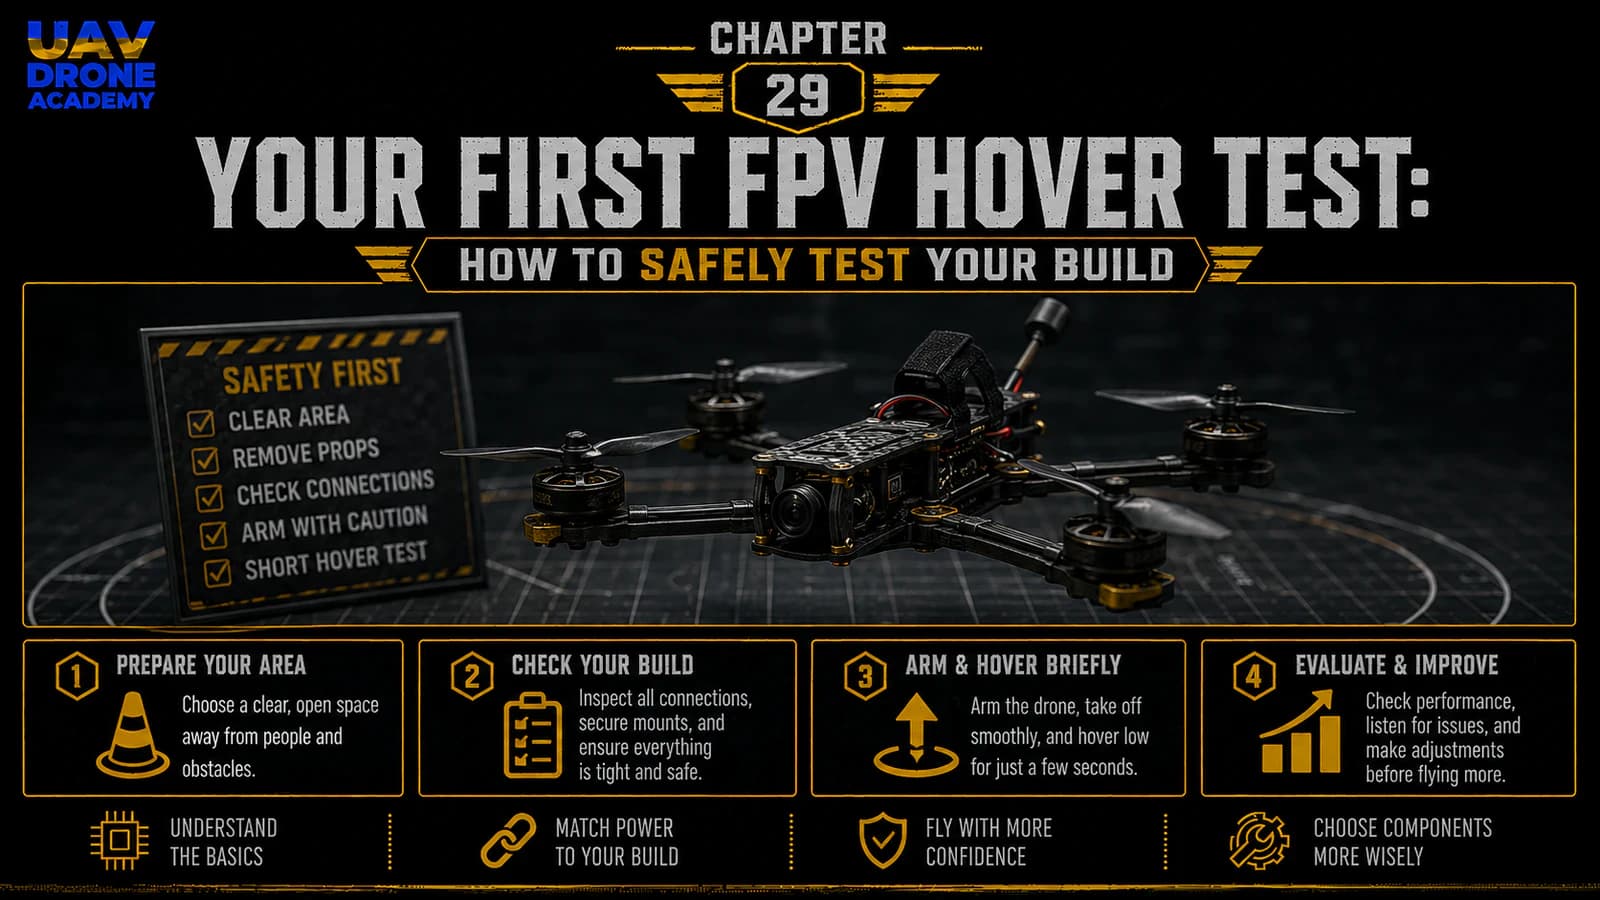
This is one of the most exciting moments in the entire build process.
After many chapters of theory, component selection, assembly, soldering, wiring, Betaflight configuration, motor checks, OSD setup, and pre-flight inspection, the drone is finally ready for its first controlled hover test.
But it is very important to understand one thing:
this is not a full flight session
The first hover test is not the moment to try freestyle tricks, fast flying, high altitude, long-range testing, or aggressive maneuvers.
The first hover test has one purpose:
validate that the drone can lift off, hover, respond correctly, and land safely
That is all.
A successful first hover may last only a few seconds.
And that is perfectly fine.
In fact, a short and controlled test is exactly what we want.
In this chapter, we will cover:
- the goal of the first hover test
- how to prepare yourself mentally
- how to arm the drone safely
- how to lift off gently
- what to observe during hover
- when to land immediately
- what to inspect after the test
This chapter is about safety, control, and validation.
The Purpose of the First Hover Test
The first hover test is not about flying skill.
It is about confirming that the build works.
During this test, we want to verify:
- the drone arms correctly
- motors spin normally
- propellers generate lift correctly
- the drone does not flip instantly
- controls respond in the correct direction
- the drone can hover briefly
- there are no abnormal vibrations
- no motor overheats immediately
- video and OSD remain visible
- the drone can land safely
This is a technical validation step.
Think of it as the first real-world system test.
Before You Begin
Before attempting the first hover, you should have completed the full pre-flight checklist from the previous chapter.
Confirm again:
- frame is secure
- motors are tight
- motor screws are correct
- motor direction is verified
- motor order is verified
- propellers are installed correctly
- battery is charged and secured
- receiver is working
- Arm switch is working
- failsafe is configured
- OSD is visible
- flight area is clear
- weather is calm
- pilot is ready to disarm
If any of these items are uncertain, do not fly yet.
Fix the issue first.
Choose the Right Flight Mode
For the first hover test, beginners may choose:
Angle Mode
Angle Mode self-levels the drone when the sticks are centered.
This can make the first hover less stressful.
However, many FPV pilots eventually fly in:
Acro Mode
Acro Mode gives full manual control and is the standard for freestyle FPV.
For the very first hover test, using Angle Mode is acceptable if it helps reduce risk and build confidence.
The goal is not to prove skill.
The goal is to validate the build safely.
Keep the First Hover Short
The first hover should be short.
A good first test may look like this:
- Arm the drone.
- Increase throttle gently.
- Lift off slightly.
- Hover for a few seconds.
- Land.
- Disarm.
- Inspect the drone.
That is enough.
Do not turn the first hover into a full flight session.
Where to Stand
Stand behind the drone.
This helps with orientation because:
- pushing pitch forward moves the drone away from you
- pulling pitch back moves it toward you
- roll left and right match your visual perspective
Do not stand in front of the drone.
Do not stand too close.
Do not stand over the drone.
Place the drone on the ground, step back, and keep a safe distance.
Use Line of Sight First
Even though this is an FPV drone, the first hover test should be observed visually as much as possible.
You may use goggles or a monitor, but for the very first lift-off, it is useful to see how the drone behaves from the outside.
If possible, have a second person act as a spotter.
A spotter can help watch:
- drone movement
- nearby people
- obstacles
- unexpected behavior
- landing area
For beginners, visual observation during the first hover is very useful.
Do Not Launch From Your Hand
Never hand-launch a first build.
For the first hover test, place the drone on a flat, clear surface.
Do not hold the drone while armed.
Do not try to test lift in your hand.
A configuration problem can cause the drone to react violently.
Always test from the ground.
Final Check Before Arming
Before arming, confirm:
- takeoff area is clear
- no people nearby
- no animals nearby
- battery is secured
- propellers are tight
- radio is on
- goggles or monitor are on
- correct flight mode selected
- throttle is at minimum
- Arm switch is off
- no unexpected OSD warnings
- pilot is ready to disarm immediately
Take a breath.
Do not rush.
Step 1 — Arm the Drone
With the drone on the ground and the area clear, activate the Arm switch.
The motors should begin spinning at idle if your configuration uses motor idle.
Listen carefully.
The motors should sound:
- even
- smooth
- consistent
The drone should not:
- jump
- twitch violently
- spin aggressively
- tilt strongly
- try to move across the ground
If anything seems wrong:
disarm immediately
Do not attempt takeoff.
Step 2 — Observe Motor Idle
Before increasing throttle, observe the drone for a moment.
Check:
- are all motors spinning?
- does the drone remain stable on the ground?
- is there unusual vibration?
- is there strange grinding?
- is any propeller visibly wobbling?
- does the OSD show warnings?
If something looks or sounds wrong, disarm and inspect.
This short pause can prevent a bad takeoff.
Step 3 — Increase Throttle Gently
Now slowly raise the throttle.
Do not punch the throttle.
Do not jump into the air aggressively.
Increase throttle gradually until the drone becomes light on the ground.
You may see it begin to unload weight from the landing surface.
Continue gently until it lifts off.
The goal is a small hover, not altitude.
Step 4 — Lift Off Cleanly
Once the drone lifts, bring it to a very low hover.
For the first test, keep it low.
A good target is approximately:
knee height to waist height
Do not climb high.
If something goes wrong close to the ground, the crash energy is much lower.
However, avoid hovering so low that ground effect makes the drone unstable.
A small amount of altitude helps the drone behave more normally.
Step 5 — Observe Basic Behavior
During the hover, observe whether the drone:
- stays reasonably stable
- responds to small stick inputs
- does not drift violently
- does not oscillate strongly
- does not spin uncontrollably
- does not sound abnormal
- maintains video signal
- shows normal battery voltage
- responds to throttle smoothly
Small drift is normal.
Do not expect perfect position holding.
This is not a GPS camera drone.
A normal FPV drone will require pilot input to stay in place.
Step 6 — Make Only Small Corrections
During the first hover, use tiny stick movements.
Avoid aggressive corrections.
Large beginner inputs can create overcorrection.
If the drone drifts slightly, correct gently.
If it feels uncomfortable, land.
You do not need to prove anything in the first hover.
The safest decision is often to land early and inspect.
Step 7 — Land Smoothly
After a few seconds, reduce throttle gently and land.
Do not cut throttle abruptly from a high position.
Bring the drone down slowly.
Once it touches the ground:
disarm immediately
Do not leave the drone armed on the ground longer than necessary.
After disarming, wait for the motors to stop completely before approaching.
When to Disarm Immediately
Disarm immediately if the drone:
- flips on takeoff
- spins uncontrollably
- tilts violently
- shoots upward unexpectedly
- drifts aggressively
- does not respond correctly
- vibrates heavily
- makes grinding noises
- loses video
- shows critical warnings
- feels unsafe
Do not try to save a bad setup.
Disarm first.
Troubleshoot after.
If the Drone Flips Instantly
If the drone flips immediately during takeoff, stop.
Do not try again without inspection.
Common causes include:
- wrong motor direction
- wrong propeller direction
- propellers installed on wrong motors
- props upside down
- incorrect motor order
- wrong flight controller orientation
- incorrect board alignment
- severe gyro issue
Remove the battery, bring the drone back to the bench, and inspect systematically.
Do not keep attempting takeoff.
If the Drone Spins on Yaw
If the drone spins rapidly around its vertical axis, possible causes include:
- incorrect motor direction
- wrong propeller orientation
- yaw control issue
- motor mapping problem
- mechanical imbalance
Disarm immediately and inspect.
A yaw spin is not normal for a first hover.
If the Drone Drifts Slowly
Slow drift can be normal.
Possible reasons:
- wind
- uneven ground
- slight stick input
- Angle Mode calibration
- center of gravity
- pilot correction delay
If the drift is mild, you can correct gently.
If the drift is strong, land and inspect.
If the Drone Vibrates
Strong vibration during hover may indicate:
- damaged propeller
- bent propeller
- loose motor screw
- loose frame screw
- bent motor shaft
- poor stack mounting
- motor bearing issue
- frame resonance
Land and inspect.
Do not keep flying a drone that vibrates heavily.
Vibration can affect gyro data and flight stability.
If the Motors Sound Rough
Rough motor sound may indicate:
- motor damage
- bad bearing
- propeller imbalance
- ESC issue
- incorrect filtering
- mechanical friction
- screw touching windings
Land and inspect.
A healthy drone should sound relatively smooth and consistent.
After the First Hover
After landing and disarming, disconnect the battery.
Then inspect the drone before flying again.
This is extremely important.
The first hover test may reveal hidden problems.
Post-Hover Inspection
Check:
Motors
Carefully touch each motor.
They may be slightly warm.
They should not be extremely hot after a short hover.
If one motor is much hotter than the others, inspect it.
Propellers
Check for:
- cracks
- bends
- chips
- loose prop nuts
- incorrect seating
Frame
Check for:
- loose screws
- vibration marks
- shifting parts
- cracked carbon
Battery
Check:
- battery strap still tight
- battery did not shift
- voltage is still safe
- no damage
Wires
Check:
- no wire moved into prop area
- motor wires still secure
- antenna still secure
- XT60 lead still safe
Stack
Check:
- flight controller still secure
- ESC not overheating
- no strange smell
- no loose harness
Check Motor Temperature
Motor temperature is one of the most useful early indicators.
After a short hover, motors should not be dangerously hot.
A simple rule:
if you cannot comfortably touch the motor, stop and investigate
Hot motors after a very short hover may indicate:
- mechanical vibration
- damaged propeller
- bad filtering
- excessive D term
- motor screw issue
- motor damage
- ESC issue
Do not ignore hot motors.
Review the OSD
If you recorded DVR or remember the OSD, check:
- battery voltage behavior
- warnings
- link quality
- flight mode
- timer
- any unexpected messages
If the OSD showed warnings, understand them before flying again.
Should You Fly Again Immediately?
If the first hover was successful and inspection looks good, you can perform another short hover.
But keep it simple.
The second test can be:
- slightly longer
- still low altitude
- still gentle
- still focused on validation
Do not immediately start freestyle flying.
Build confidence gradually.
What a Successful First Hover Looks Like
A successful first hover does not need to look perfect.
It may include:
- small drift
- nervous pilot inputs
- short duration
- cautious landing
- minor corrections
That is normal.
A successful first hover means:
- the drone lifted off
- responded correctly
- did not flip
- did not overheat
- did not lose signal
- landed safely
That is a major achievement.
Common Beginner Mistakes
Treating the First Hover Like a Full Flight
Do not turn the first hover into a freestyle session.
Validate first.
Fly later.
Taking Off Too Slowly
This may sound surprising, but increasing throttle too slowly can cause the drone to tip or slide on the ground.
You need a smooth but confident lift-off.
Do not punch the throttle, but do not drag the drone across the ground either.
Flying Too High Too Soon
Keep the first test low.
Altitude increases risk during early validation.
Overcorrecting
Beginners often move sticks too much.
Use small inputs.
Ignoring Strange Sounds
If something sounds wrong, land.
Sound is an important diagnostic tool.
Not Inspecting After Landing
Always inspect after the first hover.
Hidden problems may appear only after the drone has flown.
Beginner Hover Test Checklist
Before hover:
- safe open area
- calm weather
- radio on
- goggles or monitor on
- correct model selected
- battery charged
- battery secured
- props installed correctly
- OSD working
- no warnings
- correct flight mode
- Arm switch ready
- pilot standing behind drone
- ready to disarm
During hover:
- lift gently
- keep low altitude
- use small stick inputs
- watch for drift
- listen for vibration
- monitor battery voltage
- keep the test short
After hover:
- land smoothly
- disarm immediately
- disconnect battery
- check motor temperature
- inspect props
- inspect wires
- inspect frame
- review warnings
- decide whether another short test is safe
What We Have Completed
At this stage, we have performed or prepared for the first controlled hover test.
We have learned:
- the purpose of the first hover
- how to arm safely
- how to lift off gently
- what behavior is normal
- what behavior is dangerous
- when to disarm
- how to inspect after landing
- how to avoid turning the first hover into an unsafe full flight
This is a major milestone in the course.
The drone is no longer just a build project.
It is now becoming a tested aircraft.
Our Build Philosophy Moving Forward
The same principle continues:
small steps build confidence
A safe first hover is more valuable than an aggressive first flight.
We are not rushing.
We are validating.
We are learning.
Every short test gives information.
Every inspection improves reliability.
Every controlled step makes the pilot safer and more confident.
Conclusion
The first FPV hover test is one of the most important moments in the build process.
It confirms whether the drone can lift off, respond correctly, hover briefly, and land safely.
For beginners, the most important lessons are:
- keep the first hover short
- fly in a safe open area
- use small stick inputs
- be ready to disarm
- land early
- inspect after the test
- never ignore abnormal behavior
A successful first hover is not about style.
It is about validation.
Once the drone has passed the first hover test, the next step is learning how to expand from a short hover into a controlled beginner flight while avoiding the most common early mistakes.
Next Chapter
First FPV Flight Tips: How to Avoid Common Beginner Mistakes